Chia pudding is one of the simplest no-cook recipes you can make, built entirely on the way chia seeds behave when soaked in liquid. Left to sit, chia seeds absorb up to 10 times their weight in liquid, swelling into a thick, gel-like consistency that forms the base of the pudding. There’s no stovetop, no oven, and no complicated technique involved — just the right ratio of seeds to liquid, a bit of patience, and time in the fridge.
What makes this recipe so valuable is its flexibility. The base formula stays the same every time, but the liquid, sweetener, add-ins, and toppings can all be changed to create an almost endless variety of flavors — chocolate, lemon, tropical, spiced, or fruity. Once you understand the mechanics of how chia pudding sets and thickens, you can build your own combinations with confidence rather than following a single fixed recipe.
Below is a full breakdown of the workflow, ingredient roles, variations, and troubleshooting steps needed to make chia pudding a reliable part of your routine.
Kitchen Workflow: How the Process Is Organized
Making chia pudding breaks down into four stages: combining the base, adding flavor, letting it set, and finishing with toppings. Each stage plays a specific role in how the final texture turns out.
Stage 1 — Combine the Base. The process starts by combining chia seeds and your chosen liquid in a jar. This is the foundation of the entire recipe — the ratio of seeds to liquid is what determines how thick or thin the final pudding will be.
Stage 2 — Add Flavor and Whisk. Once the base is combined, flavorings and sweeteners are added and whisked in thoroughly. Whisking at this stage is important because it distributes the chia seeds evenly through the liquid before they begin to swell, which helps prevent clumping later.
Stage 3 — Rest, Restir, and Chill. After the initial whisk, the mixture needs to be stirred again after about 10 minutes. This second stir catches any seeds that have started to settle and redistributes them before the mixture thickens too much to stir evenly. From there, the jar is covered and chilled overnight, or for a minimum of about 3 hours, which gives the chia seeds enough time to fully absorb the liquid and reach a pudding-like consistency.
Stage 4 — Top and Serve. The next day, toppings are added just before serving. Keeping toppings separate until the last moment preserves their texture — fresh fruit stays fresh, and anything crunchy stays crunchy, rather than softening in the fridge overnight.
Component Breakdown
It helps to think of chia pudding as four interchangeable components rather than a single fixed ingredient list.
1. Chia Seeds — The Thickening Agent Whole chia seeds are what create the pudding’s signature thick texture. As they soak, they absorb liquid and form a natural gel. Ground chia can also thicken liquid, but it results in more of a porridge texture, which works better for smoothies or baking than for pudding. Whole, fresh chia seeds give the best gelling results — older seeds can lose some of their thickening power over time.
2. Liquid of Choice — The Base The liquid used has a major effect on both the flavor and texture of the final pudding. Higher-fat milks, such as canned coconut milk or whole dairy milk, create a richer, creamier, more dessert-like pudding. Lower-fat or plant-based options, like almond or oat milk, produce a lighter, more refreshing result. Milks can also be combined — for example, half coconut milk and half almond milk — to balance richness and lightness. As a general rule, the thicker the milk, the thicker the finished pudding will be.
3. Sweetener Options — The Flavor Layer Sweetening is entirely a matter of preference. Maple syrup contributes a warm, caramel-like note, while honey adds a more floral sweetness. For an unrefined option, a pitted date can be blended into the milk before the chia seeds are added. For a high-protein version without added sugar, a scoop of vanilla or chocolate protein powder can replace a traditional sweetener, adding flavor, sweetness, and staying power at the same time.
4. Optional Add-Ins — The Boosters Once the base recipe is established, add-ins can take the pudding further. Greek yogurt or cottage cheese stirred in creates an ultra-thick, protein-packed version. A spoonful of nut butter — almond, peanut, or cashew — adds richness and healthy fats. Collagen peptides can also be mixed in for a subtle protein boost, dissolving seamlessly and giving the pudding a silky finish.
Approved Variations and Swaps
Based strictly on the details provided, the following variations and dietary adaptations can be made to this recipe:
Liquid options:
- Almond milk – light and nutty, well suited to fruity versions.
- Coconut milk – creamy and rich, ideal for tropical or dessert-style puddings.
- Oat milk – slightly sweet and a bit thicker, good for a cozy feel.
- Cow’s milk – adds natural protein and creaminess.
- Cashew or pistachio milk – smooth and luxurious, pairs well with matcha or chocolate flavors.
Flavor variations:
- Chocolate Chia Pudding – mix in cocoa powder and top with strawberries.
- Lemon Chia Pudding – tangy and protein-packed with cottage cheese.
- Berry Chia Pudding – swirl in fresh blueberries or raspberries.
- Tropical Chia Pudding – use coconut milk with pineapple and mango.
- Almond Butter Vanilla Chia Pudding – creamy and nutty with a drizzle of nut butter.
Dietary adaptations:
- High Protein – blend in protein powder, cottage cheese, or Greek yogurt.
- Keto / Low Carb – skip traditional sweeteners, or use monk fruit or stevia instead.
- Dairy-Free – use coconut, almond, or oat milk, with nut butter added for creaminess.
- Vegan – stick with plant-based milks and use maple syrup as the sweetener.
No ingredients outside of what’s described above should be introduced if you want to keep the recipe within its intended framework.
Step-by-Step Assembly Strategy
To make a batch of chia pudding with reliable results, follow this sequence:
- Choose your liquid first, since it determines the overall richness and flavor direction of the pudding — lighter plant milks for a refreshing result, or richer milks like coconut for something more dessert-like.
- Combine the chia seeds and liquid in a jar. This is your foundational base, and getting the ratio right (2 tablespoons of chia seeds to about 1/2 cup of liquid, as a starting point) sets you up for the right texture.
- Add your flavorings or sweeteners and whisk well. Whisking thoroughly at this stage distributes the seeds evenly and helps prevent clumping as the mixture begins to thicken.
- Stir again after 10 minutes. This second stir is a small but important step — it catches any seeds that have started to sink or clump together before the mixture sets too firmly to redistribute them.
- Chill overnight, or for at least 3 hours. This is the passive stage where the chia seeds fully absorb the liquid and transform into a thick, pudding-like texture.
- Add toppings the next day, right before serving. Waiting until serving time keeps fresh fruit vibrant and crunchy toppings crisp, rather than letting them soften overnight in the fridge.
- Adjust consistency as needed before eating. If the pudding seems too thick, stir in a splash of milk. If it seems too thin, an extra teaspoon of chia seeds can be stirred in, followed by another 30 to 60 minutes of rest to thicken further.
For an extra-smooth, mousse-like texture — particularly nice for dessert-style versions — the finished pudding can be blended after it has thickened.
Nutrition Overview
A basic chia pudding made with 2 tablespoons of chia seeds and 1/2 cup of unsweetened almond milk comes in at approximately:
- Calories: ~130
- Protein: 5g
- Fat: 9g
- Carbohydrates: 11g
- Fiber: 9g
Adding 1/2 scoop of vanilla or chocolate protein powder turns this into a higher-protein version, bringing the nutrition to roughly:
- Calories: ~200–220
- Protein: 15–20g (depending on the brand)
- Fat: 9g
- Carbohydrates: 15g
- Fiber: 9g
This higher-protein version works well as a post-workout breakfast or afternoon snack, and can be customized further with toppings like nut butter or Greek yogurt.
Storage and Meal Prep
Chia pudding is designed for make-ahead eating. A few jars can be mixed at once and stored in the fridge for grab-and-go mornings throughout the week.
Storage guidelines:
- Store chia pudding in airtight containers or mason jars in the refrigerator for up to 5 days.
- Keep toppings separate until serving so fruit stays fresh and crunchy items don’t soften.
- Give each jar a quick stir before eating, since the pudding may thicken slightly as it sits.
Freezer option: Chia pudding can also be frozen. Fill jars or freezer-safe containers, leaving room at the top for expansion, then thaw overnight in the fridge and give it a good stir before serving.
Batch prep tip: Prepare the chia pudding base plain, then flavor each jar differently — chocolate, lemon, or berry, for example — before chilling. This approach gives you variety without needing to make multiple separate batches from scratch.
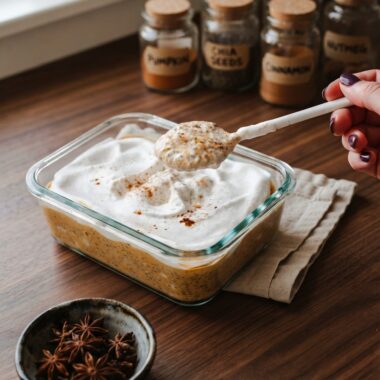
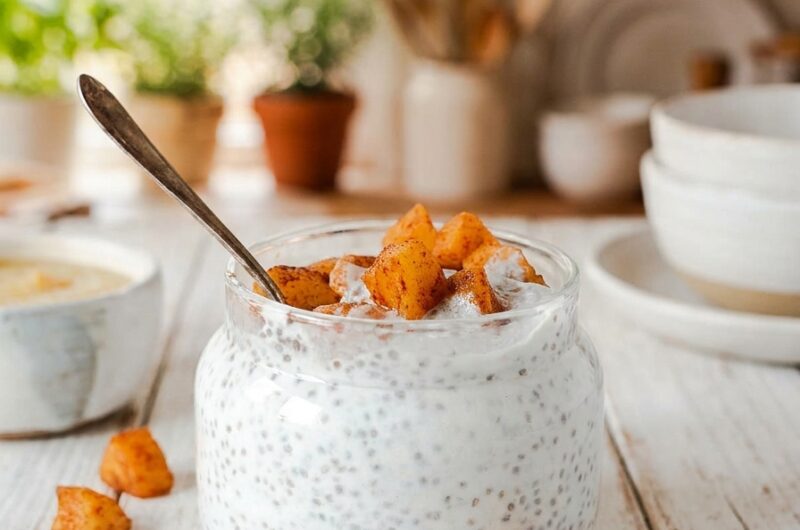
Favorite Toppings
Toppings add texture, color, and extra nutrition, and let the same base recipe become an entirely different dish depending on what’s added.
Fruity favorites:
- Fresh berries (strawberries, raspberries, blueberries)
- Diced mango, pineapple, or kiwi for tropical vibes
- Sliced banana with a drizzle of nut butter
Crunchy additions:
- Granola or toasted oats
- Crushed nuts or seeds
- Coconut flakes or cacao nibs
Creamy extras:
- Greek yogurt or cottage cheese to increase protein content
- A spoonful of almond butter, peanut butter, or cashew butter
- Coconut cream for a dessert-style pudding
Sweet touches:
- Maple syrup or honey drizzle
- Dark chocolate shavings or chocolate chips
- Cinnamon or pumpkin pie spice sprinkle
Troubleshooting Chia Pudding Texture
Getting the right consistency takes a little practice, but a few adjustments can fix most common issues.
Too thin? The chia-to-liquid ratio may be off. Add an extra teaspoon of chia seeds, stir well, and let it sit for another 30 to 60 minutes to thicken further.
Too thick? Stir in a splash of milk until the pudding reaches your preferred texture. Chia pudding continues to absorb liquid as it sits, so it’s normal to need to loosen it up before eating.
Clumpy or uneven? This usually happens when the mixture wasn’t stirred enough early on. Whisking or stirring a few times within the first 30 minutes helps every seed hydrate evenly and prevents clumping.
Slimy texture? This can happen with old chia seeds that have lost their gelling power or developed an off taste. Store chia seeds in a cool, dry place, and replace them if they smell stale or oily.
Part 2: Recipe Card
Basic Chia Seed Pudding Recipe
Description: A one-stop base recipe for chia seed pudding — creamy, customizable, and easy to meal prep. Combine chia seeds with your favorite liquid, chill overnight, and adjust flavor and toppings however you like.
Duration:
- Prep Time: 10 minutes
- Cook Time: 0 minutes
- Chill Time: 3 hours (overnight recommended)
- Total Time: 3 hours 10 minutes
- Servings: 1
Ingredients:
- 2 tbsp chia seeds
- 1/2 cup liquid of choice
- Optional sweetener
- Optional add-ins
Instructions:
- Combine the chia seeds and milk in a jar.
- Add flavorings or sweeteners and whisk well.
- Stir again after 10 minutes.
- Chill overnight, or for at least 3 hours.
- The next day, add toppings before serving and enjoy.
Notes:
- Use whole chia seeds rather than ground for the best pudding-like texture; ground chia creates more of a porridge consistency.
- The thicker the milk used, the thicker the finished pudding will be.
- For a high-protein version, stir in 1/2 scoop of vanilla or chocolate protein powder instead of a traditional sweetener.
- If the pudding is too thin, add an extra teaspoon of chia seeds and let it sit longer. If too thick, stir in a splash of milk.
- Stir the mixture once after 10 minutes, and again after about an hour, to prevent clumping.
- Store in airtight containers in the refrigerator for up to 5 days, or freeze in freezer-safe containers and thaw overnight in the fridge before serving.
- Nutrition (per serving, approximate, base recipe): Calories: 134kcal, Carbohydrates: 11g, Protein: 5g, Fat: 9g, Saturated Fat: 1g, Sodium: 166mg, Potassium: 98mg, Fiber: 9g, Sugar: 0.1g, Vitamin A: 13IU, Vitamin C: 0.4mg, Calcium: 301mg, Iron: 2mg.
Medical and Nutritional Disclaimer
The information provided in this recipe and guide is intended for general informational and educational purposes only and does not constitute medical, dietary, or nutritional advice. Nutritional values listed are automatically calculated estimates and should be used as an approximation only; actual values may vary based on specific ingredient brands, substitutions, and portion sizes used. This recipe is not intended to diagnose, treat, cure, or prevent any disease or health condition. Individuals with food allergies, dietary restrictions, or specific medical conditions should consult with a qualified healthcare provider or registered dietitian before making dietary changes or preparing this recipe. The author and publisher assume no responsibility for any adverse effects resulting from the use or application of the information contained herein.