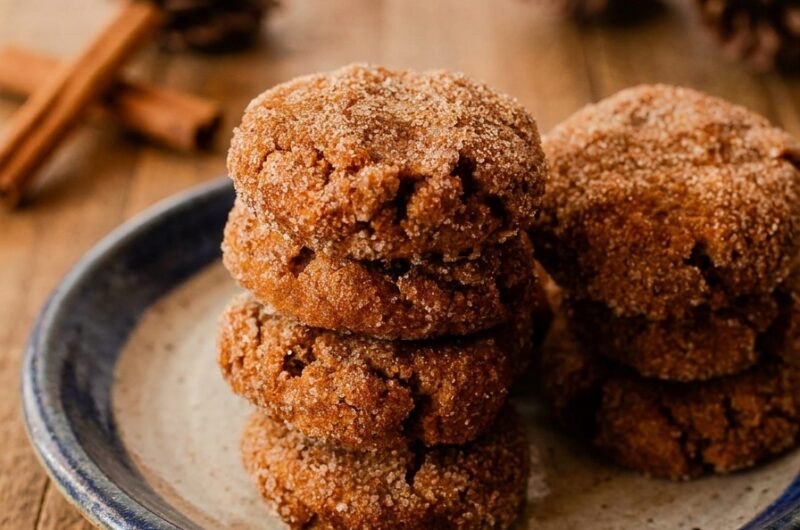
The evolution of modern pastry arts has established a highly sophisticated intersection between traditional comfort baking and functional, plant-based nutrition. Historically, classic snickerdoodle formulations have relied exclusively on high concentrations of refined white flour, saturated dairy fats, and chemical stabilizing agents (such as cream of tartar) to achieve their signature pillowy expansion and tender bite. While these conventional methods offer instant sensory satisfaction, they often lack macronutrient complexity and structural depth. This master recipe fundamentally redefines that paradigm. By utilizing the intrinsic moisture networks of cooked winter tubers alongside a dual-flour composite matrix, this one-bowl formula creates an exquisite crumb structure that bridges the delicate gap between a crisp-edged bakery cookie and a dense, chewy dessert center.
To master this specific confection, one must analyze the complex food chemistry occurring within the un-chilled dough. Sweet potato flesh contains high levels of complex starches and natural, unrefined sugars. When cooked and thoroughly mashed, it functions as a highly effective, whole-food binding agent and humectant. In vegan baking, where traditional whole eggs are omitted, the soluble plant fibers and natural pectins within the sweet potato step in to coat the dry starch molecules. This forms a structural network that traps moisture at a cellular level, preventing the cookies from drying out during the baking phase or turning stale during storage.
Simultaneously, the structural architecture of the cookie is carefully engineered through a balanced blend of whole wheat flour and almond flour. Whole wheat flour introduces complete grain kernels containing fibrous bran and nutrient-dense germ, which provide a robust, nutty structural foundation. However, because the sharp edges of grain bran can easily slice through developing gluten networks—potentially leading to a heavy or dry crumb—this recipe implements finely ground almond flour as a softening countermeasure. The natural, monounsaturated lipids inherently present in almond flour work in perfect harmony with the melted coconut oil. They surround the whole-wheat proteins, restricting excessive gluten development to ensure a delightfully soft, melt-in-your-mouth center. Because this plant-based dough lacks the chemical leavening reactions that cause traditional cookies to melt and spread across a baking sheet, the cookies must be manually pressed into their final shape prior to baking, locking in a uniform, professional thickness.
The sensory success of this dessert is further elevated through a meticulously balanced spice application. The subtle, earthy sweetness of the sweet potato base is sharpened by a bold inclusion of ground cinnamon distributed directly through the dough matrix. The exterior surface is then completely enrobed in a crisp, sweet cinnamon sugar coating. During the high-temperature baking cycle, the surface sugars undergo rapid thermal crystallization, producing a lightly crackled, delicate crust that seals in the incredibly moist, chewy core.
Section 1: The Essential Ingredients Blueprint
Achieving an impeccable cookie structure and an authentic snickerdoodle finish without relying on dairy or eggs requires strict adherence to ingredient quality and function. Below is the comprehensive analytical blueprint detailing the purpose of each component:
- 1/2 Cup Cooked Mashed Sweet Potato: This must be completely smooth, fully cooled to room temperature, and entirely unsweetened (whether using prepared homemade tubers or pure canned sweet potato purée). It acts as the primary fat-reducer, structural binder, and natural humectant, giving the cookie its signature pillowy softness.
- 2 Tablespoons Coconut Oil: Must be fully melted and cooled to room temperature before mixing. This plant-derived lipid coats the grain starches, creating a tender crumb and a satisfyingly rich mouthfeel that replicates traditional butter formulations.
- 1 Teaspoon Pure Vanilla Extract: Infuses the plant-based dough with a deep, warm, and floral aromatic profile that grounds the sweet notes of the cane sugar.
- 2/3 Cup Whole Wheat Flour: The structural backbone of the cookie dough, introducing a wholesome, hearty body and a subtle, toasted nut flavor that pairs beautifully with fall spices.
- 2/3 Cup Almond Flour: Blends finely ground, skinless almonds into the flour matrix. It introduces healthy monounsaturated fats and essential moisture, softening the whole wheat strands to ensure a delicate, non-crumbly bite.
- 1/3 Cup Natural Cane Sugar (Dough Matrix): A clean, unrefined granulated sugar that provides balanced sweetness without overwhelming the delicate flavor notes of the sweet potato.
- 1 Tablespoon Ground Cinnamon (Dough Matrix): A generous addition of premium spice mixed directly into the batter to build a deeply aromatic foundation throughout the entire cookie.
- 3 Tablespoons Natural Cane Sugar (Coating): Coarse or standard granules used to build the exterior crust, creating the classic snickerdoodle appearance.
- 2 Teaspoons Ground Cinnamon (Coating): Combined with the exterior sugar to create a highly aromatic, beautifully fragrant outer layer that hits the palate first.
Section 2: Step-by-Step Master Cooking Instructions
The construction of these vegan snickerdoodles relies on proper wet-dry homogenization, precise hand-shaping, and exact thermal application. Follow these instructions carefully to ensure an immaculate result:
- Phase 1: Thermal Stabilization and Sheet Preparation: Begin by preheating your oven to exactly 350°F (175°C). Ensure the oven rack is situated in the absolute center position to allow for completely balanced radiant heat distribution. Take a heavy, commercial-grade baking sheet and line it with a fresh sheet of silicone-coated parchment paper to prevent the exterior sugar coating from sticking or burning.
- Phase 2: Emulsifying the Wet Base: In a large, deep mixing bowl, combine the 1/2 cup of fully cooled, smooth mashed sweet potato, 2 tablespoons of melted and cooled coconut oil, and 1 teaspoon of pure vanilla extract. Using a heavy wire whisk or a rigid spatula, blend the ingredients vigorously for roughly 45 to 60 seconds until the oil is fully integrated and the mixture forms a completely smooth, glossy, and homogeneous wet emulsion.
- Phase 3: Integrating the Dry Matrix: Add the 2/3 cup of whole wheat flour, 2/3 cup of almond flour, 1/3 cup of natural cane sugar, and 1 tablespoon of ground cinnamon directly into the bowl with the wet emulsion. Switch to a firm silicone spatula or wooden spoon. Stir the mixture thoroughly, pressing down on any dry flour pockets until the ingredients coalesce into a smooth, thick, and perfectly uniform cookie dough with no visible streaks of flour remaining.
- Phase 4: Blending the Aromatic Coating: In a separate, shallow small bowl, combine the 3 tablespoons of natural cane sugar and 2 teaspoons of ground cinnamon intended for the exterior coating. Use a small fork or whisk to blend the two ingredients for 15 seconds until the cinnamon is evenly distributed through the sugar granules.
- Phase 5: Mechanical Portioning and Enrobing: Using a standard 2-tablespoon cookie scoop or a large spoon, portion out identical rounds of cookie dough. Roll each portion firmly between your palms to form a smooth, solid dough ball. Immediately drop the dough ball into the cinnamon sugar mixture, rolling it gently until the entire exterior surface is heavily and uniformly enrobed in the spiced crystals. Place the coated ball onto the prepared parchment-lined baking sheet, leaving approximately 2 inches of space between each cookie.
- Phase 6: Structural Shaping: Because this unique whole-food dough contains no melting animal fats or chemical expanding agents, the cookies will not naturally spread or flatten while baking. Use the flat bottom of a glass, a small measuring cup, or the clean palm of your hand to gently press down on each dough ball until it forms a uniform disc shape of your desired thickness.
- Phase 7: Precision Baking Cycle: Place the baking sheet directly onto the center rack of your preheated oven. Bake undisturbed for 12 to 15 minutes. Monitor the pastry closely toward the end of the cycle; the cookies are perfectly done when the exterior edges appear fully set and dry, and the tops display a light golden hue beneath the cinnamon crust. For an exceptionally soft, fudgy center, pull the sheet closer to the 12-minute mark.
- Phase 8: Thermal Setting and Cooling: Remove the baking sheet from the oven and place it onto a heat-safe surface. Allow the cookies to sit completely undisturbed on the hot sheet for 5 minutes; this brief resting phase allows the delicate internal starch structures to fully set and firm up. Use a thin spatula to gently transfer the cookies onto a wire cooling rack to cool completely before serving or storing.
Section 3: Professional Kitchen Secrets for Success
- The Tuber Moisture Control Metric: The single most critical factor governing the final texture of these cookies is the moisture level of your sweet potato. If using freshly boiled or steamed sweet potatoes, ensure they are thoroughly drained and allowed to cool completely so excess steam can escape. If the mash feels overly wet or watery, spread it across a plate and pat it gently with a clean paper towel before measuring to prevent your dough from turning sticky.
- The Coconut Oil Temperature Boundary: When integrating your melted coconut oil into the sweet potato base, it is absolutely essential that the oil has cooled to a comfortable room temperature. If the oil is added while it is still hot, it can shock the starch fibers in the sweet potato or melt the sugar granules prematurely, causing the dough to turn greasy and preventing the cinnamon sugar coating from sticking properly.
- The Intentional Press Technique: Since these cookies do not spread at all during the baking process, the exact shape, diameter, and thickness you give them on the baking sheet is exactly how they will emerge from the oven. For a beautifully authentic, professional bakery finish, use a small piece of parchment paper between your hand and the cookie dough to press them into perfectly flat, uniform discs with smooth, un-cracked edges.
- The Sifting Protocol for Fine Flours: Almond flour is naturally rich in healthy oils, which frequently causes it to form small, stubborn clumps inside its packaging. To ensure your cookie dough has a completely uniform texture without any dense, unmixed pockets of nut flour, fluff the almond flour with a fork or pass it through a wide sieve before stirring it into the wet ingredients.
Section 4: Strategic Ingredient Substitutions and Variations
- Flour Matrix Adaptations: If whole wheat flour is unavailable, it can be seamlessly replaced at a direct 1:1 ratio with standard unbleached all-purpose flour or white whole wheat flour for a slightly lighter flavor and color profile. For individuals managing gluten sensitivities, an equal amount of a premium 1:1 gluten-free baking flour blend containing xanthan gum can be successfully substituted for the whole wheat portion.
- Alternative Flour Enhancements: The 2/3 cup of almond flour can be substituted with an equal measurement of finely ground oat flour. This modification maintains a beautifully soft and tender cookie center while making the recipe completely nut-free and safe for school lunchboxes.
- Alternative Lipid Frameworks: The 2 tablespoons of coconut oil can be easily swapped for an equal measurement of melted unsalted vegan plant butter or a neutral fluid fat such as premium avocado oil. Both options will maintain excellent moisture distribution throughout the dough sheet.
- Sweetener Profile Variations: For a deeper, more rustic flavor reminiscent of old-fashioned molasses cookies, replace the natural cane sugar within the dough matrix with an equal amount of dark brown sugar or unrefined coconut sugar. This introduces rich caramel undertones that perfectly complement the earthy sweet potato.
- Alternative Curcurbit Purées: While sweet potato offers a beautifully rich flavor and structure, you can replace it at a direct 1:1 ratio with pure, unseasoned canned pumpkin purée or well-strained butternut squash purée to quickly pivot this recipe into a festive autumn pumpkin snickerdoodle.
Section 5: Long-Term Preservation, Storage, and Reheating
- Room Temperature Storage Parameters: Because these cookies are completely dairy-free and egg-free, they store beautifully without immediate refrigeration. Place the fully cooled cookies inside an airtight glass or plastic container, sealing it tightly to trap the natural moisture. They will remain exceptionally soft and fresh at room temperature for up to 3 days.
- Extended Refrigeration Protocols: To prolong the shelf life of your snickerdoodles, transfer the sealed airtight container into the refrigerator. Storing the cookies in a cool environment preserves the integrity of the natural whole-food ingredients, keeping them perfectly safe and delicious for up to 5 days.
- Advanced Freezing Architecture: These sweet potato snickerdoodles freeze beautifully for long-term meal prep. Place the fully baked and cooled cookies in a single layer on a baking sheet and freeze for 1 hour until solid. Once frozen, transfer them into a heavy-duty freezer zip-top bag, separating any layers with parchment paper, and freeze for up to 2 months. Thaw individual cookies on your kitchen counter at room temperature whenever a sweet craving strikes.
- Thermal Restoration Techniques: If you prefer to enjoy your cookies with a freshly baked, warm-from-the-oven texture, simply place a single cookie on a microwave-safe plate and heat it on low power for 10 to 15 seconds. This gently warms the sweet potato starches, making the center incredibly soft and fragrant once again.
Section 6: Frequently Asked Kitchen Questions
Troubleshooting Textural Densities and Dough Consistency
If your cookie dough feels overly sticky or difficult to roll into cohesive balls, the sweet potato purée likely contained slightly more natural water than average. You can easily fix this by dusting in an extra 1 to 2 tablespoons of whole wheat flour until the dough easily pulls away from the sides of the bowl. Conversely, if the dough feels dry or crumbly when you attempt to shape it, add a tiny splash of unsweetened almond milk or water—one teaspoon at a time—until the dough is smooth and holds its shape perfectly.
Maximizing Spice Customization and Aromatic Depth
While classic snickerdoodles rely entirely on a heavy hand of cinnamon, you can easily customize the flavor profile to match your favorite seasonal bakes. Try replacing the ground cinnamon inside the dough matrix with an equal amount of a premium pumpkin pie spice blend, or add a warm pinch of fresh ground nutmeg and ground ginger. This adds a sophisticated, multi-layered warmth that enhances the natural sweetness of the baked tuber base.
Achieving the Perfect Soft-Chew Baker’s Finish
The secret to a truly exceptional snickerdoodle lies in avoiding the temptation to overbake. When you check the cookies at the 12-minute mark, the center of the cookie should still feel slightly soft to a gentle touch. Do not wait for the center to turn completely firm or hard while in the oven. The cookies will continue to cook and set from the residual heat of the hot baking sheet during their 5-minute post-bake rest on the kitchen counter, ensuring a perfect chewy bite every single time.
Section 7: Estimated Nutritional Profile
The values listed below are calculated approximations per individual serving based on dividing the completed dough matrix into 10 identical cookies:
- Calories: 137 kcal
- Carbohydrates: 20 g
- Protein: 3 g
- Fat: 7 g
- Saturated Fat: 3 g
- Polyunsaturated Fat: 0.1 g
- Monounsaturated Fat: 0.2 g
- Sodium: 4 mg
- Potassium: 61 mg
- Dietary Fiber: 2 g
- Sugars: 11 g
- Vitamin A: 948 IU
- Vitamin C: 0.2 mg
- Calcium: 32 mg
- Iron: 1 mg
Please Note: I am not a doctor, certified nutritionist, or medical professional. The nutritional information and dietary suggestions provided in this article are based purely on the historical recipe records and are intended for general educational and informational purposes only. Every individual’s body, health conditions, and dietary needs are completely different. Before making any significant changes to your diet, implementing new meal plans, or consuming specific ingredient adjustments, please consult with a qualified doctor or a registered healthcare professional to ensure it aligns safely with your personal health requirements.