The evolution of modern pastry arts has established a highly sophisticated intersection between traditional yeast-leavened doughs and functional, whole-food nutrition. Historically, classic cinnamon rolls have relied exclusively on highly refined white flours, intense concentrations of saturated dairy fats, and pure sucrose fillings to achieve their iconic cloud-like expansion and gooey interiors. While these conventional methods yield immediate sensory gratification, they frequently lack structural complexity and degrade quickly into staled starches. This master recipe fundamentally redefines that paradigm. By utilizing the intrinsic moisture-retaining networks of winter tubers alongside a precise flour-blend composite and a controlled overnight fermentation cycle, this formula creates an exquisite crumb structure that bridges the gap between a feather-light bakery pastry and a dense, nutrient-dense brioche.
To master this advanced baking project, one must analyze the complex food chemistry occurring during the multi-stage fermentation process. Whole wheat flour contains the entire grain kernel—including the fibrous bran and the nutrient-dense germ. In conventional bread-making, the sharp, microscopic edges of the wheat bran act like tiny blades, physically cutting through developing gluten sheets and weakening the carbon dioxide pockets produced by yeast. This typically results in a heavy, dense, or unpleasantly dry baked good. To beautifully resolve this issue, this recipe implements a comprehensive dual-stabilization strategy. First, it introduces a specific white-to-whole-wheat flour composite ratio, ensuring there are enough unbleached wheat proteins to build a strong, elastic gluten framework. Second, it integrates pure sweet potato purée directly into the dough matrix. The natural plant fibers and complex starches within the cooked tuber function as high-capacity humectants, wrapping around the flour proteins to trap water at a cellular level, ensuring the baked rolls remain incredibly soft and tender for days.
Simultaneously, the fermentation timeline is optimized through the implementation of an advanced overnight cooling phase. Scalding the milk prior to mixing plays a vital chemical role: it denatures the whey proteins (specifically serum albumin), which would otherwise weaken the gluten structure and yield a flatter, less resilient dough. Once the active dry yeast blooms in the warm liquid and is combined with natural cane sugar, it feeds on the simple carbohydrates, kicking off the initial fermentation cycle. By punching down the dough, rolling it with a rich brown sugar-cinnamon filling, and immediately transferring the sliced rolls to a chilled environment, we slow down the yeast’s metabolism. This extended, cold overnight rise allows organic acids to develop slowly, creating a deep, complex flavor profile that cannot be replicated in a rushed, same-day bake. When the cold rolls encounter the high ambient heat of a preheated oven, the dormant gases rapidly expand—a phenomenon known as “oven spring”—lifting the pastry sheets into incredibly fluffy, golden swirls.
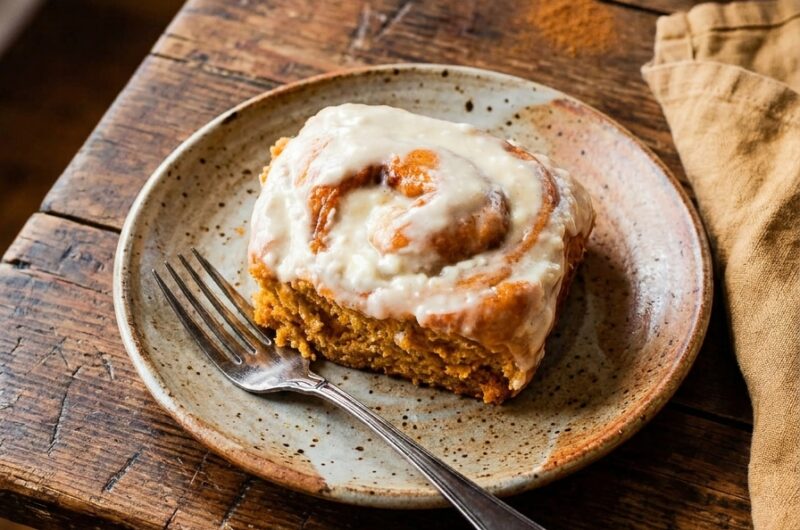
The sensory success of this breakfast centerpiece is further elevated through a meticulously balanced maple cream cheese glaze. Rather than relying on standard, overly sweet icing made entirely of powdered sugar, this formula utilizes a tangy, fully softened cream cheese base whipped with pure liquid maple syrup. The natural organic acids in the cheese provide a sharp, clean contrast that cuts through the intense caramel notes of the brown sugar filling, while the floral undertones of the maple syrup complement the earthy sweetness of the sweet potato dough.
Section 1: The Essential Ingredients Blueprint
Achieving an impeccable, pillowy rise and an authentic gooey center when baking with whole-grain composites requires strict adherence to ingredient functions and thermal boundaries. Below is the precise analytical blueprint detailing the role of each component:
- 1/4 Cup Warm Water (105°F–110°F): The foundational hydration source used exclusively to wake the dry yeast from dormancy. The temperature must be strictly monitored; liquid below 100°F will fail to fully activate the organisms, while liquid exceeding 115°F will instantly denature the yeast proteins, killing the culture.
- 3/4 Cup Whole Milk (Scalded and Cooled): Heated almost to a boil to eliminate gluten-weakening whey proteins, then cooled completely to room temperature. It introduces vital dairy fats and lactose sugars that soften the crumb and caramelize beautifully in the oven.
- 2.25 Teaspoons Active Dry Yeast: The biological leavening engine of the dough. It metabolizes simple sugars to produce carbon dioxide gas and ethanol, creating the microscopic air pockets required for a light, airy pastry expansion.
- 1/4 Cup Natural Cane Sugar: A clean, unrefined crystalline sweetener that provides immediate nourishment to the blooming yeast cells, accelerating early gas production and adding a delicate sweetness to the dough base.
- 1/4 Cup Unsalted Butter (Dough Matrix): Must be fully softened to room temperature (not melted). This solid dairy fat coats the forming gluten strands, ensuring the finished dough remains elastic, malleable, and incredibly tender.
- 1 Large Egg: Acts as a powerful natural emulsifier and structural binder. The lecithin in the yolk binds water and fat molecules together into a smooth emulsion, while the white proteins provide the elasticity needed to retain expanding gases.
- 3/4 Teaspoon Sea Salt: A crucial structural and flavor crystal. It tightens the gluten network, regulates the rate of yeast fermentation to prevent over-proofing, and sharpens the sweet notes of the filling.
- 2.5 Cups Whole Wheat Flour: Establishes a robust, fiber-rich foundation. It infuses the pastry with a deep, nutty flavor profile and provides a satisfying, wholesome body.
- 2 Cups White All-Purpose Flour: Lightens the dense structural load of the whole-grain fibers, providing the necessary gluten-forming proteins to build a strong, stretchy web that traps air bubbles perfectly.
- 1 Can (Approx. 15 Ounces) Pure Sweet Potato Purée: Must be 100% pure, unseasoned, smooth, and used at room temperature. It injects a high concentration of beta-carotene, natural moisture, and plant sugars directly into the crumb matrix.
- 4 Tablespoons Unsalted Butter (Filling Matrix): Softened to a spreadable consistency. It forms a rich lipid barrier over the rolled dough sheet, holding the cinnamon sugar crystals in place and creating a gooey, separated swirl pattern as it bakes.
- 1/2 Cup Brown Sugar: Packed with natural molasses, which provides deep caramel undertones and melts into a rich, fluid syrup during baking.
- 2 Teaspoons Ground Cinnamon: The primary aromatic driver of the filling, delivering an intense, woody warmth that pairs perfectly with the sweet potato base.
- 8 Ounces Cream Cheese: The dense, tangy foundation of the glaze. It must be thoroughly softened to room temperature prior to mixing to ensure a completely smooth, lump-free emulsion.
- 1/3 to 1/2 Cup Pure Maple Syrup: A completely unrefined liquid sweetener that flavors and thins the cream cheese glaze, introducing complex notes of wood spice and caramel.
- 1 Teaspoon Pure Vanilla Extract: Infuses the glaze with a warm, floral aromatic top note that beautifully connects the tangy dairy topping to the spiced interior swirls.
Section 2: Step-by-Step Master Cooking Instructions
The construction of artisanal overnight cinnamon rolls depends on proper yeast hydration, thorough dough development, precise portioning, and controlled thermal stages. Follow these instructions carefully to ensure an immaculate result:
- Phase 1: Yeast Activation and Base Emulsification: In the large bowl of a heavy-duty stand mixer fitted with the paddle attachment (or a large ceramic mixing bowl), pour in the 1/4 cup of warm water (105°F–110°F) and the 3/4 cup of scalded and fully cooled milk. Sprinkle the 2.25 teaspoons of active dry yeast evenly over the surface. Allow the liquid to sit undisturbed for exactly 5 minutes until a dense, foamy layer of bubbles forms on the surface, indicating the yeast is alive and active. Add the 1/4 cup of natural cane sugar, 1/4 cup of softened unsalted butter, 1 large egg, and 3/4 teaspoon of sea salt. Mix on low speed for 30 seconds until the wet ingredients are completely homogenized.
- Phase 2: Flour Integration and Primary Dough Development: Measure out your flour types accurately. Add all of the whole wheat flour (2.5 cups) and exactly half of the white flour (1 cup) into the wet mixture. Turn the mixer to low speed and blend until a thick, wet batter forms. Stop the mixer and add the remaining 1 cup of white flour along with the entire can of smooth sweet potato purée. Resume mixing on low speed, using a wooden spoon or the paddle attachment, until the flour is fully absorbed and the ingredients pull away from the walls of the bowl to form a cohesive, slightly sticky dough mass.
- Phase 3: Kneading and Structural Stabilization: Swap the paddle attachment for a heavy dough hook. Knead the sweet potato dough on low-to-medium speed for approximately 5 minutes. If working by hand, turn the dough out onto a lightly floured surface and knead vigorously by folding and stretching the dough for 5 to 7 minutes. Continue until the dough transforms into a smooth, highly elastic, and supple ball that springs back instantly when gently pressed with a finger. Shape the dough into a ball and place it into a large, greased bowl. Cover the bowl with a clean, damp kitchen towel and leave it to rise in a warm, draft-free spot for 1 to 2 hours, or until it has fully doubled in size.
- Phase 4: Sheet Rolling and Filling Application: Gently punch down the risen dough to release excess gas build-up. Turn the dough out onto a clean, lightly floured countertop. Using a heavy wooden rolling pin, roll the dough outward from the center until it forms a large, uniform rectangle roughly 1/4-inch thick. Using a flexible offset spatula, spread the 4 tablespoons of softened filling butter evenly across the entire surface of the dough, leaving a clean 1/2-inch border along the top edge. In a small bowl, toss together the 1/2 cup of brown sugar and 2 teaspoons of ground cinnamon, then sprinkle this sweet spice mixture evenly over the layer of spreadable butter.
- Phase 5: Rolling, Slicing, and Chilled Fermentation: Grip the long edge of the dough rectangle closest to you and roll it upward tightly away from you, forming a long, uniform log. When you reach the top edge, pinch the clean dough seam firmly along the entire length of the cylinder to seal the filling inside. Slide a long piece of unflavored, unscented dental floss completely underneath the log. Cross the two ends of the floss over the top of the log at 1.5-inch intervals and pull sharply to slice clean, un-squished rounds. Arrange the 10 to 12 resulting slices cut-side-up inside a large 9×13-inch baking dish that has been thoroughly greased with butter. Cover the pan tightly with a clean layer of plastic wrap and place it immediately into the refrigerator for a slow, overnight cold rise lasting anywhere from 8 to 12 hours.
- Phase 6: Thermal Baking Stage: In the morning, remove the baking dish from the refrigerator. Leave the pan covered on your kitchen counter for 20 to 30 minutes to allow the rolls to shake off the refrigerator chill and puff up slightly. While they rest, preheat your oven to exactly 350°F (175°C), ensuring the rack is centered. Remove the plastic wrap entirely and place the dish into the hot oven. Bake for 25 to 30 minutes, keeping a close watch; the sweet potato rolls are perfectly baked when they appear significantly puffed, the seams look set, and the tops are a beautiful, uniform golden brown.
- Phase 7: Glaze Homogenization and Final Assembly: While the pastries are baking, place the 8 ounces of fully softened room-temperature cream cheese, 1/3 to 1/2 cup of pure maple syrup (depending on your preferred sweetness level), and 1 teaspoon of pure vanilla extract into a small mixing bowl. Using an electric hand mixer or a firm whisk, beat the ingredients vigorously for 2 minutes until the glaze transforms into an incredibly silky, smooth, and completely lump-free icing. The second the cinnamon rolls emerge hot from the oven, use a spoon or spatula to spread the maple glaze generously over the surface. The residual heat from the baked pastries will gently melt the cream cheese, allowing the sweet maple icing to cascade deep into every spiced swirl. Serve immediately while warm.
Section 3: Professional Kitchen Secrets for Success
- The Scalded Milk Temperature Mandate: Scalding your milk is a traditional baking secret that cannot be skipped when creating high-end viennoiserie. Ensure you heat the milk in a small saucepan until tiny bubbles form around the edges (about 180°F), but do not let it boil. Most importantly, you must let it cool down below 110°F before pouring it over your yeast; adding hot milk will instantly kill your leavening culture, resulting in flat, dense rolls.
- The Dental Floss Slicing Technique: Never use a dull or standard serrated kitchen knife to cut raw, rolled yeast dough. The downward pressure of a knife blade compresses the delicate layers, sealing the edges together and turning your round rolls into misshapen, squished ovals. Utilizing a simple piece of unflavored dental floss or clean sewing thread allows you to slide under the log and slice upward through the dough with zero downward compression, keeping every circular layer perfectly distinct.
- The Moisture Equilibrium Rule: Sweet potato purée introduces varying levels of hydration depending on the brand or extraction process. When kneading your dough, pay close attention to its consistency. The dough should feel soft, pliable, and slightly tacky to the touch, but it should not stick aggressively to your fingers or the countertop. If it feels overly wet after 3 minutes of kneading, dust in white flour one tablespoon at a time; if it feels dry or stiff, add a tiny teaspoon of warm milk.
- The Hot Glaze Application Strategy: For a truly professional, melt-in-your-mouth texture, apply exactly half of your prepared maple cream cheese glaze the very second the pan comes out of the oven. This initial layer will liquefy from the high heat and sink deep into the core of the spirals, keeping the inner layers incredibly moist. Wait 5 minutes for the rolls to cool slightly, then spread the remaining half of the glaze over the top to create a thick, stable, and beautifully visible frosted coating.
Section 4: Strategic Ingredient Substitutions and Variations
- Flour Framework Alterations: If you prefer an exceptionally light, feather-soft, and traditional café-style pastry texture, you can completely omit the whole wheat flour and utilize 4.5 cups of unbleached all-purpose flour or premium bread flour for the entire recipe. Alternatively, white whole wheat flour can be used as a 1:1 replacement for regular whole wheat flour to provide identical whole-grain nutrition with a much milder flavor and lighter color.
- Alternative Vegetable Purées: While sweet potato purée introduces a uniquely rich, buttery flavor profile, it can be seamlessly substituted at an exact 1:1 ratio with pure, unseasoned canned pumpkin purée or thick, well-strained roasted butternut squash purée. Both options will provide an identical moisture level and an equally festive autumn color.
- Dairy-Free and Plant-Based Transitions: To transform this recipe into a dairy-free masterpiece, replace the unsalted dairy butter with a premium plant-based stick butter alternative in both the dough and the filling. Substitute the whole milk with an equal measurement of unsweetened oat milk or soy milk, and utilize a high-quality almond- or coconut-based cream cheese alternative for the final whipped glaze.
- Sweetener Framework Modifications: The natural cane sugar and brown sugar can be successfully replaced at a direct 1:1 ratio with coconut sugar or maple sugar. This substitution introduces a much deeper, rustic, and caramel-like flavor profile that pairs exquisitely with the warm ground cinnamon.
- Textural and Botanical Fillings: Elevate the classic filling by scattering 1/2 cup of finely chopped raw pecans or English walnuts over the cinnamon-brown sugar layer before rolling to add a delightful crunch. For a bright, festive holiday pop, grate the fresh zest of an orange directly into the cream cheese glaze during the whipping phase.
Section 5: Long-Term Preservation, Storage, and Reheating
- Room Temperature Storage Restrictions: Because the decadent maple glaze contains fresh, perishable cream cheese, these rolls cannot be safely stored on an open kitchen counter for more than 2 days. Ensure any leftover rolls are placed inside a rigid, airtight container and kept in a cool, dark pantry zone.
- Refrigeration Preservation Protocols: For optimal freshness past 48 hours, place the airtight container holding your frosted cinnamon rolls directly into the refrigerator, where they will remain perfectly safe and delicious for up to 4 days. The cool environment will firm up the dairy fats, so proper reheating is essential before serving.
- Advanced Freezing Architectures: This recipe is exceptionally freezer-friendly and can be frozen at two distinct stages:
- Unbaked Strategy: After slicing the raw dough into individual rolls and arranging them in your greased baking dish, wrap the pan tightly in a double layer of plastic wrap followed by aluminum foil and freeze immediately for up to 1 month. To bake, transfer the frozen pan to the refrigerator to thaw overnight (8 to 12 hours), then bake exactly as directed in the master instructions.
- Baked Strategy: You can freeze fully baked rolls (ideally without the glaze applied) by wrapping them tightly in plastic wrap and placing them in a heavy-duty freezer bag for up to 4 months. Thaw at room temperature before warming and frosting.
- Thermal Restoration and Reheating Metrics: To restore a refrigerated or thawed cinnamon roll to its original soft, gooey glory, place an individual roll onto a microwave-safe plate and heat on high power for 20 to 30 seconds. Alternatively, warm a whole pan of rolls in a preheated oven at 300°F (150°C) for 8 to 10 minutes until the center is hot and the cream cheese glaze is beautifully melted.
Section 6: Frequently Asked Kitchen Questions
Troubleshooting Proofing Delays and Inactive Dough Rising
If your dough fails to double in size during the initial 2-hour warm rise or during its overnight stay in the refrigerator, the primary cause is typically related to thermal activation. If your kitchen counter is too cold during the winter months, the yeast will enter a state of semi-dormancy. To easily fix this, create a warm proofing chamber by turning your oven on to 200°F for exactly 2 minutes, turning the oven completely OFF, and placing the covered bowl of dough inside the warm oven with the door closed. Additionally, always double-check the expiration date on your yeast packet to ensure the cultures are completely viable.
Adjusting and Fine-Tuning the Viscosity of the Cream Cheese Glaze
Achieving the perfect balance between a spreadable frosting and a fluid glaze depends heavily on the temperature of your ingredients and the amount of liquid added. If your maple cream cheese glaze feels too thick or stiff to spread smoothly over the hot rolls, add a tiny splash of milk or an extra tablespoon of maple syrup, whipping continuously until it reaches a velvety consistency. If the glaze turns out too runny, place it in the refrigerator for 10 minutes to allow the natural cream cheese fats to firm back up before frosting.
Serving Ideas and Elegant Holiday Brunch Plating
While these sweet potato cinnamon rolls are a magnificent standalone treat, they can easily anchor a luxurious holiday breakfast spread. Try topping the freshly frosted swirls with a handful of toasted, chopped pecans or a light sprinkle of candied ginger pieces for a beautiful textural contrast. To create a perfectly balanced brunch menu, serve these rich, sweet rolls alongside a savory main dish—such as a spinach and goat cheese frittata or baked egg cups—accompanied by a large bowl of fresh, tart citrus fruits and a pot of hot black coffee or iced matcha lattes.
Section 7: Estimated Nutritional Profile
The values listed below are calculated approximations per individual serving based on dividing the completed recipe into 12 identical cinnamon rolls:
- Calories: 385 kcal
- Carbohydrates: 55 g
- Protein: 8 g
- Fat: 16 g
- Saturated Fat: 9 g
- Polyunsaturated Fat: 1 g
- Monounsaturated Fat: 4 g
- Trans Fat: 0.3 g
- Cholesterol: 55 mg
- Sodium: 221 mg
- Potassium: 210 mg
- Dietary Fiber: 4 g
- Sugars: 20 g
- Vitamin A: 552 IU
- Vitamin C: 0.03 mg
- Calcium: 74 mg
- Iron: 2 mg
Please Note: I am not a doctor, certified nutritionist, or medical professional. The nutritional information and dietary suggestions provided in this article are based purely on the historical recipe records and are intended for general educational and informational purposes only. Every individual’s body, health conditions, and dietary needs are completely different. Before making any significant changes to your diet, implementing new meal plans, or consuming specific ingredient adjustments, please consult with a qualified doctor or a registered healthcare professional to ensure it aligns safely with your personal health requirements.