This yogurt cake strips a traditional cake recipe down to its most basic elements: Greek yogurt, eggs, and cornstarch. There’s no flour, butter, or oil involved at all, yet the combination still produces a cake with real structure, a creamy, cheesecake-like texture, and a slightly chewy exterior. The eggs provide the structural framework that would normally come from flour, while cornstarch thickens the batter and helps maintain that creamy consistency throughout.
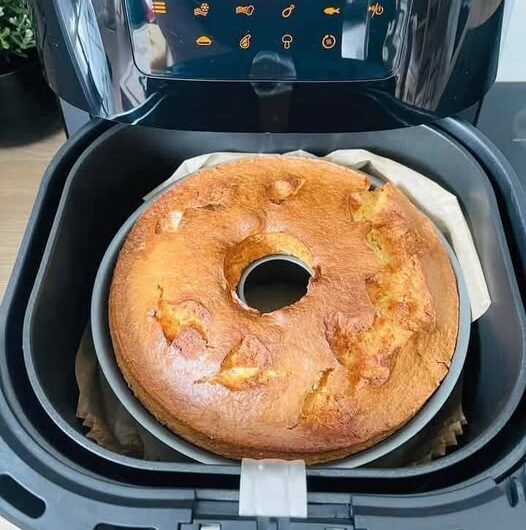
What makes this recipe especially convenient is that it can be made two different ways — in an air fryer or in a conventional oven — with each method producing a slightly different final texture. The air fryer version cooks faster and results in a firmer texture with a more caramelized top, while the oven version takes considerably longer but produces a moister cake. Either way, the batter itself takes only about 5 minutes to mix, with the bulk of the time going toward hands-off cooking and chilling.
Below is a full breakdown of the workflow, ingredient roles, and technique for both cooking methods, along with tips for adjusting sweetness to taste.
Kitchen Workflow: How the Process Is Organized
This recipe breaks into four stages: preparing the pan, mixing the batter, cooking (by either method), and cooling before serving.
Stage 1 — Prepare the Pan. The inside of a 6-inch round cake pan is sprayed with cooking spray, then lined with a large piece of parchment paper that covers the bottom and sides. The paper is allowed to stick out above the edges of the pan, which will look a little wrinkled — this is expected and not a sign of anything going wrong. This lining step is what allows the finished cake to be lifted cleanly out of the pan later, since the batter has no flour to help it release on its own.
Stage 2 — Mix the Batter. In a large bowl, the yogurt and eggs are mixed together until smooth. If additional sweetness is desired, sugar is added at this point. Cornstarch is then added and whisked in until the batter is fully smooth. This order — wet ingredients first, then cornstarch last — helps the cornstarch incorporate evenly without clumping, since it’s being whisked into an already-smooth liquid base rather than a drier mixture.
Stage 3 — Cook by Your Chosen Method. For the air fryer method, the air fryer is preheated to 320°F (160°C), the batter is poured into the prepared pan, and it cooks for 20–23 minutes. The cake should puff up, the top should turn golden, and it should not be jiggly when done; it will deflate slightly after cooking, which is normal. For the oven method, the oven is preheated to 350°F (177°C), and the cake bakes for 70–75 minutes. It will also puff up and deflate slightly once removed, with a texture that ends up a bit moister than the air fryer version.
Stage 4 — Cool and Chill. The cake cools on the counter for 30 minutes, then goes into the fridge for at least 2 hours, with overnight being the best option for full setting. Before serving, it’s taken out of the fridge for 15–30 minutes to come back to room temperature. This extended chilling period is essential for a cake with this kind of custard-like, cheesecake-similar texture — it needs time in the cold to fully set into a sliceable consistency.
Component Breakdown
It’s useful to think of this recipe as three functional ingredients, each doing a specific job.
1. The Base and Flavor — Nonfat Vanilla Greek Yogurt Greek yogurt forms the bulk of the batter and is also the primary source of both flavor and the small amount of sweetness in the final cake, since no other sugar is included by default. Using a sweetened yogurt, as opposed to plain, contributes some inherent sweetness before any additional sugar is considered.
2. The Structure — Eggs Eggs are what give this flourless cake its structure, since there’s no flour present to provide the usual framework a cake batter relies on. Four large eggs are enough to hold the yogurt-based batter together as it cooks.
3. The Thickener — Cornstarch Cornstarch thickens the batter and is largely responsible for the cake’s smooth, creamy texture throughout. Without it, the yogurt-and-egg mixture would likely stay closer to a liquid custard rather than setting into a sliceable cake.
Approved Variations and Swaps
Based strictly on the details provided, the following adjustments can be made to this recipe:
- Yogurt flavor – vanilla was used in the original recipe, but other yogurt flavors also work as a substitute.
- Sweetness level – if using sweetened yogurt, 1/4 cup of sugar can be added for extra sweetness. If using plain, unsweetened yogurt instead, 1/2 cup of sugar is recommended to compensate for the lack of built-in sweetness from the yogurt itself.
- Topping – honey or another sweetener can be drizzled on top when serving if a sweeter finished cake is preferred.
Step-by-Step Assembly Strategy
To make this cake with the best texture, follow this sequence:
- Prepare the pan first. Spray the inside of a 6-inch round cake pan with cooking spray, then line it with a large piece of parchment paper covering the bottom and sides, letting the paper extend above the pan’s edges.
- Mix the yogurt and eggs together in a large bowl until smooth. Add sugar at this stage if you want a sweeter cake.
- Add the cornstarch and whisk again until the batter is completely smooth, with no lumps of cornstarch remaining.
- Choose your cooking method based on preference and time available. For a firmer texture with a caramelized top, use the air fryer. For a moister texture, use the oven.
- For the air fryer method: preheat to 320°F (160°C), pour the batter into the prepared pan, and cook for 20–23 minutes. Watch for the cake to puff up with a golden top and no jiggle in the center before removing it.
- For the oven method: preheat to 350°F (177°C) and bake for 70–75 minutes, watching for similar visual cues — a puffed top that will deflate slightly once removed from the heat.
- Let the cake cool on the counter for 30 minutes before moving it to the next stage.
- Chill in the fridge for at least 2 hours, or overnight for the best result. This step is what allows the cake to fully set into its final, sliceable texture.
- Bring the cake back to room temperature for 15–30 minutes before serving. This short rest at room temperature makes the texture more enjoyable to eat compared to serving it straight from the fridge.
- Drizzle with honey or another sweetener just before serving, if desired.
A Note on Texture and Sweetness
This cake is naturally quite creamy, similar in texture to a cheesecake, with an exterior that may feel slightly chewy. Because the only inherent sugar comes from the yogurt itself, the cake is not very sweet on its own. Adding sugar directly into the batter, or drizzling honey on top at serving time, are both effective ways to adjust the sweetness level to personal preference.
Part 2: Recipe Card
Creamy 3-Ingredient Yogurt Cake
Description: A soft, creamy yogurt cake made with only 3 ingredients — no flour, butter, or oil. Ready in minutes to prepare and perfect as a healthier dessert or snack, cooked in either the air fryer or the oven.
Duration:
- Prep Time: 5 minutes
- Cook Time: 20–23 minutes (air fryer) or 70–75 minutes (oven)
- Chill Time: At least 2 hours (overnight recommended)
Ingredients:
- 1 2/3 cups (400g) nonfat vanilla Greek yogurt, sweetened
- 4 large eggs
- 4 tbsp (32g) cornstarch
Instructions:
- Spray the inside of a 6-inch round cake pan with cooking spray, then line it with a large piece of parchment paper covering the bottom and sides, letting the paper stick out above the edges.
- In a large bowl, mix the yogurt and eggs together until smooth. Add sugar now if you want extra sweetness.
- Add the cornstarch and whisk again until the batter is smooth.
- For the air fryer method: preheat to 320°F (160°C) and cook for 20–23 minutes. The cake should puff up, the top should turn golden, and it should not be jiggly. It will deflate slightly after cooking, which is normal.
- For the oven method: preheat to 350°F (177°C) and bake for 70–75 minutes. The cake will puff up and deflate a bit once removed; the texture will be a bit moister than the air fryer version.
- Let the cake cool on the counter for 30 minutes, then place it in the fridge for at least 2 hours (overnight is best).
- Take the cake out of the fridge 15–30 minutes before serving to bring it to room temperature. Drizzle with honey or sweetener if desired.
Notes:
- If using sweetened yogurt, add 1/4 cup of sugar for extra sweetness. If using plain, unsweetened yogurt, add 1/2 cup of sugar instead.
- Works best in a 6-inch round cake pan or springform pan.
- The air fryer version has a slightly firmer texture with a caramelized top; the oven version is a bit moister.
Medical and Nutritional Disclaimer
The information provided in this recipe and guide is intended for general informational and educational purposes only and does not constitute medical, dietary, or nutritional advice. This recipe is not intended to diagnose, treat, cure, or prevent any disease or health condition. Individuals with food allergies, dietary restrictions, or specific medical conditions should consult with a qualified healthcare provider or registered dietitian before making dietary changes or preparing this recipe. The author and publisher assume no responsibility for any adverse effects resulting from the use or application of the information contained herein.