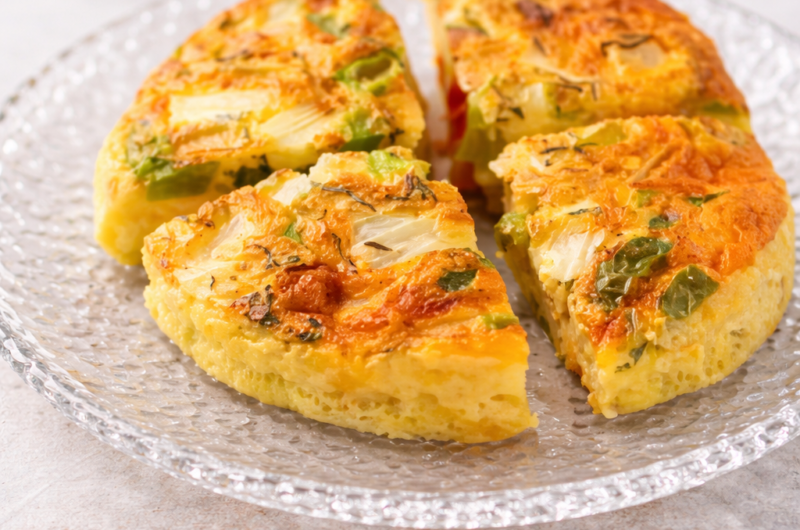
This crustless quiche, sometimes called an “impossible quiche,” skips the traditional pastry crust entirely while still achieving a structured, sliceable texture. The trick is in the batter itself: by adding flour to a mixture of eggs and milk, the flour sinks and settles during cooking, forming a crust-like layer at the bottom without any pastry ever being made or rolled out. This makes the quiche a hybrid between a crustless frittata and a classic quiche, with all the flavor of the latter and none of the pastry work.
Cooking this in the air fryer follows the same general principle as baking it in the oven, but requires a smaller quiche dish to fit inside the appliance — a loose-bottom pie tin around 20cm (8 inches) works well. This recipe is especially useful for meals that need to travel, since it holds together well once cooled and makes a convenient grab-and-go option for work, picnics, or packed lunches.
Below is a full breakdown of the workflow, ingredient roles, and technique for getting a fully set, well-textured quiche, along with the variations and troubleshooting notes for different air fryer models.
Kitchen Workflow: How the Process Is Organized
This recipe breaks into four stages: building the egg base, adding the fillings, incorporating the flour, and air frying at two temperature stages.
Stage 1 — Build the Egg Base. Eggs are cracked into a mixing jug, milk is added, and the mixture is whisked well with a fork to create the quiche batter. Mixed herbs, oregano, salt, and pepper are stirred in at this stage as well. Building the base first, before adding any solid fillings, ensures the eggs and milk are fully combined and evenly seasoned before anything else goes in.
Stage 2 — Add the Fillings. Diced tomato, chopped onion, ham, and grated cheese are mixed into the egg base and combined thoroughly to ensure even distribution throughout the batter. Mixing the fillings in before the flour keeps the process organized and ensures nothing clumps together once the batter starts to thicken.
Stage 3 — Incorporate the Flour. Self-raising flour is added gradually to the mixture and stirred well until a thick batter forms. Adding the flour last, and gradually, is what allows it to fully dissolve and evenly thicken the batter rather than clumping if added all at once to a thinner egg mixture.
Stage 4 — Air Fry at Two Temperatures. The batter is poured into a pie dish suitable for the air fryer, and the dish is placed in the air fryer basket. It cooks at 180°C (360°F) for 20 minutes, then the temperature is reduced to 160°C (320°F) for an additional 10 minutes, or until a toothpick inserted into the center comes out clean. This two-stage temperature approach allows the quiche to set initially at a higher heat, then finish cooking through more gently at a lower temperature, which helps prevent the top from over-browning before the center is fully cooked.
Component Breakdown
It’s useful to think of this recipe in terms of three functional components.
1. The Structural Base — Eggs, Milk, and Flour Eggs and milk form the custard-like base of the quiche, while flour is what gives this crustless version its structure, sinking during cooking to form a crust-like layer without any actual pastry. Milk is used rather than heavy cream or crème fraîche because it blends more effectively with the eggs, resulting in a lighter, fluffier filling.
2. The Savory Fillings — Tomato, Onion, Ham, and Cheese Diced tomato, chopped red onion, chopped ham, and grated cheddar cheese make up the customizable filling of this particular version. These ingredients can be swapped out for other combinations depending on preference, since the egg-milk-flour base is what does the structural work regardless of filling choice.
3. The Seasoning — Mixed Herbs, Oregano, Salt, and Pepper Mixed herbs and dried oregano bring herby, savory depth to the quiche, while salt and pepper round out and balance the overall flavor of the batter.
Approved Variations and Swaps
Based strictly on the details provided, the following variations can be made within this recipe:
- Fillings can be customized freely — spinach, mushrooms, bacon, or feta cheese are all mentioned as popular alternative filling choices.
- Quiche Lorraine variation – swap the filling ingredients for diced ham, cheese, or bacon for a classic ham-and-cheese style quiche.
- Cooking times may vary slightly depending on the specific air fryer model being used. Adjust cooking time as needed and check doneness with a toothpick rather than relying strictly on the stated times.
- Some air fryers cook primarily from the top. If the top of the quiche browns too quickly before the inside is fully set, covering it with foil partway through cooking can help prevent over-browning.
Step-by-Step Assembly Strategy
To make a well-set, evenly cooked quiche, follow this sequence:
- Crack the eggs into a mixing jug and add the milk. Whisk well with a fork until fully combined, then stir in the mixed herbs, oregano, salt, and pepper.
- Mix in the diced tomato, chopped onion, ham, and grated cheese. Combine thoroughly so the fillings are evenly distributed rather than clumped in one area of the batter.
- Gradually add the self-raising flour, stirring well as you go until the mixture reaches a thick, uniform batter consistency.
- Pour the batter into a pie dish sized to fit your air fryer, scraping the sides of the mixing jug to make sure no batter is left behind.
- Place the pie dish in the air fryer basket and cook at 180°C (360°F) for 20 minutes.
- Reduce the temperature to 160°C (320°F) and continue cooking for an additional 10 minutes, or until a toothpick inserted into the center comes out clean.
- Let the quiche cool slightly before slicing. It can be served either warm or cold, depending on preference.
A Note on Equipment
A loose-bottom pie tin measuring around 20cm (8 inches) is well suited to this recipe, since it needs to fit inside the air fryer basket while still holding the full batter. If your particular air fryer tends to brown food primarily from the top, keep an eye on the quiche as it cooks and cover it loosely with foil if the top is browning faster than the center is setting.
Storage Guidance
Leftover quiche can be stored in an airtight container in the refrigerator for up to 3 days. Once cooled, it also holds up well as a portable, grab-and-go meal for work or packed lunches.
Part 2: Recipe Card
Crustless Quiche in the Air Fryer
Description: A quick, hassle-free crustless quiche made in the air fryer, using flour in the batter to create a pastry-free “crust.” Perfect as a main course, side dish, snack, or portable meal.
Duration:
- Prep Time: 5 minutes
- Cook Time: 30 minutes
- Total Time: 35 minutes
- Servings: 6
- Calories: 261 kcal
Ingredients:
- 125 g self-raising flour
- 5 large eggs
- 120 ml whole milk
- 1 medium tomato, diced
- 1 medium red onion, finely chopped
- 4 slices ham, chopped into chunks
- 85 g grated cheddar cheese
- 2 tsp mixed herbs
- 2 tsp dried oregano
- Salt and pepper, to taste
Instructions:
- Crack the eggs into a mixing jug. Add the milk and whisk well with a fork to create the quiche batter. Stir in the mixed herbs, oregano, salt, and pepper.
- Mix in the diced tomato, chopped onion, ham, and grated cheese. Combine thoroughly to ensure even distribution.
- Gradually add the self-raising flour to the mixture. Stir well until you achieve a thick batter.
- Pour the batter into a pie dish suitable for your air fryer. Scrape the sides of the mixing jug to ensure no batter is left behind.
- Place the pie dish in the air fryer basket. Set the temperature to 180°C (360°F) and cook for 20 minutes.
- Reduce the temperature to 160°C (320°F) and cook for an additional 10 minutes, or until a toothpick inserted into the center comes out clean.
- Let the quiche cool slightly before slicing. Serve warm or cold as desired.
Notes:
- Feel free to experiment with different fillings, such as spinach, mushrooms, bacon, or feta cheese.
- Cooking times may vary slightly depending on your air fryer model; adjust accordingly and check for doneness with a toothpick.
- Store leftover quiche in an airtight container in the refrigerator for up to 3 days.
Medical and Nutritional Disclaimer
The information provided in this recipe and guide is intended for general informational and educational purposes only and does not constitute medical, dietary, or nutritional advice. Nutritional values listed are automatically calculated estimates and should be used as an approximation only; actual values may vary based on specific ingredient brands, substitutions, and portion sizes used. This recipe is not intended to diagnose, treat, cure, or prevent any disease or health condition. Individuals with food allergies, dietary restrictions, or specific medical conditions should consult with a qualified healthcare provider or registered dietitian before making dietary changes or preparing this recipe. The author and publisher assume no responsibility for any adverse effects resulting from the use or application of the information contained herein.