The presentation of classic holiday hor d’oeuvres provides an exceptional opportunity to balance traditional flavors with visually engaging, high-protein options. While standard festive spreads often lean into dense carbs, incorporating structured, nutrient-dense finger foods can sustain energy levels during long celebrations.This professional guide details how to transform a standard deviled egg into a stunning, festive Turkey Deviled Egg. By combining a perfectly creamy, tangy yolk emulsion with crisply sliced bell pepper plumages, this dish acts as a light, high-protein appetizer. It serves as an engaging, low-pressure kitchen project where children can assist with tasks like peeling or adding facial features, fostering culinary curiosity during the holiday season.
Section 1: The Essential Ingredients and Structural Blueprint
Achieving clean, structurally stable deviled egg turkeys requires proper ingredient portioning and crisp decorative accents. This blueprint lists the precise functions of each component:
- 5 Large Fresh Eggs: The primary structural canvas. Hard-boiled precisely to yield firm, smooth egg whites and creamy, sulfur-free bright yellow yolks.
- 3 to 4 Tablespoons Avocado Oil Mayonnaise: The primary lipid base. It emulsifies the dry yolks into a smooth, velvety, and luxurious piping consistency.
- 1 Teaspoon Yellow Mustard: Introduces acidity and a bright, nostalgic tang to balance the rich fats of the yolk and mayonnaise.
- Sea Salt and Black Pepper: Fine-grain seasonings added entirely to taste to elevate the natural savoriness of the yolk mixture.
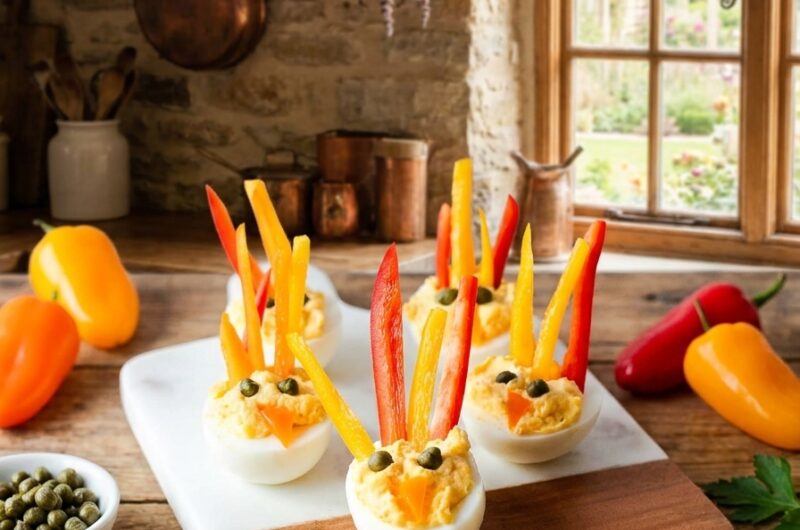
- Fresh Red and Yellow Bell Peppers: Sliced into paper-thin, rigid vertical strips to mimic colorful, upright “tail feathers” without tipping the egg over.
- 10 Whole Capers: Small, naturally brined green pearls that serve as distinct, kid-friendly “eyes” without requiring inedible plastic picks.
- 1 Small Orange Bell Pepper: Trimmed down cleanly into tiny, uniform triangles to act as the turkey’s signature beak.
Section 2: Step-by-Step Structural Assembly Instructions
Constructing clean, level deviled egg turkeys depends heavily on a strict thermal shock process and delicate assembly lines. Follow these consecutive execution phases:
Phase 1: Precision Boiling and Peeling
Place your 5 large eggs in a medium pot in a single layer, covering them with cold water by at least one inch. Bring the water to a gentle boil over medium-high heat. The moment the water reaches a full boil, turn off the heat completely, cover the pot with a tight-fitting lid, and let it sit undisturbed for 10 to 12 minutes. Immediately transfer the cooked eggs into a prepared bowl filled with ice water for 5 minutes. This rapid cooling shrinks the egg whites slightly away from the shell, allowing for seamless peeling without tearing the smooth exterior.
Phase 2: Emulsifying the Yolk Base
Gently peel the cooled eggs and slice them in half lengthwise using a clean, sharp chef’s knife. Carefully remove the cooked yolks and place them into a medium mixing bowl, setting the hollowed egg white vessels flat onto a clean serving platter. Add the avocado oil mayonnaise, yellow mustard, sea salt, and black pepper to the yolks. Using a stiff fork or an immersion blender, mash and whip the mixture thoroughly until it is completely smooth, creamy, and free of grainy lumps.
Phase 3: Piping and Structural Refinement
Spoon the creamy yolk mixture back into the center cavities of the egg whites. For a more polished, professional presentation, scrape the filling into a zip-top bag or piping bag fitted with a star tip, snipping the corner to create clean, elegant swirls that sit slightly above the rim of the egg white shell.
Phase 4: Plumage and Facial Artistry
Slice your fresh red and yellow bell peppers into very thin, uniform vertical matchsticks. Gently insert 3 to 4 pepper strips into the rear top edge of each stuffed egg yolk, fanning them out slightly to form the turkey’s vibrant tail plumage. Place two capers side-by-side onto the front face of the yolk swirl to establish the eyes. Finish the presentation by resting a tiny carved triangle of orange bell pepper right below the capers to serve as the beak. Serve cold.
Section 3: Professional Kitchen Secrets for Success
- The Aging Egg Strategy: Always choose eggs that have sat in your refrigerator for 1 to 2 weeks rather than farm-fresh ones. As an egg ages, it gradually loses moisture through its porous shell, increasing the inner air pocket and lowering its pH, which naturally prevents the white from fusing stubbornly to the shell during peeling.
- The Weight Slicing Law: Cut your decorative bell pepper strips as thinly as possible. Heavy or overly thick pepper slices will place too much top-heavy weight on the rear of the egg yolk, causing the delicate egg white base to tip backward or split open on your serving platter.
- The Piping Bag Alternative: If you do not own a professional piping bag or decorative tips, simply transfer your yolk filling into a heavy-duty storage bag. Push the mixture firmly toward one bottom corner, seal the bag completely, and snip a small diagonal cut across the very tip of that corner to create a functional, mess-free dispenser.
Section 4: Creative Culinary and Decorative Variations
Flavor Profiling Options
The classic egg yolk base can easily be modified to match your specific taste preferences or holiday theme:
- Spicy Turkey Version: Incorporate a small pinch of chipotle chili powder, a splash of sriracha, or a dash of cayenne pepper directly into the yolk emulsion for a warm kick.
- Smoked Paprika Style: Gently dust the tops of the finished eggs with high-quality smoked Spanish paprika to give a rustic, smoky depth that complements the crisp peppers.
- The Tangy Pickle Twist: Fold in one teaspoon of finely minced sweet pickle relish or a splash of clear dill pickle juice to introduce extra crunch and brightness.
- Dijon Refinement: Swap out the standard yellow mustard for a smooth Dijon or whole-grain mustard to add a sharp, sophisticated flavor profile.
Decorative Material Substitutions
If you need to pivot based on what is available in your pantry, utilize these excellent alternative components:
- Tail Feather Alternatives: Substitute thin, blanched carrot sticks, crisp green snap pea pods, celery slivers, or even baked strips of smoky turkey bacon for the bell pepper plumage.
- Facial Accent Swaps: Replace the capers with whole black sesame seeds, tiny slivers of sliced black olives, or small dots of thick black pepper paste.
Section 5: Long-Term Storage and Prep Guidelines
- The Deconstructed Make-Ahead Strategy: To ensure your appetizers remain pristine for Thanksgiving dinner, do not assemble the final turkeys a day ahead. Instead, hard-boil your eggs, mash the yolk filling, and store the filling in a tightly sealed container up to 24 hours in advance. Keep the empty egg white halves wrapped in a damp paper towel inside a sealed bag. Assemble the fresh pepper feathers and facial features right before serving.
- Standard Refrigerator Storage: Place any fully assembled leftover turkey deviled eggs in a single layer inside a rigid, airtight container. Keep refrigerated at or below 4°C (40°F) for up to 2 to 3 days. While the bell pepper decorations may soften slightly over time, the eggs will remain safe and delicious.
Section 6: Frequently Asked Kitchen Questions
Preventing a Dark Green Ring from Forming Around Egg Yolks
That unappealing grey-green discoloration is caused by an iron-sulfur reaction that occurs when an egg is boiled too long or at too high a temperature. Following the precise “boil, cover, and rest” method detailed in Section 2 completely prevents this reaction, ensuring your deviled egg filling retains a brilliant, clean golden color.
Ensuring the Stuffed Appetizer Platters Stay Completely Safe to Eat
Because deviled eggs utilize fresh eggs and mayonnaise, they should never sit out at room temperature for more than 2 hours. If your holiday gathering runs long, place your serving platter over a larger tray filled with crushed ice, or keep half of the batch chilled in the refrigerator, refilling the display tray as your guests enjoy them.
Section 7: Estimated Nutritional Profile
The values listed below are calculated approximations per individual serving based on dividing the completed master recipe into 5 individual 2-piece portions:
- Calories: 121 kcal
- Carbohydrates: 0.4 g
- Protein: 6 g
- Fat: 11 g
- Saturated Fat: 2 g
- Polyunsaturated Fat: 5 g
- Monounsaturated Fat: 3 g
- Trans Fat: 0.03 g
- Bakery Cholesterol: 167 mg
- Sodium: 127 mg
- Potassium: 64 mg
- Dietary Fiber: 0.04 g
- Sugars: 0.2 g
- Vitamin A: 244 IU
- Vitamin C: 0.004 mg
- Calcium: 26 mg
- Iron: 1 mg
Please Note: The nutritional information and dietary suggestions provided in this article are based purely on raw ingredient calculations and are intended for general educational and informational purposes only. Every individual’s health conditions, allergies, and dietary needs are completely different. Please consult with a qualified healthcare professional before making significant dietary changes.