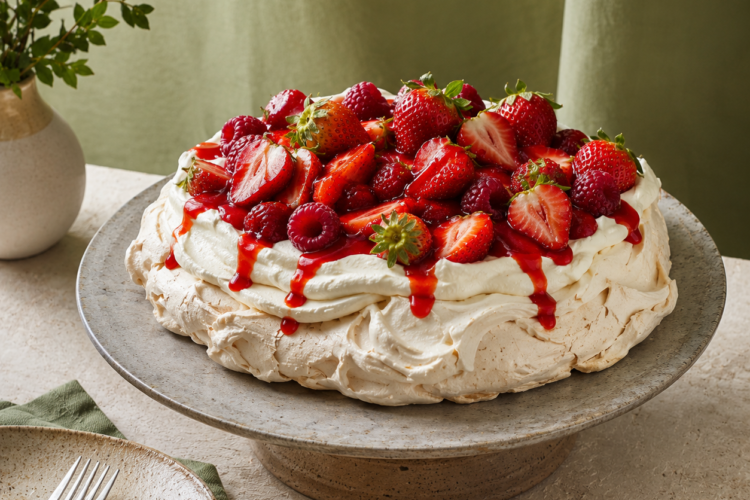
This Strawberry Pavlova recipe combines a crisp, delicate meringue shell with a soft, marshmallow-like center, crunchy walnuts, smooth dulce de leche, freshly whipped cream, and juicy sliced strawberries. Although pavlova looks like an elegant bakery dessert, the actual preparation is surprisingly manageable. The key is giving the egg whites enough time to whip properly, adding the sugar gradually, and allowing the baked meringue to cool slowly inside the oven.
Fresh strawberries bring brightness to the rich layers of cream and dulce de leche, while chopped walnuts add a subtle nutty crunch directly inside the meringue. Each component contributes a different texture, creating a dessert that is crisp, creamy, airy, fruity, and slightly crunchy at the same time. The recipe can be prepared as seven individual 5-inch pavlovas or shaped into one larger pavlova for sharing.
What Makes This Strawberry Pavlova Special?
Classic pavlova is known for its unusual combination of textures. The outside dries into a delicate, crisp shell during baking, while the center remains lighter and softer. This recipe builds on that traditional meringue foundation by folding one cup of chopped walnuts directly into the mixture before baking.
The finished meringue is then layered with one cup of dulce de leche, two cups of whipped heavy cream, and four cups of thinly sliced fresh strawberries. Dulce de leche contributes rich caramel flavor, whipped cream provides a light and creamy contrast, and strawberries bring freshness that balances the sweeter elements.
An Elegant Dessert with Simple Ingredients
Despite its impressive presentation, this homemade strawberry pavlova requires only six main ingredients. The meringue is made from egg whites, sugar, and walnuts, while the topping consists of heavy whipping cream, dulce de leche, and strawberries. There are no complicated cake batters, frostings, pastry doughs, or decorative techniques involved.
The technique matters more than the number of ingredients. Egg whites must be whipped correctly, sugar needs to dissolve gradually, walnuts should be folded in gently, and the meringue needs slow baking and cooling. Once these steps are understood, the dessert becomes much less intimidating and can be prepared for holidays, dinner parties, birthdays, summer gatherings, or other special occasions.
Understanding the Perfect Pavlova Texture
A well-made pavlova is not supposed to have the same texture from edge to center. The outside should become dry and crisp enough to provide a light crunch when sliced, while the inside retains a softer, airy, almost marshmallow-like quality. This contrast is one of the defining characteristics of pavlova.
Baking at a relatively low temperature of 285°F (140°C) helps create this effect. Rather than rapidly browning the meringue, the gentle heat gradually dries the exterior. After one hour of baking, the oven is switched off and the pavlova remains inside until completely cool. This slow transition in temperature helps preserve its delicate structure.
Why Walnuts Work in Pavlova
One cup of chopped walnuts is folded into the finished meringue before shaping. Walnuts introduce a light crunch and nutty flavor that contrasts with the otherwise airy texture of the pavlova. Their flavor also pairs particularly well with the caramel notes of dulce de leche.
The walnuts should be folded in rather than vigorously stirred. By the time they are added, considerable air has been incorporated into the egg whites, and rough mixing can remove that volume. A spatula and gentle folding motion allow the nuts to spread throughout the meringue while preserving as much of the airy structure as possible.
Fresh Strawberries for a Bright Finish
Four cups of thinly sliced strawberries create the fresh fruit layer on top of this pavlova. Strawberries work particularly well because their natural sweetness and slight tartness provide contrast to the sweet meringue and dulce de leche. Their bright red color also gives the finished dessert an attractive presentation without requiring elaborate decoration.
Prepare the strawberries close to assembly time rather than slicing them far in advance. Freshly sliced berries retain a firmer texture and fresher appearance. Once sliced fruit sits for an extended period, it can release moisture, which is something you want to minimize when serving it over a crisp meringue shell.
Dulce de Leche Adds Caramel Richness
One cup of dulce de leche is spread over the completely cooled pavlova before the whipped cream and strawberries are added. Its deep caramel flavor makes this version richer than a pavlova topped with fruit and cream alone. Because the meringue underneath is fragile, the consistency of the dulce de leche matters during assembly.
If preparing homemade dulce de leche, make it in advance and allow it to cool fully. Store-bought dulce de leche can also be used according to the supplied recipe. Let it come to room temperature before spreading so it becomes soft enough to move gently across the meringue without requiring heavy pressure that could break the shell.
Whipped Cream Balances the Sweetness
Two cups of heavy whipping cream create the light, creamy layer between the dulce de leche and fresh strawberries. The cream is whipped until soft peaks form rather than being beaten until extremely stiff. This gives the topping a smooth, airy consistency that complements the delicate meringue underneath.
For easier whipping, use chilled heavy cream and a cold mixing bowl. Stop once soft peaks form. Over-whipped cream can become grainy and heavy, while properly whipped cream remains smooth enough to spread gently over the dulce de leche without placing unnecessary pressure on the pavlova shell.
Preparing the Baking Sheet
Preheat the oven to 285°F (140°C) and line a baking sheet with parchment paper. If making individual pavlovas, use a 5-inch plate or cake pan as a guide to trace seven circles onto the parchment. Turn the paper over afterward so the pencil markings remain underneath rather than touching the meringue.
The same recipe can also be shaped as one larger rectangular pavlova. Choosing between individual portions and one large dessert mainly affects presentation. Individual pavlovas provide ready-made portions, while a single large pavlova can create a dramatic centerpiece that guests can slice at the table.
Why the Mixing Bowl Must Be Clean
Place four room-temperature egg whites in a completely clean, dry mixing bowl. This detail is important because even small traces of grease, oil, or moisture can interfere with the ability of egg whites to whip properly. The mixer attachments should also be clean and completely dry.
Room-temperature egg whites are recommended because they can whip efficiently and develop good volume. Beat them on medium speed until soft peaks begin forming. At this point, the egg whites should have expanded considerably and should look light and foamy, but they are not yet ready to support the finished pavlova structure.
How to Add Sugar Correctly
The recipe uses one cup, or 200 grams, of sugar. Rather than adding it all at once, incorporate the sugar approximately one tablespoon at a time while continuing to beat the egg whites. This gradual process helps the sugar dissolve and allows the meringue to become thick, smooth, glossy, and stable.
Continue beating for approximately six to eight minutes, until stiff peaks form. Test the mixture by rubbing a small amount between two fingers. If it feels gritty, the sugar has not fully dissolved and mixing should continue. A smooth texture is one of the best indicators that the meringue is ready for the walnuts.
How to Recognize Stiff Peaks
When the meringue reaches stiff peaks, lifting the mixer attachment should produce a peak that remains upright rather than immediately folding over. The mixture should also appear thick and glossy rather than loose or foamy. Reaching this stage provides the structure necessary for shaping and baking the pavlova.
Avoid stopping too early, because under-whipped egg whites may not provide enough stability. At the same time, careful attention prevents unnecessary over-whipping. Once stiff peaks are present and the sugar feels fully dissolved, stop beating and switch to a spatula for gently incorporating the chopped walnuts.
Folding Walnuts into the Meringue
Add the one cup of chopped walnuts to the prepared meringue. Use a spatula to gently fold them through the mixture until they are reasonably evenly distributed. Avoid vigorous circular stirring, which can deflate the egg whites and reduce the light texture developed during whipping.
Folding involves lifting meringue from the bottom of the bowl and gently turning it over the walnuts. Continue only until the nuts are distributed. The mixture does not need extended stirring. Preserving air at this stage contributes to the characteristic light interior of the finished strawberry pavlova.
Shaping Individual or Large Pavlovas
Spoon the walnut meringue onto the prepared parchment paper. If you traced circles, use those markings to guide the size of seven individual pavlovas. Alternatively, spread the entire mixture into one large rectangular shape. Use a spatula to form the edges and keep the center slightly flatter.
Creating a subtle depression or flatter area in the middle provides a natural place for the dulce de leche, whipped cream, and strawberries after baking. There is no need to make the edges perfectly uniform. Slight waves, peaks, and uneven areas contribute to pavlova’s characteristic homemade appearance.
How Long to Bake Pavlova
Bake the shaped meringue at 285°F (140°C) for one hour. Low, gentle heat allows the outside to dry and become crisp while helping the center retain its softer texture. Avoid frequently opening the oven door to inspect the pavlova because temperature fluctuations can interfere with its structure.
After the one-hour baking period, turn the oven off but leave the pavlova inside. Keep the door closed and allow the dessert to cool completely in the oven. This gradual cooling stage is an important part of the recipe rather than simply optional waiting time.
Why Pavlova Should Cool Inside the Oven
Meringue is sensitive to sudden changes in temperature. Moving a hot pavlova directly from the oven into a cooler kitchen can encourage excessive cracking or collapse. Leaving it inside the switched-off oven provides a much more gradual transition from baking temperature to room temperature.
Do not open the oven door during this cooling period. Small surface cracks may still develop, and that is completely normal. Pavlova naturally has a rustic appearance, so a few cracks should not be considered a failed dessert. The toppings will also cover much of the center when the pavlova is assembled.
Preparing the Cream and Strawberries
While the pavlova is cooling, prepare the toppings. Pour two cups of chilled heavy whipping cream into a cold bowl and beat until soft peaks form. Keep the cream refrigerated if the pavlova still needs significant cooling time. The meringue must be completely cool before any topping is added.
Hull and thinly slice four cups of strawberries shortly before assembly. Keeping the fruit preparation close to serving time helps prevent excess juice from collecting. Moisture is one of the main enemies of crisp meringue, so both the cream and strawberries should be added only when you are nearly ready to serve the dessert.
How to Assemble Strawberry Pavlova
Carefully move the completely cooled pavlova to a serving plate. Begin with the dulce de leche, spreading one cup gently across the surface. Use a light touch to avoid breaking the crisp meringue shell. Next, spoon the softly whipped heavy cream over the dulce de leche and spread it across the center.
Finish with the four cups of thinly sliced strawberries, arranging them generously over the cream. The red strawberries against the white cream create a naturally attractive finish. Once assembled, the dessert is ready to serve and does not require additional frosting, glaze, or decoration.
Why Pavlova Should Be Assembled Just Before Serving
Pavlova has its best texture shortly after the toppings are added. Whipped cream and strawberries contain moisture, and over time that moisture moves into the meringue and gradually softens its crisp exterior. For this reason, the baked shell can be prepared in advance, but final assembly is best left until close to serving.
This timing allows you to enjoy the full contrast of crisp shell, soft center, creamy toppings, and fresh fruit. If preparing the dessert for guests, have the strawberries sliced, cream whipped, and dulce de leche ready so assembly takes only a few minutes immediately before serving.
Are Cracks in Pavlova Normal?
Yes. Small cracks are a natural characteristic of pavlova and should not be treated as a serious problem. Meringue expands and contracts during baking and cooling, so a perfectly smooth, completely crack-free shell is not necessary for a successful dessert. The source specifically describes slight cracking as part of pavlova’s rustic charm.
If cracking becomes excessive, the oven temperature may be too high or the pavlova may have experienced a sudden temperature change. Accurate oven temperature and slow cooling inside the switched-off oven can reduce these problems, although they may not eliminate every crack.
Why Is My Pavlova Weeping?
Sticky liquid or small beads of moisture around a pavlova can indicate that it was slightly underbaked or exposed to high humidity. Sugar-rich meringue is sensitive to moisture in the surrounding air, so weather and kitchen conditions can affect the final result even when the recipe is followed carefully.
Giving the pavlova its full baking time and allowing it to cool correctly can help. If possible, prepare meringue desserts in relatively dry conditions. Humidity does not necessarily make the dessert inedible, but it can reduce the crispness that provides the characteristic contrast with the soft center.
Why Did My Pavlova Collapse?
A pavlova can collapse when the oven door is opened before it has cooled or when the egg whites have not been whipped correctly. Under-whipped whites may lack sufficient structure, while over-whipped egg whites can also become unstable. Adding the sugar gradually and stopping at properly formed stiff peaks helps reduce these risks.
Some sinking in the center is not necessarily a problem because the top will eventually hold dulce de leche, whipped cream, and strawberries. Focus more on obtaining a crisp exterior and soft interior than achieving a perfectly flat or symmetrical shape.
Why Is My Meringue Grainy?
Grainy meringue usually indicates that the sugar has not completely dissolved. Since this recipe contains one cup of sugar, adding it gradually is important. Continue beating after each addition rather than pouring the full amount directly into the egg whites.
Before folding in the walnuts, rub a little meringue between two clean fingers. It should feel smooth. If you can still detect sugar crystals, continue beating. This simple test is more reliable than judging the meringue by appearance alone because a mixture can look glossy while still containing undissolved sugar.
Is Strawberry Pavlova Gluten-Free?
Based on the supplied ingredient list, this strawberry pavlova does not contain wheat flour or another obvious gluten-containing grain. It can therefore fit naturally within a website’s Gluten-Free Recipes category when all packaged ingredients, particularly dulce de leche and other processed products, are verified as suitable for the reader’s gluten-free requirements.
The primary website category should still be Desserts, with Gluten-Free Desserts, Fruit Desserts, or Meringue Desserts working well as secondary categories. For readers searching online, phrases such as gluten-free strawberry pavlova, strawberry meringue dessert, and pavlova with fresh strawberries can naturally support the article’s SEO focus.
Best Occasions for Strawberry Pavlova
The combination of fresh strawberries, whipped cream, and crisp meringue makes this dessert particularly attractive for spring and summer entertaining. It can work well for birthdays, family gatherings, Mother’s Day, holiday meals, dinner parties, or occasions when you want a dessert that looks impressive without requiring elaborate cake decorating.
Individual pavlovas are useful for dinner parties because each guest can receive a complete dessert. A larger pavlova works better as a centerpiece for a family-style meal. Either presentation showcases the layers of white cream, caramel-colored dulce de leche, red strawberries, and crisp walnut meringue.
Notes for the Best Strawberry Pavlova
Use room-temperature egg whites and make sure the mixing bowl is completely clean, dry, and free from grease. Add the sugar one tablespoon at a time and continue beating until it is fully dissolved. Fold the walnuts gently rather than stirring them aggressively, and keep the oven door closed throughout the cooling process.
Wait until the pavlova has completely cooled before assembling it. Whip the heavy cream only to soft peaks and slice the strawberries close to serving time. Finally, add the dulce de leche, cream, and berries shortly before the dessert reaches the table. These details help preserve the contrast between crisp meringue and creamy toppings.
Why This Strawberry Pavlova Recipe Works
For readers searching for Strawberry Pavlova Recipe, Easy Strawberry Pavlova, Pavlova with Strawberries, Strawberry Meringue Dessert, Gluten-Free Pavlova, Pavlova with Whipped Cream, Walnut Pavlova, Fresh Strawberry Dessert, or Pavlova with Dulce de Leche, this recipe combines several appealing flavors in one elegant dessert.
The meringue uses only egg whites, sugar, and walnuts, while the topping requires heavy whipping cream, dulce de leche, and strawberries. Careful whipping, gradual sugar addition, low-temperature baking, and slow cooling create the desired meringue texture. Once topped with creamy dulce de leche, softly whipped cream, and fresh strawberries, the finished pavlova offers a beautiful balance of crisp, soft, creamy, fruity, and nutty textures.
Strawberry Pavlova
A beautiful Strawberry Pavlova featuring a crisp walnut meringue shell with a soft, marshmallow-like center.
7
servings20
minutes1
hour300
kcal1
hour20
minutesIngredients
- For the Pavlova
4 egg whites, at room temperature
1 cup (200 g) sugar
1 cup walnuts, chopped
- For the Toppings
2 cups heavy whipping cream
1 cup dulce de leche
4 cups strawberries, thinly sliced
Instructions
- Prepare the dulce de leche ahead of time and bring it to room temperature before assembly.
- Preheat the oven to 285°F (140°C).
- Line a baking sheet with parchment paper.
- For individual pavlovas, trace seven 5-inch circles and flip the parchment over.
- Beat the room-temperature egg whites in a completely clean, dry bowl until soft peaks form.
- Add the sugar 1 tablespoon at a time while continuing to beat.
- Beat for 6–8 minutes, until thick, glossy, and at stiff peaks.
- Check that the sugar has dissolved by rubbing a little meringue between your fingers.
- Gently fold the chopped walnuts into the meringue.
- Shape into seven individual rounds or one large pavlova.
- Bake for 1 hour.
- Turn off the oven and leave the pavlova inside until completely cool. Keep the door closed.
- Whip the chilled heavy cream until soft peaks form.
- Hull and thinly slice the strawberries.
- Transfer the cooled pavlova carefully to a serving plate.
- Gently spread the dulce de leche over the meringue.
- Spoon the whipped cream over the dulce de leche.
- Arrange the sliced strawberries generously over the top.
- Slice carefully with a sharp knife and serve immediately.