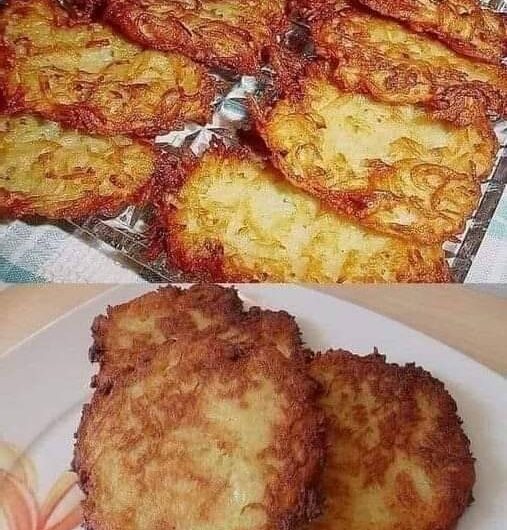
Potato pancakes — also known as latkes — are shredded potato and onion fritters that get pan-fried until the edges turn deeply golden and crisp while the inside stays soft and tender. They’re built from pantry staples: potatoes, onion, eggs, and a small amount of flour to bind everything together. There’s no soaking, boiling, or pre-cooking of the potatoes involved — the whole thing comes together raw, shredded, drained, and fried.
This is a straightforward one-component recipe, unlike layered pastries with separate elements to manage. The entire process is really just three phases: preparing the raw mixture, frying it in batches, and keeping everything warm until it’s time to serve. The recipe works equally well as a breakfast side, a brunch centerpiece, or an accompaniment to a main dish.
A gluten-free version is built directly into the recipe — potato starch can be used in place of the all-purpose flour with no other changes needed.
Getting Everything Ready
Because the frying stage moves fast once it starts, having everything shredded, mixed, and staged ahead of time makes a real difference here.
Equipment to have ready:
- A box grater or food processor with a grating attachment
- A clean kitchen towel or cheesecloth, for squeezing moisture out of the potatoes
- A large mixing bowl
- A large skillet
- A spatula, for flattening and flipping
- A plate lined with paper towels, for draining
- A low oven (200°F / 90°C), for keeping finished pancakes warm
Ingredients to have measured and ready:
- 4 large potatoes (Russet or Yukon Gold), peeled
- 1 small onion, grated or finely chopped
- 2 large eggs
- ¼ cup all-purpose flour, or potato starch for a gluten-free version
- 1 teaspoon salt
- ½ teaspoon black pepper
- ½ teaspoon garlic powder (optional)
- Oil for frying (vegetable, canola, or sunflower)
Optional garnishes to have on hand for serving: sour cream or Greek yogurt, applesauce, chopped chives or parsley.
The single most important prep step in this whole recipe is squeezing the water out of the grated potatoes. Skipping this, or being lazy about it, is the number one reason potato pancakes turn out soggy instead of crisp.
Workflow: How the Process Comes Together
This recipe doesn’t require the kind of multi-day planning that layered pastries do, but it does have a clear order that matters:
- Shred and drain the potatoes. This step needs to happen first and needs real effort — squeeze out as much liquid as the towel or cheesecloth will give up.
- Combine with the onion. The onion is mixed in right after the potatoes are drained, before any of the binding ingredients go in.
- Build the batter. Eggs, flour (or potato starch), salt, pepper, and optional garlic powder go in last, once the potato-onion base is ready.
- Fry in batches. The oil needs to be properly hot before the first batch goes in, and each pancake needs room in the pan — this is not a one-batch job for a full recipe.
- Keep warm while finishing the rest. A low oven holds the first batches at serving temperature while later batches cook.
Because frying happens in batches, the “keep warm in the oven” step isn’t optional if you want everything to hit the table hot at the same time — plan for it rather than treating it as an afterthought.
Approved Variations & Swaps
Based strictly on what’s built into this recipe, here are the adjustments it already allows for:
- Gluten-free swap: potato starch can replace the all-purpose flour directly, with no other changes to the recipe.
- Garlic powder is optional. It’s included for extra flavor but can be left out entirely without affecting the texture of the pancakes.
- Batter consistency adjustment: if the mixture is too wet to hold together when scooped, a little extra flour can be added to firm it up.
- Flavor add-ins: grated carrot, zucchini, or fresh herbs can be worked into the batter for a variation on the base recipe.
- Oil choice: vegetable, canola, or sunflower oil are all specified as suitable options for frying.
- Garnish choice: sour cream, Greek yogurt, applesauce, or fresh chopped chives or parsley can all be used to finish the dish, depending on preference.
No other ingredient substitutions are specified in the source recipe, so swaps to the potato variety, egg quantity, or core binding ingredients would be going beyond what’s actually been tested here.
Step-by-Step Frying Strategy
Frying is where potato pancakes succeed or fail, so it’s worth walking through carefully and separately from the main ingredient list.
Get the oil properly hot before anything goes in the pan. Pour enough oil into the skillet to cover the bottom by about ¼ inch, and heat it over medium-high until it’s shimmering. The reliable way to check readiness is to drop a small bit of batter in — it should sizzle immediately. If it doesn’t, wait longer; frying in oil that isn’t hot enough leads to greasy, limp pancakes instead of crisp ones.
Scoop consistent portions. About ¼ cup of batter per pancake keeps sizes even, which matters for cooking time — mismatched sizes mean some pancakes finish before others, forcing you to either pull some early or overcook others.
Flatten gently after placing in the oil. A light press with the spatula spreads the pancake out for even, crisp edges without compacting it so much that the center turns dense.
Fry 3 to 5 minutes per side, watching for a deep golden color rather than going strictly by the clock — stovetops vary, so adjust the heat if pancakes are browning too fast or too slow.
Don’t overcrowd the pan. Frying in batches, with space between pancakes, is what keeps the oil temperature stable and the crust crisp. Crowding the pan drops the oil temperature and steams the pancakes instead of frying them.
Drain immediately after frying. Moving cooked pancakes straight onto a paper-towel-lined plate pulls off excess surface oil before it has a chance to soak back in.
Hold in a low oven, not on the counter. Keeping finished batches in a 200°F (90°C) oven maintains crispness and warmth while later batches cook, rather than letting the first pancakes cool and go soft while you finish the rest.
Potato Pancakes (Crispy Homemade Latkes)
Description: Crispy, golden potato pancakes with a tender interior, made from shredded potatoes, onion, egg, and a small amount of flour, then pan-fried until deeply browned. A gluten-free version can be made by swapping in potato starch. Works well for breakfast, brunch, or as a side dish.
Ingredients
- 4 large potatoes (Russet or Yukon Gold), peeled
- 1 small onion, grated or finely chopped
- 2 large eggs
- ¼ cup all-purpose flour (or potato starch for gluten-free)
- 1 teaspoon salt
- ½ teaspoon black pepper
- ½ teaspoon garlic powder (optional)
- Oil for frying (vegetable, canola, or sunflower)
Optional garnishes: sour cream or Greek yogurt, applesauce, chopped chives or parsley
Instructions
- Peel and grate the potatoes. Squeeze out as much moisture as possible using a clean kitchen towel or cheesecloth.
- Combine the drained potatoes with the grated onion in a large mixing bowl.
- Add the eggs, flour (or potato starch), salt, pepper, and garlic powder if using. Mix until the batter holds together; add a little extra flour if it’s too wet.
- Heat oil in a large skillet (about ¼ inch deep) over medium-high until shimmering — test with a small drop of batter, which should sizzle immediately.
- Scoop about ¼ cup of batter per pancake into the hot oil, flatten slightly, and fry 3–5 minutes per side until golden brown and crispy.
- Drain on paper towels and keep warm in a 200°F (90°C) oven while frying the remaining batches.
- Serve hot, garnished with sour cream, applesauce, or fresh herbs as desired.
Notes
- Removing excess moisture from the grated potatoes is essential for crispiness.
- Keep pancake sizes uniform for even cooking.
- Use a non-stick or well-seasoned skillet to prevent sticking.
- Don’t overcrowd the pan — fry in batches.
- Store leftovers in an airtight container in the refrigerator for up to 2 days.
- Reheat in a skillet over medium heat or in an air fryer at 350°F (175°C) for 3–5 minutes; avoid microwaving, as it can make the pancakes soggy.
Disclaimer: This recipe is provided for general informational purposes only and does not constitute medical or dietary advice. Individuals with food allergies, dietary restrictions, or specific health conditions (including but not limited to gluten sensitivities and egg allergies) should consult a qualified healthcare provider or registered dietitian before preparing or consuming this recipe. This recipe involves hot oil and frying; please take appropriate care and food safety precautions. Neither the author nor the publisher assumes responsibility for any adverse effects resulting from the preparation or consumption of this recipe.