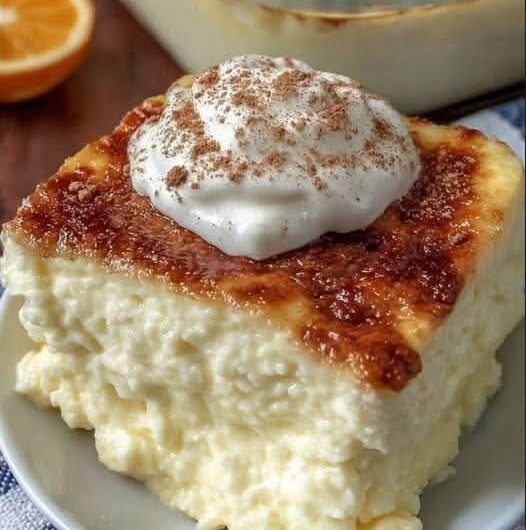
This is a classic baked custard built on three pantry staples: eggs, sweetened condensed milk, and hot water. There’s no heavy cream, no complicated technique, and no special equipment beyond ramekins (or a baking dish) and a larger tray for a water bath. It’s the kind of dessert that rewards patience rather than skill — the ingredients are simple, but the method is what determines whether you end up with a silky, spoonable custard or a rubbery, overbaked one.
The condensed milk does a lot of the heavy lifting here. Because it’s already sweetened and concentrated, it gives the custard its rich flavor and creamy body without needing added sugar or dairy cream. The eggs are the structural backbone — they set the custard as it bakes, transforming a loose liquid mixture into something sliceable and smooth.
This is also a genuinely flexible dessert in terms of serving. It works warm, straight from the oven with a dusting of nutmeg, or chilled the next day, when many people find the flavor actually improves as it rests.
Understanding the Texture: How Custard Actually Works
Custard is a balancing act between two ingredients doing opposite jobs. The eggs thicken and set the mixture as heat is applied; the milk keeps everything creamy and loose enough that the final texture stays soft rather than firm like a cake. Get the ratio and the heat right, and you get a smooth, silky set. Get it wrong — too much heat, too fast — and the eggs overcook, seizing into curds instead of setting evenly.
This is exactly why the water bath (bain-marie) matters so much. Baking the ramekins or dish inside a larger tray of hot water insulates the custard from the oven’s direct, harsher heat. Instead of blasting the eggs with high, uneven temperatures, the water bath keeps the heat gentle and consistent all the way around the dish, which is what allows the custard to set slowly and evenly rather than curdle.
Prep and Setup
Before mixing anything, get your setup in order — this recipe has a few steps that go faster with everything staged ahead of time:
- Oven: preheat to 325°F (160°C) before you start mixing. A properly preheated oven is part of what keeps the bake gentle and even from the first minute.
- Two mixing bowls: one for the condensed milk and hot water, one for the eggs. Keeping these separate until the tempering step is what protects the eggs from scrambling.
- Ramekins or a 2-quart baking dish: choose based on how you want to serve it — individual ramekins for portioned servings, or one larger dish if you’re serving custard as a shared dessert (note this changes the bake time — more on that below).
- A larger baking tray: needed to hold the water bath. It has to be big enough to fit your ramekins or dish with room around the edges for water.
- Hot water: for both the condensed milk mixture and the water bath itself — have a kettle or a pot ready so you’re not scrambling for hot water mid-recipe.
- Nutmeg: set aside for garnish at the end.
Workflow: How the Steps Actually Flow
1. Preheat first. The custard’s gentle, even set depends on the oven already being at temperature when the dish goes in.
2. Combine condensed milk and hot water. Mixing these together first, before the eggs enter the picture, means you’re diluting the concentrated condensed milk into a lighter, pourable liquid — this is the “milk” component of the custard.
3. Whisk the eggs separately until light and slightly frothy. This step aerates the eggs just enough to help them blend smoothly with the milk mixture in the next step, without overbeating them.
4. Temper the eggs. This is the most important technical step in the whole recipe. Add the warm milk mixture into the eggs slowly, a small amount at a time, stirring continuously. Warm liquid added too fast, or too hot, will start cooking the eggs on contact — you’d end up with bits of cooked egg in your custard instead of a smooth mixture. Gradual addition raises the eggs’ temperature slowly enough that they stay liquid and blend evenly.
5. Add vanilla extract and salt. Stirred in once the eggs and milk mixture are fully combined — this rounds out the flavor of the custard base.
6. Pour into ramekins or a baking dish. How you portion it here determines your final bake time (see below).
7. Set up the water bath. Place your filled ramekins or dish inside the larger tray, then pour hot water into the tray itself — about half an inch deep. The water goes around the dish, not into it.
8. Bake low and slow. At 325°F (160°C), gentle heat is what allows the eggs to set without cracking or curdling.
9. Test for doneness with a knife. Insert it into the center — a clean blade means the custard has set properly.
10. Cool before serving. About an hour of cooling lets the custard finish setting and makes it easier to serve cleanly, whether you serve it warm or chill it further.
Component Organization: What Each Ingredient Is Doing
- Structure: eggs. They’re what transforms this from a sweet milk mixture into a custard with a set, sliceable texture.
- Creaminess and sweetness: sweetened condensed milk and hot water. Together, they form the “milk” base — condensed milk provides richness and sweetness in one ingredient, while the hot water dilutes it to the right consistency.
- Flavor: vanilla extract, salt, and nutmeg. Vanilla and salt go into the base itself to round out the flavor; nutmeg is reserved for garnish at the very end, added after baking and cooling.
Approved Variations and Enhancements (Based Strictly on the Recipe)
The source material outlines several ways to adjust the flavor while keeping the core method and ingredients intact:
- Add a pinch of cinnamon alongside the nutmeg for a spiced version.
- Use pure vanilla extract for a richer, more pronounced aroma.
- Lightly caramelize sugar at the base of the ramekins before adding the custard mixture, for a flan-style twist.
- Add citrus zest — lemon or orange — for a brighter, more refreshing note.
These are additions layered onto the existing base; the original ingredient list and method stay the same regardless of which enhancement you choose.
Serving Ideas
- Warm, with a sprinkle of nutmeg on top, for a comforting, straight-from-the-oven treat.
- Chilled in the refrigerator, for a cooler, more refreshing dessert.
- Paired with fresh fruit, like berries or sliced apples.
- Alongside tea or coffee, as a light after-meal sweet.
Storage and Shelf Life
- Refrigerate in an airtight container for up to 3 days.
- Cover ramekins with plastic wrap to keep them fresh.
- Avoid freezing — it affects the texture.
- Chilled custard often tastes even better the next day, once the flavors have had time to develop.
Common Mistakes to Avoid
- Overbaking, which makes the custard rubbery instead of silky.
- Skipping the water bath, which can cause uneven texture and cracking.
- Using very high heat, which leads to curdling.
- Not straining the mixture (an optional step), which can leave air bubbles in the finished custard.
Step-by-Step Assembly Strategy
- Preheat the oven to 325°F (160°C).
- Mix condensed milk with hot water in one bowl.
- Whisk eggs in a separate bowl until light and slightly frothy.
- Slowly temper the eggs by adding the warm milk mixture in small amounts, stirring continuously.
- Fully combine, then mix in vanilla extract and salt.
- Pour into ramekins or a 2-quart baking dish.
- Set the dish inside a larger tray and add hot water to the tray, about half an inch deep.
- Bake about 1 hour (ramekins) or about 1 hour 40 minutes (larger dish), until a knife inserted in the center comes out clean.
- Cool for about an hour.
- Garnish with nutmeg and serve warm or chilled.
Creamy Baked Egg Custard with Condensed Milk
Description: A classic baked custard recipe that is smooth, comforting, and incredibly simple to prepare. Made using basic pantry staples like eggs, milk, and vanilla, this traditional custard delivers a delicate texture and rich flavor that feels luxurious despite its simplicity. Serve it warm on a cozy evening or chilled as a refreshing treat.
Duration: 5 min read (prep and bake time as detailed in Instructions below)
Ingredients:
- 1 can (14 ounces) sweetened condensed milk
- 4 cups hot water
- 6 eggs
- 2 teaspoons vanilla extract
- 1/4 teaspoon salt
- Nutmeg (for garnish)
Instructions:
- Preheat your oven to 325°F (160°C).
- In a bowl, mix the condensed milk with hot water until well combined.
- In another bowl, whisk the eggs until they become light and slightly frothy.
- Slowly add a small amount of the warm milk mixture into the eggs, stirring continuously to blend smoothly. Then combine everything fully.
- Add vanilla extract and salt, mixing well.
- Pour the mixture into ramekins or a 2-quart baking dish.
- Place the filled dish into a larger baking tray and pour hot water into the tray (about half an inch deep) to create a water bath.
- Bake for about 1 hour, or until a knife inserted in the center comes out clean. If using a larger dish, bake for about 1 hour 40 minutes.
- Remove from the oven and let it cool for about an hour.
- Sprinkle nutmeg on top and serve warm or chilled.
Notes:
- Can I make this custard without an oven? Yes — it can be steamed on the stovetop using a covered pot, similar to traditional steamed custard methods.
- Why is my custard watery? It may be undercooked — bake a bit longer until properly set.
- Can I make it ahead of time? Yes — it’s perfect for preparing a day in advance and serving chilled.
Medical Disclaimer: This recipe and the accompanying content are provided for general informational and culinary purposes only and are not intended as medical, nutritional, or dietary advice. Nutritional needs vary from person to person, and individuals with food allergies, intolerances, medical conditions, or specific dietary requirements should consult a qualified healthcare professional or registered dietitian before preparing or consuming this recipe. Cooking times and temperatures may vary depending on individual equipment; always ensure food is cooked to a safe internal temperature before serving. The creator of this content assumes no liability for any adverse reactions, allergic responses, or health outcomes resulting from the preparation or consumption of this recipe.