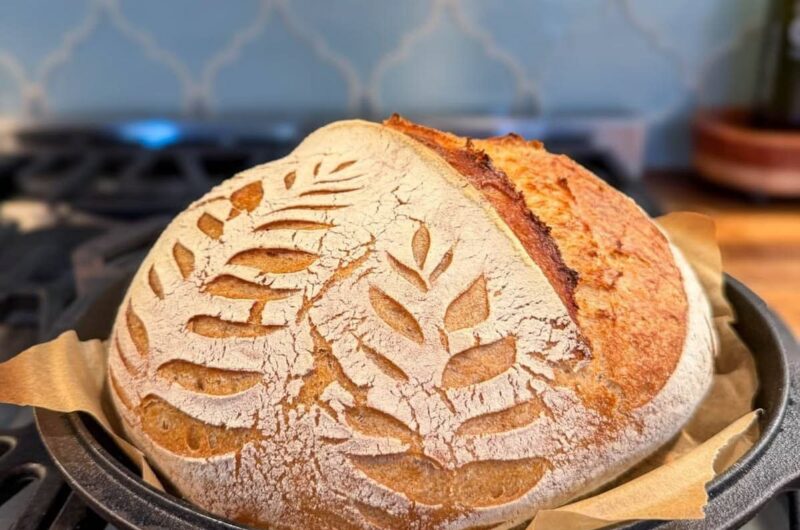
This is a rustic sourdough bread recipe that skips traditional kneading entirely, relying instead on time and fermentation to develop the gluten naturally. The result is an artisan-style loaf with a crisp, golden crust and a soft, airy, chewy interior, made from just an active sourdough starter, water, flour, and salt. Because there’s no kneading involved, this recipe is approachable for beginners while still producing genuinely bakery-quality bread.
The process spans a full day or more once you account for bulk fermentation and proofing, but almost none of that time is hands-on — most of it is simply waiting while the dough develops flavor and structure on its own. It pairs well with soups, sandwiches, or simply toasted with butter and jam.
Getting Everything Ready
Because this recipe depends on an active starter and a series of timed rest periods, having your starter properly fed and your equipment ready before you begin mixing sets the whole process up for success.
Equipment to have ready:
- A large mixing bowl
- A Dutch oven or heavy baking pot with a lid
- A banneton basket or a bowl lined with a towel
- Parchment paper
- A kitchen scale (recommended)
Ingredients to have ready:
- 100g active sourdough starter
- 350g warm water
- 500g bread flour
- 10g salt
Optional: rice flour or cornmeal for dusting, extra flour for shaping.
Feeding your starter 4 to 6 hours before mixing the dough is a genuinely important prep step — a ready starter should double in size and pass the float test, where a small spoonful placed in water floats rather than sinking. Skipping this check risks starting the whole process with a starter that isn’t active enough to properly rise the dough.
Workflow: How the Process Comes Together
This recipe moves through several distinct stages, most of which involve waiting rather than active work:
- Feed the starter several hours ahead of time and confirm it’s active.
- Mix the dough until no dry flour remains, then rest briefly.
- Stretch and fold the dough several times over about 2 hours, instead of kneading.
- Bulk ferment for 8 to 12 hours, or overnight.
- Shape the dough into a round loaf.
- Proof again, either at room temperature or in the refrigerator overnight.
- Preheat a Dutch oven to a very high temperature.
- Score and bake, covered then uncovered.
- Cool completely before slicing.
Because the dough needs long, largely unattended stretches of time at several points, this is a recipe that benefits from planning around your schedule — starting the dough in the morning for an overnight bulk ferment, for example, rather than trying to compress the timeline.
Approved Variations & Swaps
Based strictly on what’s built into this recipe, here are the adjustments it already allows for:
- Dusting flour: rice flour or cornmeal can be used for dusting the banneton or work surface.
- Proofing method: the shaped dough can proof at room temperature for 1 to 2 hours, or be refrigerated overnight for even more developed flavor.
- Cold proofing: refrigerating overnight not only develops deeper flavor but also makes scoring the dough easier.
No other ingredient substitutions are specified in the source recipe, so changes beyond these listed adjustments would go beyond what’s actually described here — this is a genuinely minimal-ingredient bread where technique and timing matter far more than ingredient swaps.
Step-by-Step Fermentation and Baking Strategy
A number of specific technique choices and timing decisions are what separate a properly risen, well-textured sourdough loaf from a dense or under-fermented one.
Confirm your starter is truly active before mixing. The float test is a simple, reliable check — if a spoonful of starter floats in water, it has enough gas production to properly leaven the dough. Using an underdeveloped starter is one of the most common reasons homemade sourdough doesn’t rise well.
Expect the dough to look shaggy and sticky after the initial mix. This is completely normal at this stage — the dough hasn’t yet developed the structure it will gain through the stretch-and-fold process, so don’t judge it against a smooth, kneaded dough.
Perform the stretch-and-fold sequence with wet hands. Wetting your hands slightly prevents the sticky dough from clinging to you during each fold, making the process cleaner and easier to repeat consistently across all four folds per round.
Repeat the stretch-and-fold process 3 to 4 times over about 2 hours, with rests in between. Each round of folding, followed by a 30-minute rest, is what builds the dough’s elasticity in place of kneading — you should notice the dough becoming visibly smoother and more elastic after each round.
Let bulk fermentation run its full course, watching for visual cues. The dough should become puffy, airy, and roughly double in size, with small bubbles appearing on the surface — these are signs that fermentation is genuinely progressing, and the 8 to 12 hour window gives room for your kitchen’s specific temperature to determine the exact timing.
Handle the dough gently during shaping. Avoid pressing out too much of the air that’s developed during fermentation — folding the edges toward the center and then gently tightening the surface by pulling the dough toward you preserves the structure you’ve built rather than deflating it.
Preheat the Dutch oven for a full 30 minutes at 475°F (245°C). A properly hot Dutch oven is what creates the steam environment responsible for the bread’s crisp, artisan-style crust — starting with an underheated pot compromises this effect.
Score the dough right before baking, not earlier. Cutting the surface with a sharp knife or bread lame allows the bread to expand in a controlled way during baking, rather than tearing unpredictably at a weak point.
Bake covered first, then uncovered. The initial 30 minutes with the lid on traps steam around the dough, while the final 15 to 20 minutes uncovered is what allows the crust to develop its deep golden-brown color.
Confirm doneness by sound, not just color. The bread should sound hollow when tapped on the bottom — this is a more reliable indicator that the interior is fully baked than color alone.
Cool for at least an hour before slicing. As tempting as it is to cut into a fresh loaf right away, this cooling period allows the crumb to finish setting properly — slicing too early can result in a gummier texture than the bread would otherwise have.
No-Knead Sourdough Bread
Description: A rustic artisan loaf with a crisp, golden crust and a soft, airy, chewy interior, made without any kneading. Naturally fermented for deep, tangy flavor using just a sourdough starter, water, flour, and salt.
Ingredients
- 100g active sourdough starter
- 350g warm water
- 500g bread flour
- 10g salt
Optional: rice flour or cornmeal for dusting; extra flour for shaping
Instructions
- Feed your sourdough starter 4 to 6 hours before mixing the dough, until it’s active, bubbly, and passes the float test.
- In a large bowl, combine the active starter and warm water, stirring until dissolved. Add the bread flour and salt, mixing until no dry flour remains. The dough will look shaggy and sticky. Cover and rest for 30 minutes.
- Wet your hands slightly, stretch one side of the dough upward, and fold it over itself. Rotate the bowl and repeat 4 times. Cover and rest for 30 minutes. Repeat this stretch-and-fold process 3 to 4 times over the next 2 hours.
- Cover the bowl and let the dough bulk ferment at room temperature for 8 to 12 hours, until puffy, airy, and roughly doubled in size, with small bubbles on the surface.
- Lightly flour your work surface and turn out the dough. Shape into a round loaf by folding the edges toward the center, then tighten the surface by pulling gently toward you. Place seam-side up into a floured banneton basket or towel-lined bowl.
- Cover and proof for 1 to 2 hours at room temperature, or refrigerate overnight for more flavor.
- Place a Dutch oven in the oven and preheat to 475°F (245°C) for at least 30 minutes.
- Transfer the dough onto parchment paper, dust off excess flour, and score the top with a sharp knife or bread lame. Carefully place into the hot Dutch oven, cover with the lid, and bake for 30 minutes.
- Remove the lid and bake another 15 to 20 minutes, until the crust is deep golden brown and the bread sounds hollow when tapped.
- Transfer to a wire rack and cool for at least 1 hour before slicing.
Notes
- A strong, active starter is essential for good rise and flavor.
- Don’t rush fermentation — longer fermentation develops better texture and a more pronounced tangy flavor.
- Handle the dough gently during shaping to avoid pressing out too much air.
- Refrigerating the shaped dough overnight creates deeper flavor and makes scoring easier.
- Store at room temperature in a paper bag or bread box for up to 3 days. For longer storage, slice and freeze for up to 2 months, and toast slices directly from frozen.
- Avoid storing sourdough in the refrigerator, as it can dry out quickly.
- Serve with butter and honey, alongside soup or stew, in grilled cheese sandwiches, toasted with avocado, or dipped in olive oil and balsamic vinegar.
Disclaimer: This recipe is provided for general informational purposes only and does not constitute medical or dietary advice. Individuals with gluten sensitivities, wheat allergies, or other dietary restrictions should consult a qualified healthcare provider or registered dietitian before preparing or consuming this recipe. This recipe involves a very hot Dutch oven and oven equipment; please take appropriate care and handle hot equipment safely. Neither the author nor the publisher assumes responsibility for any adverse effects resulting from the preparation or consumption of this recipe.