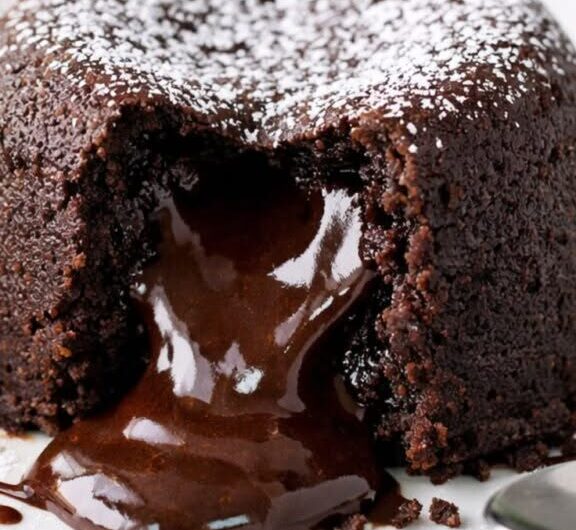
Molten lava cake is defined by one dramatic contrast: a delicate, fully-baked cake exterior surrounding a warm, gooey chocolate center that flows out like molten lava when the cake is cut open. Despite its restaurant-quality appearance, it comes together with simple ingredients and a technique that hinges on precise timing rather than complicated steps. The entire process — melting chocolate and butter, whisking eggs with sugar, combining the two, folding in flour, and baking for a very specific window of time — is what creates that signature liquid center.
Because the difference between a molten center and a fully baked cake comes down to just a couple of minutes in the oven, this is a dessert where attention to detail during baking matters more than almost any other step.
Understanding the Components
Before starting, it helps to separate this recipe into its two working parts:
1. The Melted Chocolate and Butter High-quality dark chocolate and unsalted butter are melted together over a double boiler (or in short microwave bursts) until smooth and glossy, then cooled slightly before use.
2. The Egg and Sugar Mixture Eggs, egg yolks, granulated sugar, vanilla extract, and a pinch of salt are whisked vigorously until pale, thick, and slightly frothy. This whisking incorporates air, which contributes to the cake’s delicate texture.
These two components are combined by slowly pouring the warm chocolate mixture into the egg mixture while whisking continuously, then flour is sifted over the top and folded in gently to finish the batter.
Kitchen Workflow: The Order That Actually Saves Time
Here’s the most efficient order to work through this recipe:
Step 1 — Preheat the oven and prep the ramekins. Preheat your oven to 425°F (220°C). Lightly grease four ramekins with butter and dust them with a small amount of cocoa powder or flour. This ensures the cakes release easily after baking and helps maintain their shape when served.
Step 2 — Melt the chocolate and butter. Place the dark chocolate and butter in a heatproof bowl set over a pot of gently simmering water, making sure the bottom of the bowl doesn’t touch the water. Stir continuously until melted into a smooth, glossy mixture. Alternatively, melt in the microwave using short intervals, stirring between each to prevent overheating. Once fully melted, remove from heat and let cool slightly.
Step 3 — Whisk the egg mixture. In a separate mixing bowl, combine the eggs, egg yolks, granulated sugar, vanilla extract, and a pinch of salt. Whisk vigorously until pale, thick, and slightly frothy.
Step 4 — Combine the two mixtures. Slowly pour the warm chocolate mixture into the egg mixture while whisking continuously. Mixing gradually prevents the eggs from scrambling and ensures a smooth, silky batter.
Step 5 — Fold in the flour. Gently sift the flour over the mixture and fold it in carefully until no dry streaks remain. Avoid overmixing, as excessive stirring can result in a denser cake.
Step 6 — Fill the ramekins and bake. Divide the batter evenly among the prepared ramekins, filling each about three-quarters full. Bake for approximately 10 to 12 minutes, depending on your oven. The edges should appear firm and set while the center remains slightly soft and jiggly.
Step 7 — Rest and unmold. Remove the cakes from the oven and let them rest for one minute. Run a small knife carefully around the edges of each ramekin to loosen the cakes, then place a serving plate upside down over each ramekin and gently invert the cake onto the plate.
Preheating the oven and prepping the ramekins first, before starting on the chocolate, means everything is ready to go the moment the batter is finished — there’s no risk of the batter sitting too long and losing the air incorporated during whisking.
Component Organization: Setting Up Your Station
A clear setup supports the precise timing this recipe requires:
- Four ramekins — greased with butter and dusted with cocoa powder or flour, ready before you start cooking
- A heatproof bowl and a pot of simmering water (or a microwave-safe bowl) — for melting the chocolate and butter
- A separate mixing bowl — for whisking the eggs, egg yolks, sugar, vanilla, and salt
- A whisk — for both the egg mixture and for combining it with the melted chocolate
- A sifter — for adding the flour gently, minimizing lumps
- A baking tray — for holding the filled ramekins as they go into the oven
- A small knife — for loosening the baked cakes before unmolding
- Serving plates — ready for the inversion step immediately after baking
Having the ramekins prepped and the oven preheated before you even start melting the chocolate means the batter can go straight into the oven the moment it’s ready, without any delay that could cause it to lose volume.
Step-by-Step Assembly Strategy
Assembly and baking are where precision matters most in this recipe:
- Fill each ramekin to about three-quarters full with the finished batter, dividing it as evenly as possible across all four.
- If desired, place a small piece of chocolate in the center of each ramekin before baking — this optional technique creates an even more dramatic molten effect when the cakes are cut open.
- Place the filled ramekins on a baking tray and transfer to the preheated oven immediately.
- Watch the baking time closely — 10 to 12 minutes is the target window, and the edges should look firm and set while the center remains slightly soft and jiggly. This precise timing is crucial, since overbaking results in a fully cooked center rather than the signature molten core.
- Let the baked cakes rest for one minute before unmolding — this brief rest makes them easier to handle without falling apart.
- Run a small knife around the edges of each ramekin to loosen the cake, then invert onto a serving plate and lift the ramekin away carefully to reveal the finished cake.
Presentation and Serving
For the best presentation, dust the cakes lightly with powdered sugar and garnish with fresh strawberries, raspberries, or a few mint leaves. A scoop of vanilla ice cream is a especially popular accompaniment, since its cold, creamy texture contrasts beautifully with the warm chocolate center.
As the cake is cut into, the molten chocolate should flow slowly onto the plate, creating the dramatic effect that gives this dessert its name. The combination of warm cake, liquid chocolate, and cold ice cream creates a balance of flavors and temperatures that feels both luxurious and satisfying.
Make-Ahead Flexibility
One of the greatest advantages of this dessert is its versatility for entertaining. The batter can be prepared several hours in advance and stored in the refrigerator until ready to bake, making it an excellent choice for dinner parties and special occasions — the cakes can be baked fresh just before serving, so guests get the full molten effect at the table.
Variations to Try
- Espresso-Enhanced: Add espresso powder to intensify the chocolate flavor.
- Citrus Twist: Incorporate orange zest for a bright, citrusy note.
- Flavored Chocolate Versions: Use flavored chocolates to create unique takes on the classic.
- White Chocolate Lava Cakes: A popular alternative using white chocolate instead of dark.
- Caramel-Filled Lava Cakes: Another popular variation that offers a different flavor experience while keeping the same dramatic presentation.
What Makes This Recipe Succeed
The success of this dessert depends largely on timing and attention to detail. Using room-temperature eggs, high-quality chocolate, and accurate baking times can make a significant difference in the final result. Every element works together to create a dessert that’s rich without being overwhelming, elegant without being complicated, and impressive without requiring professional baking skills. The texture should be tender and moist on the outside, while the center remains irresistibly smooth and liquid.
Practical Notes for Best Results
- Use high-quality dark chocolate with a rich cocoa content — the quality of the chocolate plays a significant role in the final flavor.
- Whisk the egg mixture until genuinely pale, thick, and slightly frothy, since this incorporates the air that gives the cake its delicate texture.
- Pour the warm chocolate into the egg mixture slowly and whisk continuously, to prevent the eggs from scrambling.
- Fold the flour in gently and stop as soon as no dry streaks remain — overmixing at this stage can make the cake denser.
- Watch the baking time closely rather than relying solely on a set number — the edges should be firm while the center stays soft and jiggly.
- Let the cakes rest for one minute before unmolding, so they hold together properly when inverted.
Part 2: Straightforward Recipe Card
Molten Chocolate Lava Cake
Description: A rich, indulgent dessert featuring a delicate cake exterior surrounding a warm, gooey chocolate center that flows like molten lava when cut open. Restaurant-quality, yet achievable at home with simple ingredients.
Servings: 4
Ingredients:
- 170 grams (6 ounces) high-quality dark chocolate
- 115 grams (½ cup) unsalted butter
- 2 large eggs
- 2 large egg yolks
- ¼ cup granulated sugar
- 1 teaspoon vanilla extract
- A pinch of salt
- ¼ cup all-purpose flour
- Optional: a small piece of chocolate per ramekin, for an extra-dramatic molten center
Instructions:
- Preheat your oven to 425°F (220°C). Lightly grease four ramekins with butter and dust them with a small amount of cocoa powder or flour.
- Place the dark chocolate and butter in a heatproof bowl set over a pot of gently simmering water, ensuring the bottom of the bowl doesn’t touch the water. Stir continuously until melted into a smooth, glossy mixture. (Alternatively, melt in the microwave in short intervals, stirring between each.) Remove from heat and let cool slightly.
- In a separate mixing bowl, combine the eggs, egg yolks, granulated sugar, vanilla extract, and a pinch of salt. Whisk vigorously until pale, thick, and slightly frothy.
- Slowly pour the warm chocolate mixture into the egg mixture while whisking continuously.
- Gently sift the flour over the mixture and fold it in carefully until no dry streaks remain. Avoid overmixing.
- Divide the batter evenly among the prepared ramekins, filling each about three-quarters full. Optionally, place a small piece of chocolate in the center of each ramekin.
- Place the ramekins on a baking tray and bake for approximately 10 to 12 minutes, until the edges are firm and set while the center remains slightly soft and jiggly.
- Remove from the oven and let rest for one minute. Run a small knife around the edges of each ramekin to loosen the cakes. Place a serving plate upside down over each ramekin and gently invert to unmold.
- Dust with powdered sugar and garnish with fresh strawberries, raspberries, or mint leaves. Serve immediately, ideally with a scoop of vanilla ice cream.
Notes:
- The batter can be prepared several hours in advance and stored in the refrigerator until ready to bake, making this a great make-ahead option for dinner parties.
- Variations: add espresso powder for a deeper chocolate flavor, orange zest for a citrus note, or try white chocolate or caramel-filled versions.
- Baking time is precise — overbaking results in a fully cooked center rather than the signature molten core, so watch closely during the last few minutes.
Medical Disclaimer: The information provided in this document is for general informational and educational purposes only and is not intended as, and should not be substituted for, professional medical or nutritional advice, diagnosis, or treatment. This recipe involves a deliberately underbaked center; individuals who are pregnant, immunocompromised, elderly, or otherwise at higher risk from undercooked eggs should take appropriate food safety precautions or consult a qualified healthcare provider before preparing or consuming this recipe. Individuals with food allergies, dietary restrictions, or medical conditions—including but not limited to egg allergies or dairy allergies—should consult a qualified healthcare provider or registered dietitian before making changes to their diet. Reliance on any information provided in this document is solely at your own risk.