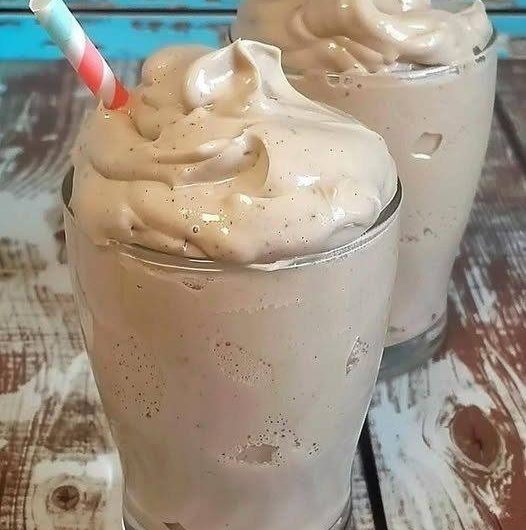
A frosty isn’t a milkshake, and it isn’t ice cream either. It sits in its own category, built on four things working together at the same time: a frozen structure made of tiny ice crystals, enough fat to keep it creamy instead of icy, a cocoa flavor that stays light instead of bitter, and air worked in through blending so the final texture is soft and a little fluffy rather than dense.
If you want a mental shortcut, think of it as soft-serve, milkshake, and mousse all showing up to the same party. None of them dominates. That balance is really the whole point of this recipe, and almost every step below exists to protect it.
Understanding the Core Components
Before you touch the blender, it helps to know why each ingredient is doing what it’s doing. This isn’t just a list — each item has a job.
Vanilla ice cream (the base). You need 2 cups, and it has to be vanilla, not chocolate. Real frosties lean on a mild chocolate profile, and vanilla is what balances out the bitterness the cocoa powder brings. When you’re choosing a tub, go for something with a higher fat content and a genuinely smooth texture. Cheap ice cream tends to be icier, and that iciness carries straight through to the final drink.
Milk. Start with 1/2 cup, though this amount is adjustable depending on how thick you like things. Milk controls the thickness of the frosty and helps everything blend together cleanly. Whole milk is the best option here because it gives you the richest, creamiest result. Low-fat milk will thin things out, and plant milk will lighten the flavor — both usable, but know what trade-off you’re making.
Cocoa powder. You’ll need 3 tablespoons. Unsweetened cocoa gives you the classic flavor, while Dutch-processed cocoa gives a smoother, darker profile. Either way, its job is to bring chocolate flavor into the mix without weighing it down — this is not meant to taste like a heavy chocolate shake.
Sugar. Use 2 to 4 tablespoons. Cocoa is bitter on its own, and ice cream alone won’t fully cover for that, so sugar is doing real balancing work here, not just adding sweetness for its own sake.
Salt. Just a pinch, but don’t skip it. It boosts the chocolate flavor and balances the sweetness — a small ingredient with an outsized effect.
Vanilla extract. Half a teaspoon. This rounds everything out and is what makes the final flavor taste complete rather than like separate ingredients sitting next to each other.
Optional Add-Ins Worth Knowing About
If you want to push the frosty in a specific direction, these additions each change something specific:
- Condensed milk — gives you a smoother, thicker texture.
- Malted milk powder — pushes the flavor toward that classic fast-food taste.
- Chocolate syrup — adds extra richness.
- Ice cubes — brings a slightly frostier edge.
None of these are required. They’re worth having in your back pocket if you want to adjust the result without changing the core recipe.
Equipment and Why It Actually Matters
You only need three things: a blender, a freezer, and a spoon or spatula for stirring during the freeze. But the blender quality matters more than people expect — a weak blender will leave you with a chunky frosty, while a strong one gives you that silky result you’re actually after. If you know your blender struggles with thick mixtures, that’s useful information going into the next section.
Mise en Place and Workflow
The order you do things in isn’t arbitrary — it protects the texture at every stage. Here’s the logical flow before you even start blending:
- Pull your ice cream out ahead of time so it has a chance to soften slightly.
- Make a cocoa paste separately (details below) — this is the step people skip and regret.
- Layer your ingredients into the blender in a specific order.
- Blend in two speed stages, not one long blast.
- Freeze with periodic stirring — this is the step that actually creates the “frosty” texture rather than a milkshake.
- Re-blend briefly after freezing to bring back smoothness and air.
Each of these gets its own breakdown below.
Step 1: Softening the Ice Cream
Pull the ice cream out and let it sit for 5 to 10 minutes. You’re aiming for slightly soft, not melted. If it’s still too hard, your blender will struggle and fight the mixture. If it’s gone too soft, you’ll end up with a watery frosty instead of a thick one. This window is short, so don’t wander off.
Step 2: Cocoa Activation (Don’t Skip This)
In a separate bowl, combine your cocoa powder with 2 tablespoons of milk and mix until it forms a smooth paste with no dry lumps. This step matters because cocoa powder is hydrophobic — it repels liquid at first rather than absorbing it smoothly. If you skip this and just dump cocoa powder straight into the blender with everything else, you’ll end up with a grainy texture that no amount of blending will fully fix.
Step 3: Layering in the Blender
Order matters more than most people assume. Layer things in this sequence:
- Milk
- Cocoa paste
- Sugar
- Vanilla
- Ice cream
- Any optional extras
This order helps the blender work through the mixture smoothly and prevents chunks from forming, since the liquid ingredients create a base for the ice cream to break down into rather than sitting on top of solid ice cream from the start.
Step 4: The Blending Technique
Blend on low speed first for about 10 seconds, then move to medium speed for another 20 to 30 seconds. Watch it closely the whole time. You’re looking for a result that’s smooth, thick, and slightly airy. Don’t push past that point — overblending generates heat, which melts the ice cream and ruins the texture you just built.
At this stage, what you’ll have looks like a thick milkshake. That’s expected. It’s not the finished product yet.
Adjusting on the Fly
If something’s off at this stage, here’s how to fix it without starting over:
- Too thick? Add milk.
- Too thin? Add ice cream.
- Too bitter? Add sugar.
- Too sweet? Add cocoa.
Step 5: The Freezing Phase (This Is the Secret Step)
Pour the blended mixture into a container and freeze it for 30 to 60 minutes. Every 15 minutes, stir it with a fork or spoon. This stirring breaks up ice crystals as they form, which is exactly what creates that soft-serve style texture and keeps the whole thing from turning into a solid block. This step is really the difference between “frosty” and “just a frozen milkshake” — don’t rush or skip it.
Step 6: Re-Blending
After the freezing phase, blend again for just 10 to 15 seconds. This brings back extra smoothness, reintroduces air, and gets you to the final consistency.
What the Texture Actually Depends On
Four factors control how your frosty turns out, and it helps to know them so you can troubleshoot instead of guessing:
- Ice crystals — bigger crystals mean an icier result, smaller crystals mean creamier.
- Fat content — more fat gives you a smoother texture.
- Air incorporation — blending adds air, which gives that fluffy feel.
- Temperature — too cold and it turns hard, too warm and it turns liquid.
What “Perfect” Actually Looks Like
You’re aiming for something thick but scoopable, that holds its shape on a spoon, and melts slowly rather than all at once. There’s a simple test for this: if you can dip a french fry into it the way you would at a fast-food counter, you’ve nailed the texture.
Serving Ideas
Keep it classic with a spoon, or go with a straw-and-spoon combo. If you want to have some fun with it, try dipping fries directly in, folding in brownie chunks, or topping it with whipped cream.
Common Mistakes to Avoid
- Using chocolate ice cream instead of vanilla — the flavor turns out too strong and loses the authentic profile.
- Skipping the freeze step — without it, you just end up with a milkshake, not a frosty.
- Using too much cocoa — this pushes it toward bitter and dry.
- Overblending — this melts everything and undoes the texture work.
- Using cheap ice cream — this leads to an icy result no technique can fully fix.
Approved Variations
These are direct swaps and additions based on the base recipe:
- Extra Chocolate Frosty — add chocolate syrup and increase the cocoa slightly.
- Vanilla Frosty — remove the cocoa entirely and add more vanilla.
- Banana Frosty — add one ripe banana, which also reduces how much sugar you need.
- Mocha Frosty — add 1 teaspoon of instant coffee.
- Nutty Frosty — add peanut butter.
Storage and Reheating
Store any leftovers in an airtight container in the freezer for up to 24 hours. Before serving again, let it sit out for 5 to 10 minutes, then re-blend or stir to bring the texture back.
Ultimate Chocolate Frosty
Description: A frozen chocolate dessert drink built on balance — frozen structure, creamy fat, light cocoa flavor, and airy texture — closer to a cross between soft-serve, a milkshake, and mousse than a standard shake.
Duration: 5–10 minutes softening + a few minutes of blending + 30–60 minutes freezing (with stirring every 15 minutes) + a short re-blend.
Ingredients:
- 2 cups vanilla ice cream (high-fat, smooth texture recommended)
- 1/2 cup milk (whole milk recommended), adjustable
- 3 tablespoons cocoa powder (unsweetened or Dutch-processed)
- 2–4 tablespoons sugar
- Pinch of salt
- 1/2 teaspoon vanilla extract
- Optional: condensed milk, malted milk powder, chocolate syrup, or ice cubes
Instructions:
- Set the ice cream out for 5–10 minutes until slightly soft, not melted.
- In a bowl, mix the cocoa powder with 2 tablespoons of milk into a smooth, lump-free paste.
- Layer the blender in this order: milk, cocoa paste, sugar, vanilla, ice cream, then any optional extras.
- Blend on low for 10 seconds, then medium for 20–30 seconds, until smooth, thick, and slightly airy. Do not overblend.
- Pour into a container and freeze for 30–60 minutes, stirring with a fork or spoon every 15 minutes to break up ice crystals.
- Re-blend for 10–15 seconds to restore smoothness and air.
- Serve with a spoon, a straw-and-spoon combo, or with fries, brownie chunks, or whipped cream.
Notes:
- Adjust with milk if too thick, ice cream if too thin, sugar if too bitter, or cocoa if too sweet.
- Store leftovers in an airtight container in the freezer for up to 24 hours; let sit 5–10 minutes and re-blend or stir before serving again.
- Avoid chocolate ice cream, skipping the freeze step, too much cocoa, overblending, or cheap ice cream — each of these throws off the intended texture or flavor.
Medical Disclaimer: This content is provided for general informational and educational purposes only and is not intended as, and should not be substituted for, professional nutritional, dietary, or medical advice. Individuals with diabetes, dairy sensitivities, allergies, or other dietary restrictions or health conditions should consult a qualified healthcare provider or registered dietitian before preparing or consuming this recipe. Ingredient substitutions may affect nutritional content, allergen exposure, and suitability for specific health needs. The creator of this content assumes no liability for any adverse effects resulting from the preparation or consumption of this recipe.