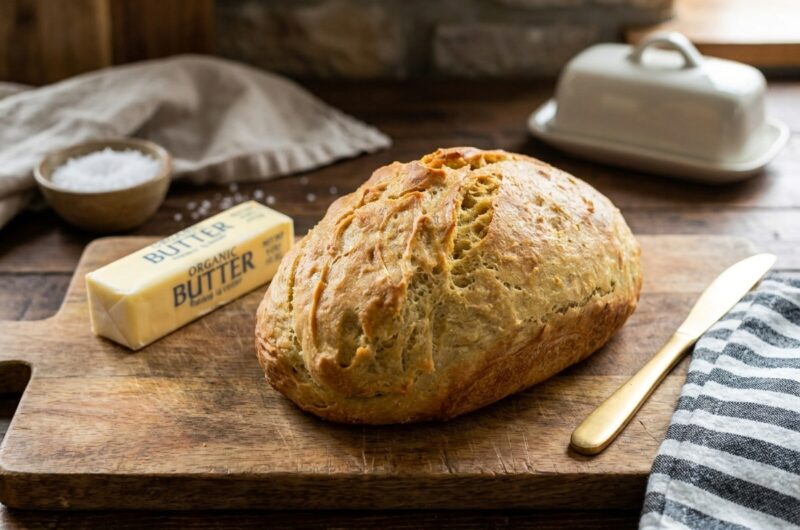
Baking a bakery-quality artisan loaf at home can often feel like an intimidating kitchen project, especially when dealing with heavy stand mixers, messy work surfaces, and the physical exhaustion of intensive manual kneading. However, this ancient grain einkorn bread recipe completely redefines the home baking experience, transforming simple kitchen staples into a magnificent, gold-crusted masterpiece without requiring a single minute of traditional dough kneading. By leveraging the natural chemistry of a slow, passive fermentation window alongside the intense heat distribution of a standard kitchen Dutch oven, beginners and experienced bakers alike can produce a spectacular loaf that boasts a shattering, crispy exterior and a deeply aromatic, pillowy internal crumb structure.
To truly understand why this specific no-knead methodology works so flawlessly, it is essential to explore the unique structural and agricultural history of einkorn wheat. Known widely as the world’s oldest heirloom wheat variety, einkorn remains completely unhybridized, retaining the exact genetic markers it possessed thousands of years ago. Unlike modern commercial wheat, which has been aggressively cross-bred over decades to develop tough, highly elastic gluten structures designed to withstand high-speed industrial mixing, einkorn possesses a remarkably delicate and weak gluten framework. Because its protein composition lacks the specific strands that typically trigger modern digestive discomfort, many individuals who struggle with standard modern wheat find this ancient grain exceptionally gentle on their systems.
When you introduce einkorn flour into a traditional bread-baking environment, you quickly realize that it behaves entirely differently than standard all-purpose or commercial whole wheat flours. Because its gluten structure is weak and highly fragile, over-kneading or aggressively handling the dough will actually cause the protein walls to tear and collapse, resulting in a heavy, flat, and unpleasantly dense loaf. This is exactly why the no-knead technique is not just an easier alternative for this ancient grain—it is structurally superior. By allowing the sticky dough to ferment slowly at room temperature over several hours, the flour particles fully hydrate on a molecular level without any mechanical intervention. The expanding gas pockets created by the active yeast gently stretch the delicate protein strands for you, creating a beautiful internal crumb without building up the tough, rubbery elasticity found in modern industrial breads.
Section 1: The Essential Ingredients Blueprint
To consistently secure a gorgeous artisan rise, a beautiful deep-golden hue, and the ultimate shattering crust, you must assemble high-quality components and understand exactly how each element functions inside this delicate ancient grain matrix.
For the core four-ingredient artisan dough assembly, prepare these precise measurements:
- 3 Cups All-Purpose Einkorn Flour: This is the primary foundational element of your artisan loaf. Ensure you are utilizing a high-quality all-purpose einkorn, which preserves the ancient grain’s characteristic nutty flavor profile and natural golden pigment. Because this heirloom flour absorbs water at a slower rate than modern commercial flour, using the precise volumetric or weight measurements is critical to preventing the dough from becoming overly saturated.
- 1.5 tsp Fine Sea Salt: Salt does far more than simply season the interior crumb of your bread. In this ancient grain matrix, the sea salt acts as a crucial structural stabilizer, tightening the naturally weak einkorn protein strands and regulating the speed of the fermentation process so the yeast does not expand too quickly and exhaust itself.
- 1 tsp Active Dry Yeast: This is the primary gaseous engine of your no-knead loaf. Because einkorn lacks the tough elastic walls required to trap large amounts of air naturally, a reliable strain of active dry yeast is necessary to provide a steady, continuous release of carbon dioxide, lifting the sticky dough upward during its resting phase.
- 1 1/4 Cups Warm Water: The temperature of this liquid vehicle must be monitored with care. It should feel pleasantly lukewarm to the touch, matching the natural temperature of your skin. If the water is too cold, the yeast cells will remain dormant, severely extending your rise time; conversely, if the liquid is hot to the touch, it will instantly scald and deactivate the living yeast proteins, leaving you with a flat, completely un-risen mass of dough.
Section 2: Step-by-Step Master Home Baking Instructions
The beauty of this baking process lies in its absolute simplicity, requiring a very brief active hand-mixing session followed by an extended room-temperature rest and a highly efficient Dutch oven steam bake.
Follow these direct, unhurried home kitchen instructions to bring your heirloom loaf to life:
- The Initial Dry Blend: Begin by selecting a large, clean ceramic or glass mixing bowl that offers plenty of vertical space for the dough to expand. Pour in your 3 cups of all-purpose einkorn flour, 1.5 teaspoons of fine sea salt, and 1 teaspoon of active dry yeast. Use a dry hand whisk or fork to stir these components together thoroughly for roughly 30 seconds, ensuring the tiny salt crystals and yeast granules are completely distributed throughout the flour mass before any liquid is introduced.
- Hydrating the Dough Matrix: Create a small well in the center of your dry flour mixture and pour the 1 1/4 cups of lukewarm water directly into the bowl. Using a sturdy wooden spoon, a stiff silicone spatula, or a specialized dough whisk, begin stirring from the center outward. Continue mixing vigorously until all the loose flour particles are fully integrated and a sticky, wet, and shaggy dough mass forms. Ensure you scrape down the inner sides of the bowl completely so no hidden pockets of dry flour remain at the bottom.
- The Long Fermentation Phase: Once the sticky dough is completely cohesive, pull your mixing tool away. Cover the top of the bowl tightly with a clean, damp kitchen towel or a sheet of clear plastic wrap to seal in the internal ambient humidity. Place the bowl in a draft-free location at standard room temperature. Allow the dough to ferment undisturbed for a minimum of 3 hours, up to 12 hours. During this passive resting window, the active yeast will slowly feed on the natural starches, expanding the volume of the dough and filling it with beautiful, intricate webs of tiny air bubbles.
- The Intensive Oven Preheating Sequence: When your fermentation window is nearing its end, it is time to prepare the baking environment. Place your empty 2.5 to 3-quart iron Dutch oven, complete with its heavy lid securely in place, onto the center rack of your oven. Turn the heat to $450^\circ\text{C}$ or $450^\circ\text{F}$ depending on your equipment specifications, though the ideal target for this configuration is a blazing hot $450^\circ\text{F}$ ($232^\circ\text{C}$). It is absolutely vital to let the empty pot heat inside the closed oven for 1 full hour. This extended preheating sequence stores an immense amount of thermal energy within the thick iron walls, which will instantly turn the moisture in your dough into steam the moment it enters the pot.
- Deflating and the Secondary Rest: Exactly 30 minutes into your oven preheating sequence, uncover your fermenting dough bowl. Take a large spoon or a flexible dough scraper and gently run it around the entire internal perimeter of the sticky mass, pulling the dough away from the glass walls to deflate it slightly and redistribute the internal gas pockets. Once scraped down, re-cover the bowl and allow the dough to rest undisturbed for the final 30 minutes of the preheating hour.
- Casting the Dough: Once the full hour of preheating is complete, wear heavy, high-temperature oven mitts to carefully extract the intensely hot Dutch oven from the appliance and set it safely onto your stovetop. Carefully lift the heavy lid away, taking care to avoid the sudden burst of escaping hot air. In a confident, swift motion, tilt your mixing bowl and tip or scrape the sticky einkorn dough directly into the center of the dry, ungreased pot. Do not worry if the dough looks rustic or loses its perfect shape during the transfer; the intense heat will shape it beautifully as it bakes.
- The Covered Steam Stage: Immediately replace the heavy lid onto the hot Dutch oven to lock in the escaping steam. Carefully slide the covered pot back onto the center rack of your preheated oven. Bake undisturbed for exactly 25 minutes. During this crucial window, the trapped steam keeps the outer surface of the dough incredibly soft and elastic, allowing the loaf to expand fully upward to its maximum height before the crust solidifies.
- The Uncovered Browning Sequence: After the 25-minute mark has passed, open your oven door and carefully lift the heavy lid completely off the Dutch oven, setting it aside safely. Close the oven door and allow the bread to continue baking uncovered for an additional 5 minutes. During this final stage, the dry, direct heat cooks the outer starches, transforming the pale dough into a deep, mahogany-golden hue and crisping the exterior into a thick, shattering artisan crust.
- The Mandatory Cooling Rest: Carefully lift the finished loaf out of the hot iron pot using a metal spatula or tongs and place it immediately onto an elevated wire cooling rack. It is absolutely mandatory to let the bread cool completely down to room temperature for at least 1 to 2 hours before slicing into it. Slicing a hot loaf traps the remaining internal steam within the crumb structure, which will instantly collapse the delicate protein walls and turn the interior of your beautiful bread dense, sticky, and gummy.
Section 3: Professional Kitchen Secrets for Artisan Success
Baking with heirloom grains like einkorn requires adhering to specific structural rules to achieve optimal results every single time. Incorporate these professional insights into your routine:
- Strictly Adhere to Pot Proportions: The absolute secret to achieving a tall, proud, beautifully rounded artisan loaf lies in utilizing a compact 2.5 to 3-quart Dutch oven. If you attempt to cast this specific dough quantity into a massive 5, 6, or 7-quart pot, the sticky dough will immediately spread out flat across the wide bottom before the heat can force it upward, resulting in a wide, flat, pancake-like loaf.
- Embrace the Sticky Texture: Do not succumb to the temptation of adding extra scoops of flour to the bowl when you see how wet and sticky the dough is. Traditional bakers are accustomed to dry, elastic modern wheat doughs that can be easily shaped by hand, but a proper einkorn dough should feel highly sticky and look shaggy. Adding extra flour will disrupt the hydration ratio, leading to a dense loaf.
- The Parchment Paper Handling Shortcut: If you find transferring the wet, sticky dough directly from the bowl into the blistering hot iron pot intimidating, you can utilize a clean piece of parchment paper. Simply tip the dough onto the paper during your final 30-minute scraping rest, then lift the entire sheet by its corners and lower both the paper and the dough safely into the preheated Dutch oven together.
- Visualizing the Crumb Structure: Because einkorn gluten is weak, the internal air pockets will naturally appear smaller and more uniform than the massive, irregular holes found in traditional high-gluten sourdoughs. This close, velvet-like crumb is ideal for holding toppings and ensuring even heat distribution when toasted.
Section 4: Strategic Ingredient Substitutions and Variations
This minimalist heirloom bread formula can be easily modified to suit your personal kitchen inventory or customized to explore unique flavor profiles:
- The Whole Grain Evolution: If you want to increase the rustic, hearty nature of your bread, you can substitute the all-purpose einkorn flour with whole wheat einkorn flour at a 1:1 ratio. Keep in mind that whole grain heirloom flour includes the dense bran and germ layers, which will naturally produce a slightly heavier loaf with a deep, earthy, molasses-like flavor profile.
- The Alternative Yeast Accelerators: If you are pressed for time, you can replace the active dry yeast with an equal measurement of quick-rise or instant yeast. Because instant yeast particles dissolve and activate much faster upon contact with liquid, you can safely shorten your minimum room-temperature fermentation window to just 2 hours before starting your oven preheating sequence.
- The Everyday Sandwich Loaf Transformation: If you prefer a traditional square shape for sandwiches over a rustic artisan boule, you can easily convert this no-knead dough. Instead of preheating an iron pot, thoroughly grease a standard 8×4-inch metal loaf pan or line it with parchment paper. Pour the fermented dough directly into the pan, allow it to rise for an extra 30 minutes on your counter, and bake at $375^\circ\text{F}$ ($191^\circ\text{C}$) for 25 to 30 minutes. Your sandwich bread is perfectly baked when a digital kitchen thermometer inserted into the very center reads an internal temperature of $200^\circ\text{F}$ ($93^\circ\text{C}$).
- Aromatic Infusion Adaptations: You can elevate the baseline nutty profile of the ancient wheat by folding savory dry additions directly into the flour mixture before adding the water. Excellent options include adding 1 tablespoon of dried rosemary needles, a half-cup of shredded sharp cheddar cheese, 2 tablespoons of toasted sesame seeds, or a half-cup of chopped kalamata olives to create a custom specialty loaf.
Section 5: Long-Term Preservation, Meal Prepping, and Reheating
Because this pristine, scratch-made artisan loaf contains absolutely zero commercial chemical dough conditioners, emulsifiers, or artificial shelf-life extenders, you must store it correctly to protect its quality:
- Short-Term Counter Storage: Once your loaf has cooled completely to room temperature on the wire rack, store it inside a clean brown paper bread bag or wrapped loosely in a breathable cotton kitchen towel on your counter. Avoid using airtight plastic bags for a fresh loaf, as plastic traps the residual moisture, migrating it to the exterior surface and instantly turning your crispy crust soft and soggy. The bread will maintain peak freshness at room temperature for up to 3 days.
- The Pro Freezer Blueprint: This einkorn loaf handles freezing beautifully, making it an exceptional candidate for bulk batch baking. You can freeze the entire cooled loaf whole, or slice it completely ahead of time so you can extract individual pieces as needed. Place the bread inside a heavy-duty, freezer-safe zipper bag, carefully press out all excess air to prevent freezer burn, label the front with the current date, and store in the freezer for up to 6 months.
- The Artisan Reheating Method: To thaw a frozen whole loaf, simply set it out on your kitchen counter for a few hours until it reaches room temperature. To restore that signature, fresh-baked crispness, mist the outer crust lightly with a spray bottle of water and place the loaf directly onto the center rack of a preheated $350^\circ\text{F}$ ($177^\circ\text{C}$) oven for 5 to 10 minutes. It will emerge looking and tasting as though it was baked that very morning. Individual pre-sliced pieces can be dropped directly from the freezer into a standard kitchen toaster for a fast, convenient breakfast.
Section 6: Frequently Asked Kitchen Questions
Home bakers often inquire whether it is necessary to apply non-stick cooking sprays, butter, or olive oil to the interior of the heavy iron Dutch oven before casting the wet dough inside. Rest assured, no greasing is required. Because the heavy iron pot preheats inside a hot oven for an entire hour, the immense thermal energy stored within the metal instantly sears the outer starches of the wet dough the moment it hits the surface. This creates an immediate natural non-stick barrier that allows the baked loaf to lift out effortlessly without a single drop of grease.
Another very frequent question is whether the dough can be left to ferment on the kitchen counter for longer than twelve hours if an unexpected delay arises in your schedule. Because einkorn wheat possesses an inherently delicate and weak gluten matrix, allowing the dough to ferment at warm room temperature for an extended period will cause the yeast to over-consume the sugars, weakening the protein walls until they can no longer support the weight of the dough. This leads to an over-proofed dough that will completely collapse and turn flat during the baking process. If you realize you cannot bake your loaf within the designated twelve-hour window, simply cover the bowl tightly and slide it into the cold refrigerator; the low temperatures will slow the yeast down safely, allowing you to delay your baking session for up to 24 additional hours.
Section 7: Estimated Nutritional Profile
The following nutritional metrics are automatically calculated as a close approximation for a single individual slice, based on a total yield of 12 equal slices from this specific artisan formula:
- Total Calories: 103 kcal
- Carbohydrates: 20g
- Protein: 4g
- Fat: 1g
- Saturated Fat: 1g
- Monounsaturated Fat: 1g
- Sodium: 291mg
- Potassium: 10mg
- Fiber: 2g
- Vitamin C: 1mg
- Calcium: 1mg
- Iron: 1mg
Important Medical Disclaimer
Please Note: I am not a doctor, certified nutritionist, or medical professional. The nutritional information and dietary suggestions provided in this article are based purely on the historical recipe records and are intended for general educational and informational purposes only. Every individual’s body, health conditions, and dietary needs are completely different. Before making any significant changes to your diet, implementing new meal plans, or consuming specific ingredient adjustments, please consult with a qualified doctor or a registered healthcare professional to ensure it aligns safely with your personal health requirements.