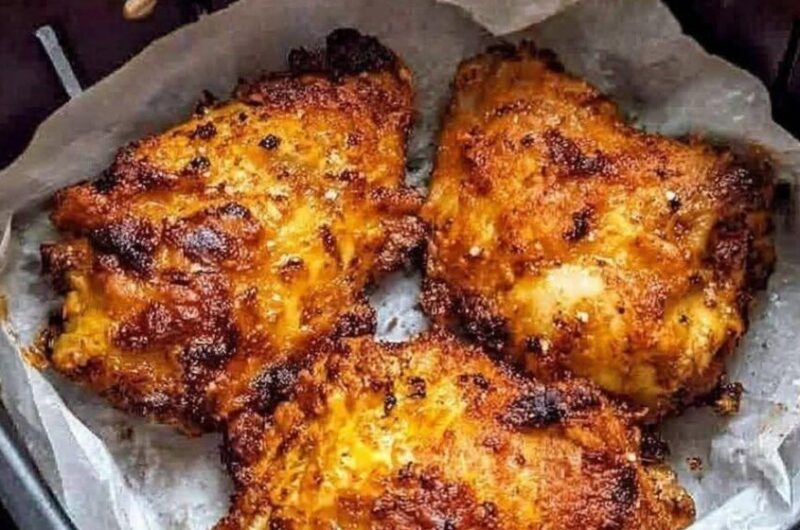
Getting real fried-chicken crunch out of an air fryer comes down to three things working together: a proper marinade to tenderize and season the meat all the way through, a well-built flour coating with starch for texture, and careful temperature management so the crust turns golden while the inside stays juicy. This recipe leans on all three, with two marinade options depending on what you have on hand — a traditional buttermilk marinade, or a buttermilk-style substitute made from milk and an acid if you don’t keep buttermilk stocked.
It works with a range of chicken pieces — thighs, drumsticks, wings, or a mix of bone-in cuts — and scales to feed a crowd, making it a solid choice whenever you want the experience of fried chicken without deep frying.
Mise En Place: Getting Organized Before You Start
Because this recipe spans marinating, coating, and air frying, staging everything ahead of time — sometimes a day ahead — makes the whole process manageable.
The chicken. 2.5 kilograms of chicken pieces, skin-on or skinless — 8 thighs, 8 drumsticks, or a mix of thighs, drumsticks, and wings.
The marinade station. Either buttermilk, salt, black pepper, paprika, garlic powder, onion powder, cayenne, dried thyme, dried oregano, and optional hot sauce — or, if substituting, whole milk combined with lemon juice or white vinegar (left to thicken slightly) plus the same seasoning blend.
The coating station. All-purpose flour, cornstarch, paprika, garlic powder, onion powder, black pepper, salt, cayenne pepper, dried thyme, dried oregano, and baking powder.
For extra crunch. A small amount of the marinade, reserved to drizzle into the flour mixture and create textured clumps.
For spraying. Cooking oil spray, or vegetable oil in a spray bottle.
Equipment. A large bowl or food-safe container for marinating, a very large bowl for the coating, a tray for resting the coated chicken, an air fryer, and ideally a meat thermometer.
Workflow: How the Process Flows
- Marinate the chicken. Place the chicken in a large container, pour the prepared marinade (traditional or buttermilk-style) over it, ensure every piece is fully coated, then cover and refrigerate for at least 4 hours, ideally overnight, or up to 24 hours for the most flavorful, tender result.
- Prepare the coating. Combine flour, cornstarch, and all the coating seasonings in a very large bowl, mixing thoroughly. Drizzle in about 2 tablespoons of the marinade and rub it into the flour with your fingertips until small clumps form.
- Coat the chicken. Remove one piece at a time from the marinade, letting excess drip off without wiping it clean, then press it firmly into the flour mixture, squeezing the coating onto the surface to create textured ridges. For an extra-thick crust, dip the coated piece back into the marinade for about 10 seconds, then dredge again in the flour.
- Rest the coated pieces. Place them on a tray and let them rest 15 to 20 minutes, which helps the coating adhere better during cooking.
- Preheat the air fryer. Preheat to 190°C (375°F) for about 5 minutes, and lightly spray the basket with oil.
- First oil spray. Arrange the chicken in a single layer without overcrowding, and generously spray all exposed surfaces with oil until lightly moistened but not soaked.
- Cook. Air fry at 190°C (375°F) for 12 minutes, then open the basket, flip each piece, spray the second side generously with oil, and continue cooking another 10 to 15 minutes, depending on piece size.
- Check doneness. Chicken is fully cooked when it reaches an internal temperature of 74°C (165°F), checked with a meat thermometer inserted into the thickest section without touching bone.
- Optional ultra-crispy finish. Increase the temperature to 205°C (400°F) for the final 3 to 5 minutes, watching closely, for deeper color and extra crunch.
- Rest before serving. Transfer to a wire rack and let rest 5 to 10 minutes without stacking, which allows juices to redistribute and keeps the crust from steaming soft.
Why Marinating Time Actually Matters
The marinade isn’t just there for flavor on the surface — the acids and enzymes in it work into the meat during refrigeration, tenderizing it while the seasonings penetrate more deeply the longer it sits. Four hours is enough for acceptable flavor, but letting the chicken marinate overnight produces a noticeably better result, and a full 24 hours gets you the most flavorful and tender chicken this recipe can produce.
Why the Coating Technique Creates That Restaurant-Style Texture
Rubbing a small amount of reserved marinade into the dry flour mixture, rather than keeping the coating perfectly dry, is what creates the small clumps responsible for that rugged, restaurant-style texture on the finished crust. Pressing the flour firmly onto the chicken — rather than a light dusting — and squeezing it to form ridges builds up the surface area that turns crispy in the air fryer. For an even thicker crust, the double-coating method (marinade, flour, back into marinade briefly, flour again) adds another full layer of texture.
Letting the coated pieces rest for 15 to 20 minutes before cooking isn’t optional if you want the coating to stay put — chicken that goes straight from coating to the air fryer is more likely to shed some of its breading during cooking.
Why Oil Spray and Preheating Are Non-Negotiable
Preheating the air fryer before the chicken goes in helps crust formation start immediately, which contributes directly to a crispier final exterior. Cooking from a cold air fryer skips that head start.
Spraying with oil, twice — once before the first side cooks, and again after flipping — is what prevents the coating from turning out pale and powdery. Air frying uses far less oil than deep frying, but it still needs some oil contact to brown and crisp properly; skipping this step is one of the most common reasons air-fried breading doesn’t crisp up the way people expect.
Avoiding overcrowding in the basket keeps air circulating freely around each piece. Pieces touching each other block that airflow, leading to uneven cooking and a less crispy result overall — cooking in batches is worth the extra time if your air fryer basket is on the smaller side.
Getting an Ultra-Crispy Finish
If you want a more pronounced, restaurant-style crunch, bumping the temperature up to 205°C (400°F) for the final 3 to 5 minutes of cooking pushes the crust to a deeper color and crunchier texture without significantly drying out the meat underneath — just watch it closely during this stage, since the higher heat works quickly.
Why Resting After Cooking Matters
Moving the cooked chicken to a wire rack, rather than a plate, and giving it 5 to 10 minutes before serving lets the juices inside redistribute through the meat, keeping it juicy when you eventually cut into it. Avoiding stacking the pieces during this rest is just as important — stacked chicken traps steam underneath, which softens the crust you just worked to build.
Approved Flavor Variations
This base recipe adapts into several different directions, mostly by adjusting the coating or adding a finish after cooking:
Southern-Style. Add celery salt, mustard powder, and white pepper to the flour mixture.
Spicy Nashville-Inspired. Increase the cayenne in the coating, then brush the cooked chicken with a mixture of hot oil, extra cayenne, and a bit of brown sugar.
Garlic Parmesan. Toss the cooked chicken with melted butter, minced garlic, grated Parmesan, and chopped parsley.
Smoky Barbecue. Add smoked paprika, brown sugar, and chipotle powder to the coating.
Lemon Herb. Add lemon zest, dried basil, dried parsley, and rosemary to the flour mixture.
Common Mistakes and How to Avoid Them
Overcrowding the basket. Restricts airflow and leads to uneven, less crispy results — always leave space around each piece.
Skipping the oil spray. Leaves the flour coating pale and powdery instead of golden and crisp.
Not resting after coating. Freshly coated chicken can shed breading during cooking if it goes straight into the air fryer without a rest period first.
Cooking from a cold air fryer. Skips the immediate crust formation that preheating provides.
Underseasoning. Every layer — marinade and coating — needs generous seasoning, since underseasoned flour produces a bland final result no matter how crispy the texture turns out.
Serving Suggestions
This chicken pairs well with a wide range of sides and dips: mashed potatoes, macaroni and cheese, coleslaw, cornbread, potato wedges, french fries, garlic rice, honey butter biscuits, roasted vegetables, a garden salad, or pickles — plus sauces like hot honey, barbecue sauce, ranch dressing, garlic aioli, spicy mayo, or buffalo sauce.
Storage and Reheating
Refrigerator: Let the chicken cool completely, then store in an airtight container for up to 4 days.
Reheating: Preheat the air fryer to 190°C (375°F) and cook the refrigerated chicken for 4 to 7 minutes — this re-crisps the crust while reheating the interior. Microwaving isn’t recommended if maintaining crispiness matters to you.
Crispy Air Fryer Chicken
Description: Exceptionally crispy, juicy air fryer chicken with a deeply seasoned crust and tender interior, designed to replicate traditional fried chicken texture and flavor using significantly less oil.
Duration:
- Marinating Time: Minimum 4 hours; recommended 12–24 hours
- Active Preparation: 30 minutes
- Cooking Time: 25–35 minutes
- Total Time: Approximately 5–25 hours depending on marination length
- Servings: 6–8 people
Ingredients:
For the Chicken:
- 2.5 kilograms chicken pieces, skin-on or skinless (8 thighs, 8 drumsticks, or a mix of thighs, drumsticks, and wings)
Option 1 — Traditional Buttermilk Marinade:
- 3 cups buttermilk
- 2 tablespoons salt
- 1 tablespoon black pepper
- 1 tablespoon paprika
- 2 teaspoons garlic powder
- 2 teaspoons onion powder
- 1 teaspoon cayenne pepper
- 1 teaspoon dried thyme
- 1 teaspoon dried oregano
- 1 tablespoon hot sauce (optional)
Option 2 — Buttermilk-Style Marinade:
- 3 cups whole milk
- 3 tablespoons lemon juice or white vinegar (let stand 10 minutes until slightly thickened)
- 2 tablespoons salt
- 1 tablespoon black pepper
- 1 tablespoon paprika
- 2 teaspoons garlic powder
- 2 teaspoons onion powder
- 1 teaspoon cayenne pepper
- 1 teaspoon dried thyme
- 1 teaspoon dried oregano
- 1 tablespoon hot sauce (optional)
Crispy Coating Mixture:
- 3 cups all-purpose flour
- 1 cup cornstarch
- 2 tablespoons paprika
- 1 tablespoon garlic powder
- 1 tablespoon onion powder
- 2 teaspoons black pepper
- 2 teaspoons salt
- 2 teaspoons cayenne pepper
- 1 teaspoon dried thyme
- 1 teaspoon dried oregano
- 1 teaspoon baking powder
- 2 tablespoons reserved marinade (for extra crunch)
For Spraying:
- Cooking oil spray, or 3–4 tablespoons vegetable oil in a spray bottle
Instructions:
- Place the chicken in a large bowl or food-safe container. Prepare your chosen marinade, whisking until evenly combined, then pour over the chicken, ensuring every piece is coated. Cover and refrigerate for at least 4 hours, ideally overnight or up to 24 hours.
- In a very large bowl, combine the flour, cornstarch, and all coating seasonings. Drizzle in 2 tablespoons of reserved marinade and rub into the mixture with your fingertips until small clumps form.
- Remove chicken pieces from the marinade one at a time, letting excess drip off. Press firmly into the flour mixture, squeezing to create textured ridges. For an extra-thick crust, dip back into the marinade for 10 seconds and dredge again.
- Place coated pieces on a tray and let rest 15–20 minutes.
- Preheat the air fryer to 190°C (375°F) for about 5 minutes. Lightly spray the basket with oil.
- Arrange chicken in a single layer without overcrowding. Generously spray all exposed surfaces with oil.
- Air fry at 190°C (375°F) for 12 minutes. Flip each piece, spray the second side, and continue cooking 10–15 minutes depending on piece size.
- Check that the internal temperature reaches 74°C (165°F) using a meat thermometer.
- For an ultra-crispy finish, increase to 205°C (400°F) for the final 3–5 minutes, watching closely.
- Transfer to a wire rack and let rest 5–10 minutes without stacking before serving.
Notes:
- Typical cooking times: wings 20–22 minutes, drumsticks 24–28 minutes, thighs 25–30 minutes, large bone-in pieces 30–35 minutes.
- Don’t overcrowd the air fryer basket — airflow is essential for crispiness.
- Don’t skip the oil spray, or the coating may stay pale and powdery.
- Store cooled leftovers in an airtight container in the refrigerator for up to 4 days; reheat in the air fryer at 190°C (375°F) for 4–7 minutes rather than microwaving.
Medical Disclaimer: This content is provided for general informational and educational purposes only and is not intended as, and should not be substituted for, professional medical, nutritional, or dietary advice. Always ensure chicken reaches a safe internal temperature (74°C/165°F) before consumption, and follow proper food safety practices when marinating, cooking, storing, and reheating this dish. If you have specific dietary restrictions, food allergies, or health conditions, consult a qualified healthcare provider or registered dietitian before making changes to your diet. The author and publisher assume no responsibility for any adverse effects resulting from the preparation or consumption of this recipe.