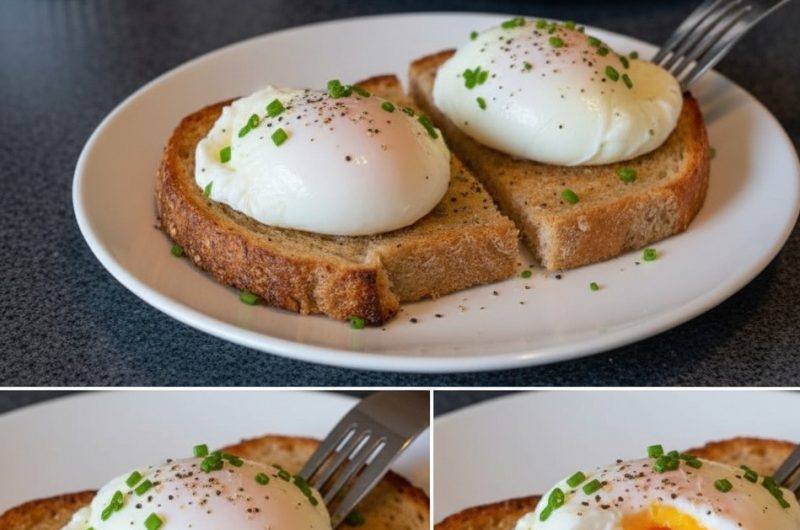
Poached eggs are a true breakfast classic, known for their creamy, delicate texture and rich flavor. When done right, poaching can turn a simple meal into something that feels genuinely special. Whether added to a warm bowl of oatmeal, set atop avocado toast, or paired with crisp greens, poached eggs are versatile and healthy — this guide walks through every step needed to get them right consistently.
What Makes Poached Eggs So Special
Poached eggs stand apart from other egg preparations because of their soft, runny yolks and tender whites. Poaching involves cooking the egg gently in simmering water, rather than boiling, which is what preserves that delicate texture. Compared to scrambled or fried eggs, poaching produces a luscious consistency that makes it especially well-suited to a lighter, healthier breakfast.
Done correctly, poached eggs are also genuinely nutrient-dense. With just a couple of ingredients, they provide a solid dose of protein along with essential vitamins and minerals, including vitamin A, calcium, and iron — and the minimal preparation involved makes them realistic for busy mornings rather than reserved for weekend cooking only.
Choosing the Best Ingredients
The star ingredient here is simply the egg. Fresh eggs are essential for poaching — the fresher the egg, the more intact the whites stay during cooking, giving you a neater, more attractive result. Older eggs tend to spread out more in the water, leading to a less uniform shape.
Beyond the egg, you’ll need water for poaching, kept at a gentle simmer rather than a rapid boil. A small amount of vinegar can be added to help the egg whites set quickly and keep the egg from spreading too much, though it’s entirely optional — with careful attention to water temperature and timing, you can get great results without it.
Essential Tools
- A pot or deep pan — large enough to give the egg room to float freely in the water.
- A fine mesh strainer or sieve — separates any excess, thin egg white from the yolk, so only the firmer whites go into the water.
- A slotted spoon — for gently removing the poached egg from the water, letting excess water drain away.
- Ramekins — small bowls for holding the cracked egg before it goes into the water, which prevents breaking or spilling during the transfer.
Workflow: How It Comes Together
- Bring the water to a simmer, adding vinegar if using.
- Prepare the egg by straining off excess whites.
- Create a vortex in the simmering water.
- Slide the egg in and let it cook.
- Remove and drain the egg.
- Serve, or store for later use.
Step 1: Preparing the Water
Fill a large pot with water — enough to fully submerge the egg — and bring it to a boil over high heat, then reduce to low so the water simmers gently rather than boiling rapidly. Water that’s too hot can cause the egg whites to break apart, leading to a mess in the pot.
If using vinegar, add it to the water at this stage — about 1 to 2 tablespoons is enough. The vinegar helps the egg whites coagulate quickly, so they hold together instead of dispersing.
Step 2: Preparing the Egg
While the water heats, crack a fresh large egg into a fine mesh strainer or sieve set over a small bowl. Gently swirl the egg in the sieve to remove any excess liquid egg white. This step keeps the egg white compact and prevents it from spreading too much once it hits the water. Once the excess has drained away, carefully transfer the egg to a small ramekin.
Step 3: Creating a Vortex
Use a spoon to stir the simmering water in a circular motion, creating a vortex. The swirling motion gently pulls the egg white around the yolk once added, helping the egg stay compact and hold a neat shape.
Step 4: Poaching the Egg
Once the vortex is going, carefully slide the egg from the ramekin into the center of the swirling water, adding it gently to avoid breaking the yolk. Let the egg cook for about 3 minutes — during this time, the whites firm up while the yolk stays soft and runny.
Avoid disturbing the egg too much while it cooks. Simply let it float in the simmering water and keep an eye on the clock so it doesn’t overcook.
Step 5: Removing the Egg
After 3 minutes, use a slotted spoon to carefully lift the egg out of the water, then gently dab it on a paper towel to remove excess water. This step prevents the finished egg from becoming soggy once plated.
Step 6: Storing for Later Use
If meal prepping or making poached eggs ahead of time, transfer them to an ice water bath right after poaching to stop the cooking process. Store in a sealed container in the fridge for up to 4–5 days. When ready to serve, submerge the cold poached egg in a bowl of hot water for 20–30 seconds to reheat, then remove, dab dry, and serve.
Tips for Perfect Poached Eggs Every Time
- Fresh eggs are key. Fresher eggs hold their shape better, giving you that classic round poached egg appearance.
- Control the heat. Keep the water at a low simmer rather than a boil — high heat causes the whites to break apart or turn tough.
- Vinegar is optional. If you’d rather skip the taste of vinegar, you can still poach eggs perfectly without it, as long as you’re careful with temperature and timing.
- Use a timer. Poach for exactly 3 minutes for a classic runny yolk, or add an extra minute or two if you prefer it more set.
Serving Ideas
Poached eggs work well on toast, over a salad, alongside avocado, or stirred into a warm bowl of oatmeal — their mild, rich flavor pairs easily with both savory and lighter dishes.
Why the Vortex Technique Works
The swirling water isn’t just a visual flourish — it’s doing real work to shape the egg. As the egg enters the center of a moving current, the motion of the water wraps the thinner strands of egg white around the more solid mass near the yolk, pulling everything inward rather than letting it spread out flat across the bottom of the pot. This is part of why straining the egg beforehand and creating the vortex work so well together: the sieve removes the loosest, wateriest whites that are most likely to drift away, and the vortex handles the rest by keeping what remains close to the yolk as it sets.
Troubleshooting Common Issues
Wispy, stringy whites in the water: This usually means the egg wasn’t strained thoroughly enough before poaching, or the water was too hot when the egg went in. Straining more aggressively and double-checking that the water is at a gentle simmer rather than a boil should fix this on the next attempt.
Egg sinking and sticking to the bottom of the pot: This can happen if the water isn’t deep enough for the egg to float freely, or if the vortex wasn’t strong enough to keep it centered. Using a deeper pot and giving the water a firmer stir before adding the egg helps prevent this.
Yolk breaking during cooking: This is almost always caused by adding the egg too roughly, from too high above the water’s surface, or by disturbing it while it cooks. Sliding the egg in gently from the ramekin, close to the water’s surface, and then leaving it alone until it’s done solves this in most cases.
A Note on Freshness and Egg Quality
Since this recipe depends so heavily on the egg itself, it’s worth paying a bit more attention to freshness than you might for scrambled or fried eggs, where a looser white matters less. A simple way to judge freshness at home is to place the egg in a bowl of water — a fresh egg will sink and lay flat, while an older egg tends to stand more upright or even float slightly, since the air pocket inside grows larger as the egg ages. For poaching specifically, sinking and lying flat is what you want to see.
Simple Poached Egg Recipe
Description: A step-by-step method for classic poached eggs, with soft, tender whites and a runny yolk, made with minimal ingredients and equipment.
Ingredients:
- 1 large egg
- 1–2 tablespoons vinegar (optional)
Instructions:
- Bring a large pot of water to a boil, then reduce to low heat to maintain a gentle simmer. Add vinegar now, if using.
- Crack the egg into a fine mesh sieve to remove excess egg whites, then transfer to a ramekin.
- Stir the simmering water to create a vortex, and gently add the egg to the center of the swirl.
- Let the egg cook for 3 minutes, until the whites are set but the yolk remains soft.
- Use a slotted spoon to lift the egg out of the water. Dab dry on a paper towel and serve immediately.
Notes:
- Fresh eggs give the best, most compact result — older eggs tend to spread more in the water.
- To store, transfer poached eggs to an ice water bath immediately after cooking, then refrigerate in a sealed container for up to 4–5 days. Reheat by submerging in hot water for 20–30 seconds before serving.
Nutrition Information (per serving):
- Calories: 65 kcal
- Protein: 5g
- Fat: 4g
- Saturated Fat: 1g
- Cholesterol: 163mg
- Sodium: 62mg
- Potassium: 60mg
- Vitamin A: 240 IU
- Calcium: 25mg
- Iron: 0.8mg
Medical Disclaimer: This content is provided for general informational and educational purposes only and is not intended as, and should not be substituted for, professional nutritional, dietary, or medical advice. Individuals with egg allergies or other dietary restrictions or health conditions should consult a qualified healthcare provider or registered dietitian before preparing or consuming this recipe. Undercooked eggs carry a risk of foodborne illness; those who are pregnant, immunocompromised, elderly, or otherwise at higher risk should consult a healthcare provider regarding egg consumption. The creator of this content assumes no liability for any adverse effects resulting from the preparation or consumption of this recipe.