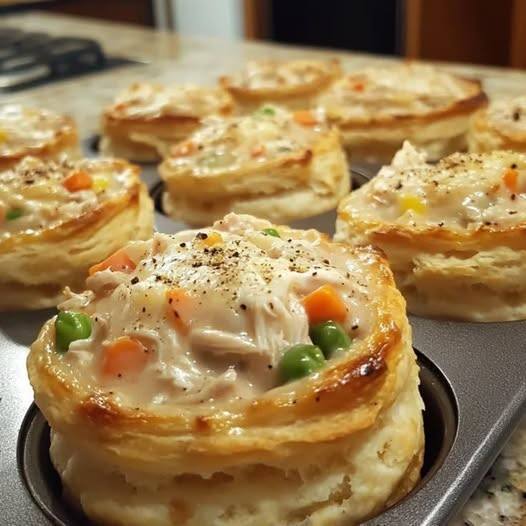
These are individual-sized chicken pot pies baked in a standard muffin tin, giving you all the comfort of a traditional pot pie in a portion that’s easy to serve and eat without slicing. Each one features a buttery, flaky crust wrapped around a creamy chicken and vegetable filling, seasoned with thyme, parsley, and rosemary. Refrigerated pie crusts keep the prep simple, though homemade pie dough works too if you want a more traditional result.
This is a two-part recipe — a stovetop filling and an assembled, baked crust — that yields 12 mini pot pies in about 50 minutes total. It’s suited to family dinners, lunch boxes, potlucks, and holiday gatherings, and it also freezes well both before and after baking, making it a solid make-ahead option.
Getting Everything Ready
Because the filling needs to cool slightly before it goes into the crust, and the crust needs to be shaped and filled fairly efficiently once you start, having everything measured and your equipment out ahead of time keeps the process moving smoothly.
Equipment to have ready:
- A standard 12-cup muffin tin
- Mixing bowls
- A medium skillet or saucepan
- A rolling pin, if using homemade dough
- A pastry brush
- A knife or round cookie cutter
- Measuring cups and spoons
Ingredients to have measured and ready, for the filling:
- 2 tablespoons unsalted butter
- 1 medium yellow onion, finely diced
- 2 cloves garlic, minced
- 2 medium carrots, peeled and diced into small cubes
- 1 celery stalk, finely diced
- 2 tablespoons all-purpose flour
- 1 cup chicken broth
- ¾ cup whole milk
- ¼ cup heavy cream
- 2 cups cooked chicken, shredded or diced
- 1 cup frozen peas
- ½ teaspoon dried thyme
- ½ teaspoon dried parsley
- ¼ teaspoon dried rosemary
- 1 teaspoon salt, or to taste
- ½ teaspoon black pepper
For the crust:
- 2 refrigerated pie crusts or homemade pie dough
- 1 large egg
- 1 tablespoon water
Having the chicken already cooked and diced or shredded before you start the filling saves a step in the middle of an already multi-stage process.
Workflow: How the Process Comes Together
This recipe moves through three clear stages, and the order matters for both texture and timing:
- Preheat the oven and prep the muffin tin. Getting the oven to temperature and the tin greased first means everything is ready the moment the assembly stage begins.
- Build the filling on the stovetop. Vegetables are sautéed, a roux is formed with the flour, liquid is added gradually, and the chicken and peas are folded in last. This entire stage happens before the crust is even touched.
- Let the filling cool slightly while you prepare the crust — this keeps the dough from softening or becoming soggy when the filling goes in.
- Cut and fit the bottom crusts, fill each cup, then top with a second layer of dough, egg wash, and a vent slit.
- Bake until deeply golden, then cool briefly in the tin before removing.
Because the filling needs a few minutes to cool while you handle the dough, this recipe naturally breaks into a “cook the filling” phase and an “assemble and bake” phase, rather than requiring you to juggle both at once.
Approved Variations & Swaps
Based strictly on what’s built into this recipe, here are the adjustments it already allows for:
- Cheddar Chicken Pot Pies: add 1 cup shredded cheddar cheese to the filling for a richer, creamier texture.
- Herb Lover’s Pot Pies: increase the thyme and parsley, and add fresh chopped rosemary for a stronger herb flavor.
- Turkey Pot Pies: replace the chicken with leftover roasted turkey — noted as especially good after holiday meals.
- Mushroom Chicken Pot Pies: add 1 cup finely chopped mushrooms while sautéing the vegetables for extra depth of flavor.
- Spicy Chicken Pot Pies: mix in a pinch of cayenne pepper or red pepper flakes for subtle heat.
- Puff Pastry Version: replace the top crust with puff pastry for an extra light, flaky texture.
- Crust choice: refrigerated pie crusts or homemade pie dough both work, with homemade offering a more traditional taste.
- Top decoration: decorative shapes like stars, hearts, or leaves can replace a simple round top crust for presentation.
No other ingredient substitutions are specified in the source recipe, so changes beyond these listed variations would go beyond what’s actually described here.
Step-by-Step Assembly and Baking Strategy
Getting these pies to come out with a flaky crust and a properly thickened filling comes down to a few specific technique points.
Build the roux properly before adding liquid. Sprinkle the flour evenly over the cooked vegetables and stir continuously for about a minute. This brief cooking step removes the raw flour taste and sets up the filling to thicken correctly once liquid is added — skipping it can leave the sauce tasting starchy.
Add the broth gradually while whisking. Pouring the chicken broth in slowly, whisking the whole time, is what prevents lumps from forming in the sauce. Dumping it in all at once risks an uneven, clumpy filling.
Let the filling simmer briefly with the chicken and peas. Two to three minutes of gentle simmering after adding the chicken and peas ensures everything is coated in the creamy sauce and heated through before it goes into the crust.
Cool the filling slightly before filling the crust. Hot filling straight from the skillet can soften the raw dough too much before baking even starts — a short cooling period while you prep the crusts avoids this.
Don’t overfill each cup. About 2 tablespoons of filling per muffin cup is the target; overfilling risks the filling bubbling over during baking, which can cause sticking or burning in the tin.
Press the top crust edges together firmly. Sealing the top and bottom crust together helps keep the filling contained and gives the pies a cleaner shape once baked.
Brush generously with egg wash. A thorough coat of the egg-and-water mixture over the top crust is what produces the deep golden-brown finish these pies are known for.
Cut a vent slit in every pie. This small step lets steam escape during baking, which helps keep the crust crisp rather than soggy.
Cool briefly in the tin before removing. Letting the pies rest for 5 to 10 minutes after baking gives the filling a chance to set slightly, making them much easier to loosen and remove cleanly.
Mini Chicken Pot Pies
Description: Individual-sized chicken pot pies with a buttery, flaky crust wrapped around a creamy, vegetable-loaded chicken filling. Perfect for family dinners, lunch boxes, parties, potlucks, holiday gatherings, or make-ahead freezer meals.
Duration:
- Preparation Time: 25 minutes
- Cooking Time: 25 minutes
- Total Time: 50 minutes
- Yield: 12 mini pot pies
- Difficulty Level: Easy to Moderate
Equipment
- Standard 12-cup muffin tin
- Mixing bowls
- Medium skillet or saucepan
- Rolling pin, if using homemade dough
- Pastry brush
- Knife or round cookie cutter
- Measuring cups and spoons
Ingredients
For the filling:
- 2 tablespoons unsalted butter
- 1 medium yellow onion, finely diced
- 2 cloves garlic, minced
- 2 medium carrots, peeled and diced into small cubes
- 1 celery stalk, finely diced
- 2 tablespoons all-purpose flour
- 1 cup chicken broth
- ¾ cup whole milk
- ¼ cup heavy cream
- 2 cups cooked chicken, shredded or diced
- 1 cup frozen peas
- ½ teaspoon dried thyme
- ½ teaspoon dried parsley
- ¼ teaspoon dried rosemary
- 1 teaspoon salt, or to taste
- ½ teaspoon black pepper
For the crust:
- 2 refrigerated pie crusts or homemade pie dough
- 1 large egg
- 1 tablespoon water
Instructions
- Preheat the oven to 375°F (190°C). Lightly grease a 12-cup muffin tin.
- Melt the butter in a large skillet over medium heat. Add the onion, carrots, and celery, and cook 5–7 minutes until tender and fragrant.
- Add the garlic and cook 1 minute more, until aromatic but not browned.
- Sprinkle the flour over the vegetables and stir continuously for about 1 minute to form a light roux.
- Slowly whisk in the chicken broth, then add the milk and heavy cream, stirring until the sauce thickens.
- Stir in the thyme, parsley, rosemary, salt, and pepper.
- Add the cooked chicken and frozen peas. Simmer gently for 2–3 minutes, then remove from heat and let cool slightly.
- On a lightly floured surface, cut circles from the pie crusts large enough to fit the muffin cups. Press each into a cup, extending the dough up the sides. Reroll scraps as needed for all 12 cups.
- Fill each cup with about 2 tablespoons of the chicken mixture, avoiding overfilling.
- Cut smaller circles for the tops, place over each filled cup, and press the edges together. Use decorative cutouts if desired.
- Whisk the egg and water together and brush generously over the tops. Cut a small vent slit in each pie.
- Bake 22–25 minutes, until the crust is deeply golden and the filling bubbles gently around the edges.
- Cool in the tin for 5–10 minutes, loosen edges with a small knife if needed, and remove. Serve warm.
Notes
- The filling can be made up to 2 days ahead and refrigerated; assemble and bake when ready.
- Pies can also be fully assembled and refrigerated for several hours before baking — add the egg wash just before baking.
- To freeze before baking: assemble, freeze in the muffin tin until firm, then transfer to a freezer-safe container for up to 3 months. Bake frozen, adding 10–15 minutes to the baking time.
- To freeze after baking: cool completely, wrap individually, and store in a freezer-safe container.
- Store leftovers in an airtight container in the refrigerator for up to 4 days.
- Reheat in a 350°F (175°C) oven for 10–15 minutes, or in an air fryer at 350°F (175°C) for about 5 minutes for a crisp crust. Microwave reheating is convenient but may soften the crust.
Disclaimer: This recipe is provided for general informational purposes only and does not constitute medical or dietary advice. Individuals with food allergies, dietary restrictions, or specific health conditions (including but not limited to gluten, dairy, or egg sensitivities) should consult a qualified healthcare provider or registered dietitian before preparing or consuming this recipe. This recipe involves raw poultry and dough handling; please take appropriate food safety precautions. Neither the author nor the publisher assumes responsibility for any adverse effects resulting from the preparation or consumption of this recipe.