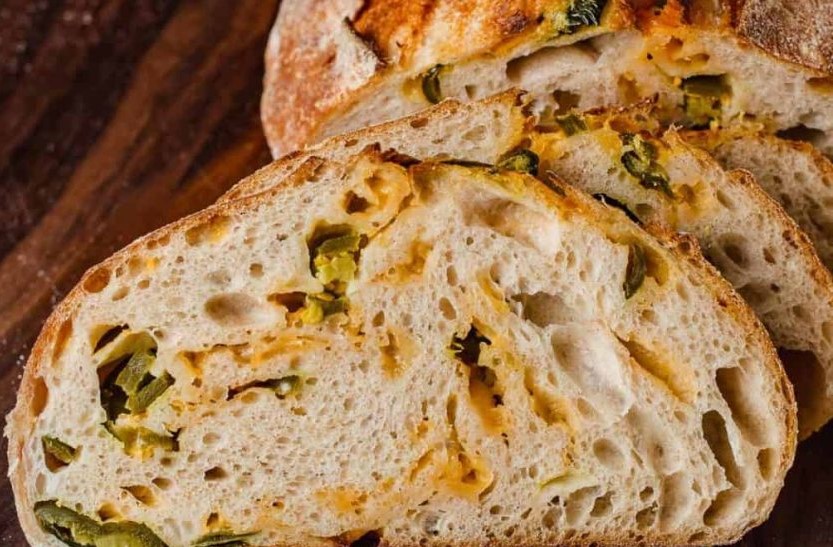
This is a crusty artisan sourdough loaf loaded with sharp cheddar cheese and spicy pickled jalapeños — the kind of bread that works alongside a bowl of soup, as the base for a spicy grilled cheese, or simply on its own as a snack. Like most true sourdough, this recipe runs on time rather than commercial yeast: a fed starter, a long autolyse, bulk fermentation with stretch and folds, and a slow second rise all come together over roughly 12 hours before the loaf ever sees the oven.
Because this is a genuine sourdough bake rather than a quick bread, the process rewards patience and attention to timing more than active effort — most of the “work” is actually waiting, checking on the dough, and folding it periodically rather than continuous hands-on labor.
Prep and Setup
Ingredients to Make ½ cup (100g) of Active Sourdough Starter:
- 1 tablespoon (15g) sourdough starter
- ⅓ cup + 1 tablespoon (50g) all-purpose flour
- 3½ tablespoons (50g) water
Dough Ingredients:
- ½ cup (100g) sourdough starter (active)
- 1½ cups (360g) water (30 grams divided)
- ⅓ cup + 1 tablespoon (50g) whole wheat flour
- 3¾ cups (450g) bread flour
- 2 teaspoons (10g) fine sea salt
Add-In Ingredients:
- ¼ cup (60g) sliced jalapeños (pickled or fresh)
- 4 oz (113g) sharp cheddar cheese, shredded
Equipment: a clean jar for the starter, a large mixing bowl, a small bowl for the salt water, a floured proving basket, parchment paper, a razor or sharp blade for scoring, a Dutch oven, and a cooling rack. Large silicone gloves are also recommended for safely handling the hot Dutch oven.
Feeding the Sourdough Starter
12 hours before you plan to mix the dough, combine the starter ingredients — sourdough starter, all-purpose flour, and water — in a clean jar, stirring until combined. Loosely cover the jar and let it rise at room temperature. This process yields a total of about 115g of active starter, slightly more than the 100g needed, since some will stick to the sides of the jar during transfer. The starter is ready to use once it has doubled in size and shows plenty of bubbles across the surface and sides of the jar — this is the clearest visual sign that it’s active enough to properly leaven the dough.
Workflow: How the Steps Actually Flow
Step 1: Autolyse. In a mixing bowl, combine 330 grams of water with the 100 grams of active sourdough starter, stirring to combine. Add the whole wheat flour and bread flour, using your hands to work the mixture until there are no dry bits left and the dough looks like a shaggy mass. Cover and let it rest on the counter for 1 hour. This resting period allows the flour to fully hydrate before the salt is introduced, which helps develop the dough’s structure more effectively.
Step 2: Add the salt. Dissolve the salt in the remaining 30 grams of water in a small bowl, then work the salt water into the dough by hand until well combined. Cover and let rest for another hour. Adding salt separately, after the autolyse, is a deliberate sourdough technique — salt slows fermentation and tightens gluten, so delaying its addition lets the dough hydrate more freely first.
Step 3: Bulk fermentation with stretch and folds. Perform 3 sets of stretch and folds, spaced 30 minutes apart, over the first hour and a half. Add the shredded cheddar and jalapeños during the second set — folding them in partway through, rather than at the very start or end, distributes them evenly through the dough without overworking it. Keep the bowl covered between each set. After the third set, cover the dough and let it rise at room temperature for an additional 2–3 hours (or, alternatively, in the fridge for up to 36 hours, which develops more flavor over a longer, slower fermentation).
How to perform a stretch and fold: with the dough still in the bowl, use a wet hand to pick up one side, pulling it up and over itself. Turn the bowl and repeat on all four sides until you’ve worked your way around the full circle.
Step 4: Shape and second rise. Turn the dough onto a floured surface and shape it into a rough ball — the outside won’t be perfectly smooth at this stage, and that’s expected. Flour the top of the dough and place it top-side down into a floured proving basket. Let it rise at room temperature for 2–3 hours, or until it has risen about 20–30%.
Step 5: Preheat with the Dutch oven inside. 500°F for 30 minutes, with the Dutch oven already inside. Preheating the vessel along with the oven means the dough hits a properly hot surface the moment it goes in, which is important for oven spring — the initial burst of rise a loaf gets in the first few minutes of baking.
Step 6: Score and bake. Turn the dough out onto a piece of parchment paper and score the top with a razor. Remove the hot Dutch oven and place it on the stovetop, then use the parchment paper as a sling to lift the dough into the pot. Cover with the lid, turn the oven down to 450°F, and bake for 30 minutes covered. Remove the lid and continue baking for another 20–25 minutes, until the crust reaches your desired color. Baking covered first, then uncovered, traps steam early on (which helps the crust stay flexible enough to expand) before finishing with dry heat to properly brown and crisp the crust.
Step 7: Cool completely before slicing. Let the bread cool on a rack for 2 hours before cutting. This is a genuinely important step for sourdough specifically — the crumb is still setting internally right after baking, and slicing too soon can result in a gummy texture rather than the properly set, chewy crumb sourdough is known for.
Component Organization: What Each Ingredient Is Doing
- Leavening: the active sourdough starter, which ferments the dough naturally over many hours rather than relying on commercial yeast for a quick rise.
- Structure: whole wheat flour and bread flour, providing the gluten network that traps gas from fermentation and gives the bread its chew.
- Fermentation control: salt, added after the autolyse to slow fermentation slightly and strengthen the dough’s structure.
- Flavor and richness: sharp cheddar cheese, folded in partway through bulk fermentation for even distribution.
- Heat and brightness: sliced jalapeños (pickled or fresh), adding spice and tang throughout the loaf.
Why the Long Fermentation Matters
Unlike a quick bread or even a standard yeasted loaf, this recipe leans on time as an ingredient. The autolyse develops the dough’s structure before salt is added; the bulk fermentation, spread across multiple stretch-and-fold sessions and several hours of rising, builds both flavor and gluten strength gradually; and the second rise in the proving basket lets the shaped loaf develop its final structure before baking. Each of these stages has a specific role, and rushing any of them tends to show up in the final loaf as a denser crumb or less developed flavor.
Notes
- Use large silicone gloves when bread baking to protect your hands and forearms from burns, especially when handling the hot Dutch oven.
- During bulk fermentation, if your kitchen is warmer than 70°F, check the dough about 2 hours after the last stretch and fold to make sure it doesn’t over-proof. The dough is ready for shaping once it has risen about 30% and shows bubbles around the edges of the bowl.
Step-by-Step Assembly Strategy
- Feed the sourdough starter 12 hours before mixing the dough, letting it double and become bubbly.
- Combine water and active starter, then mix in whole wheat and bread flour; rest 1 hour (autolyse).
- Dissolve salt in the remaining water, work into the dough, and rest 1 hour.
- Perform 3 sets of stretch and folds 30 minutes apart, adding cheddar and jalapeños during the second set; let rise 2–3 hours after the final set.
- Shape into a ball, place top-side down in a floured proving basket, and let rise 2–3 hours (or refrigerate up to 36 hours after bulk fermentation).
- Preheat the oven with the Dutch oven inside to 500°F for 30 minutes.
- Score the dough, transfer into the Dutch oven using parchment paper, cover, and bake at 450°F for 30 minutes.
- Uncover and bake an additional 20–25 minutes, until the crust is golden.
- Cool on a rack for 2 hours before slicing.
Jalapeño Cheddar Sourdough Bread
Description: This jalapeño cheddar sourdough bread recipe makes a crusty artisan loaf, loaded with cheddar cheese and spicy pickled jalapeños. It can be enjoyed alongside soups, as the base for a spicy grilled cheese sandwich, or on its own for a tasty snack.
Duration:
- Prep Time: 40 minutes
- Cook Time: 50 minutes
- Fermenting Time: 12 hours
Ingredients:
To Make ½ cup (100g) of Active Sourdough Starter:
- 1 tablespoon (15g) sourdough starter
- ⅓ cup + 1 tablespoon (50g) all-purpose flour
- 3½ tablespoons (50g) water
Dough Ingredients:
- ½ cup (100g) sourdough starter (active)
- 1½ cups (360g) water (30 grams divided)
- ⅓ cup + 1 tablespoon (50g) whole wheat flour
- 3¾ cups (450g) bread flour
- 2 teaspoons (10g) fine sea salt
Add-In Ingredients:
- ¼ cup (60g) sliced jalapeños (pickled or fresh)
- 4 oz (113g) sharp cheddar cheese, shredded
Instructions:
Feed Your Sourdough Starter: 12 hours before you plan to mix the dough, add the starter ingredients to a clean jar. Stir until combined, loosely cover, and let rise at room temperature until doubled in size with plenty of bubbles on the surface and sides of the jar.
Make the Dough:
- Autolyse: Combine 330 grams water and 100 grams active sourdough starter in a mixing bowl, stir to combine. Add the whole wheat flour and bread flour, mixing by hand until there are no dry bits and the dough looks like a shaggy mass. Cover and rest for 1 hour.
- Add salt: Dissolve the salt in the remaining 30 grams of water. Add to the dough and work in by hand until combined. Cover and rest for 1 hour.
- Bulk fermentation: Perform 3 sets of stretch and folds, 30 minutes apart, over the first hour and a half. Add the shredded cheddar and jalapeños during the second set. Keep the bowl covered between sets. After the third set, cover and let rise at room temperature for 2–3 more hours (or refrigerate up to 36 hours).
- Shape and second rise: Turn the dough onto a floured surface and shape into a rough ball. Flour the top and place top-side down in a floured proving basket. Rise at room temperature for 2–3 hours, or until risen about 20–30%.
- Preheat: Preheat the oven with the Dutch oven inside to 500°F for 30 minutes.
- Score and bake: Turn the dough onto parchment paper and score the top with a razor. Remove the Dutch oven, place on the stovetop, and use the parchment as a sling to lift the dough in. Cover with the lid, reduce oven to 450°F, and bake 30 minutes. Remove the lid and bake an additional 20–25 minutes, until the crust reaches the desired color.
- Cool: Let the bread cool on a rack for 2 hours before cutting.
Notes:
- Use large silicone gloves when bread baking to protect hands and forearms from burns.
- During bulk fermentation, if your kitchen is warmer than 70°F, check the dough 2 hours after the last stretch and fold to prevent over-proofing. The dough is ready for shaping once it has risen about 30% with bubbles around the edges of the bowl.
Nutrition (per slice): Calories: 327kcal | Carbohydrates: 58g | Protein: 12g | Fat: 5g | Saturated Fat: 2g | Cholesterol: 10mg | Sodium: 449mg | Potassium: 111mg | Fiber: 3g | Sugar: 1g | Vitamin A: 115 IU | Vitamin C: 2mg | Calcium: 82mg | Iron: 1mg
Medical Disclaimer: This recipe and the accompanying content are provided for general informational and culinary purposes only and are not intended as medical, nutritional, or dietary advice. Nutritional needs vary from person to person, and individuals with food allergies, intolerances, medical conditions, or specific dietary requirements should consult a qualified healthcare professional or registered dietitian before preparing or consuming this recipe. Cooking times and temperatures may vary depending on individual equipment; always ensure food is cooked to a safe internal temperature before serving. The creator of this content assumes no liability for any adverse reactions, allergic responses, or health outcomes resulting from the preparation or consumption of this recipe.