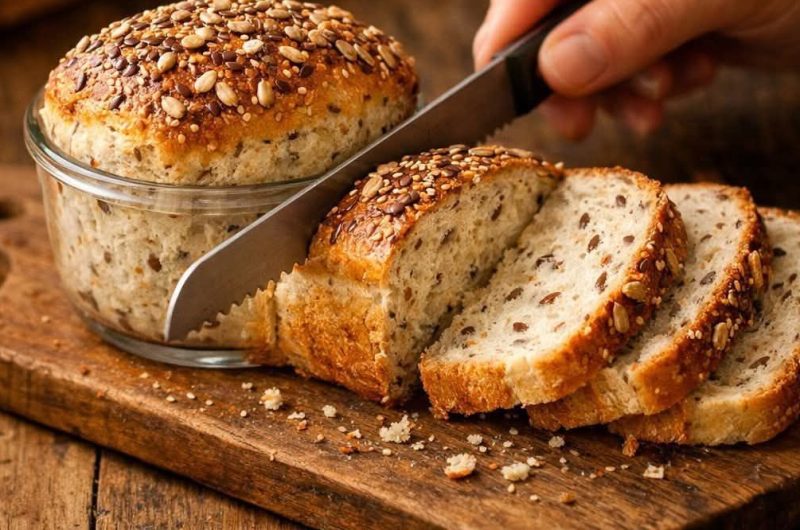
Healthy Seeded No-Knead Jar Bread is an easy homemade quick bread filled with sunflower seeds, pumpkin seeds, sesame seeds, and black sesame seeds. It combines all-purpose flour with whole wheat flour to create a loaf that is soft enough for sandwiches while still having the hearty flavor and texture people expect from a seeded bread. Best of all, there is no yeast, kneading, or lengthy proofing involved, so the entire loaf can be prepared and baked in about one hour.
This easy no-knead bread recipe is particularly useful for home bakers who want fresh bread without planning several hours ahead. Baking powder and baking soda provide the rise instead of yeast, while buttermilk, egg, oil, and honey create a moist and tender crumb. Toasted seeds are incorporated throughout the batter and sprinkled over the surface, giving every slice a pleasant nutty flavor and a lightly crunchy finish.
Why You Prefer This Recipe
The biggest advantage of this homemade seeded bread is convenience. Traditional yeast bread usually requires kneading, rising, shaping, and additional proofing before it reaches the oven. This loaf works more like a savory quick bread. The dry ingredients are combined in one bowl, the wet ingredients in another, and the two mixtures are gently stirred together before going directly into the prepared loaf pan.
Despite the simple preparation, the finished bread offers plenty of texture and flavor. Whole wheat flour gives it a slightly earthy character, honey contributes mild sweetness, and buttermilk provides a gentle tang. Sunflower, pumpkin, sesame, and black sesame seeds create a richer flavor throughout the loaf. Because the overall taste remains balanced, the bread works equally well with sweet breakfast toppings and savory sandwich fillings.
A No-Yeast Bread with No Kneading Required
This recipe does not use yeast, which means there is no waiting for dough to double in size. Instead, one teaspoon of baking powder and half a teaspoon of baking soda provide the leavening. Once the wet ingredients meet the dry ingredients, the batter should be transferred to the pan and baked without a long waiting period.
There is also no traditional kneading. In fact, excessive mixing should be avoided. The ingredients need only be stirred until the dry flour has disappeared and a thick batter has formed. Keeping the mixing gentle helps maintain a softer crumb. This makes the recipe approachable even for beginners who have never made homemade bread before.
The Benefits of Combining Two Flours
The bread uses one and one-quarter cups of all-purpose flour together with three-quarters cup of whole wheat flour. Each flour contributes something different to the finished loaf. All-purpose flour helps create a softer, lighter structure, while whole wheat flour brings a deeper grain flavor and contributes additional fiber.
This combination helps prevent the bread from becoming excessively heavy while still providing some of the character of a whole wheat seeded loaf. The finished texture is tender rather than chewy because this is a quick bread instead of a traditional yeast bread. For that reason, slightly thicker slices generally hold together better when serving.
Sunflower Seeds Add Crunch and Flavor
Toasted sunflower seeds are one of the major seed ingredients in this recipe. Half a cup, or 65 grams, goes directly into the bread batter, while another tablespoon is reserved for the topping. Toasting the seeds before adding them strengthens their naturally nutty aroma and provides a more noticeable contrast with the soft crumb.
Because the sunflower seeds are mixed throughout the batter rather than simply scattered over the crust, their flavor appears in almost every bite. The additional seeds on top continue to toast as the bread bakes, creating an attractive seeded crust. This combination of seeds inside and outside makes the loaf more flavorful and visually interesting than bread with a simple garnish.
Pumpkin Seeds Create a Hearty Seeded Loaf
The recipe also contains half a cup, or 75 grams, of toasted pumpkin seeds in the batter, plus another tablespoon for the surface. Pumpkin seeds have a rich, slightly earthy flavor that pairs naturally with whole wheat flour and honey. Their green color also creates an attractive contrast against the golden-brown interior of the bread.
Along with sunflower seeds, pumpkin seeds give this bread a hearty texture without requiring nuts. Chopping is not specified, so they can be used according to the original preparation. Toasting them before mixing is worthwhile because it develops their aroma and makes their flavor more noticeable after baking.
Sesame and Black Sesame Seeds
Two tablespoons each of toasted sesame seeds and black sesame seeds are incorporated into the main bread mixture. The regular sesame seeds provide a familiar toasted flavor, while black sesame seeds contribute both flavor and strong visual contrast. The small seeds distribute easily through the batter, complementing the larger sunflower and pumpkin seeds.
The topping repeats these flavors with half a tablespoon each of sesame seeds and black sesame seeds. Together with the sunflower and pumpkin seed topping, they form a varied seeded surface that becomes golden and aromatic in the oven. This generous use of four different seeds is one of the defining characteristics of the recipe.
Why Toasting the Seeds Matters
Toasting seeds before adding them to bread can make their natural flavor more pronounced. Heat develops their nutty aroma, which then becomes even more noticeable as the loaf continues baking. Since seeds are an important part of this recipe rather than a minor garnish, this extra flavor contributes significantly to the finished bread.
The original recipe specifically calls for toasted sunflower seeds, toasted pumpkin seeds, and toasted sesame seeds. Keeping those ingredients as specified ensures the loaf has the intended flavor. The black sesame seeds do not carry the same toasted description in the supplied ingredient list, so they should be used as listed rather than altering the original ingredients.
Buttermilk Keeps the Bread Moist
One and one-quarter cups, or 310 milliliters, of room-temperature buttermilk provides most of the liquid in this no-knead bread. Buttermilk adds moisture and a mild tang while also working with the baking soda to support the rise. This combination is commonly useful in quick breads because it provides both flavor and tenderness.
Using the buttermilk at room temperature helps it combine smoothly with the egg, oil, and honey. Rather than pouring each wet ingredient separately into the flour, they are whisked together first. This produces a uniform liquid mixture that can be distributed through the dry ingredients with less stirring, which is helpful when trying to avoid overmixing.
Honey Provides Gentle Sweetness
One-quarter cup, or 80 grams, of honey gives this seeded bread a mild sweetness. The quantity is enough to round out the flavors of the whole wheat flour, buttermilk, and toasted seeds without turning the loaf into a dessert-style bread. That balanced sweetness is one reason the finished bread can work with both savory and sweet toppings.
Whisking the honey thoroughly with the buttermilk, egg, and oil before combining the mixtures is important because honey is thick and needs to be distributed evenly. Once incorporated, it contributes both flavor and moisture. A slice can therefore be served plain or paired with another sweet topping without the bread itself tasting excessively sugary.
Preparing the Loaf Pan
Before mixing the batter, preheat the oven to 350°F (175°C) using conventional upper and lower heat without the fan. Lightly grease a 5 × 9-inch (13 × 23 cm) loaf pan or a 4.4 × 10-inch (11 × 25 cm) pan. Line the pan with parchment paper and leave enough paper extending over the long sides to create convenient handles.
The parchment overhang makes it easier to lift the baked bread from the pan after it has cooled sufficiently. Preparing the pan before combining wet and dry ingredients is also practical because baking powder and baking soda begin working once the batter is mixed. Having the oven hot and the pan ready allows the bread to move directly into baking.
How to Combine the Dry Ingredients
Place the all-purpose flour, whole wheat flour, toasted sunflower seeds, toasted pumpkin seeds, toasted sesame seeds, black sesame seeds, baking powder, baking soda, and salt into a large mixing bowl. Stir until the ingredients are evenly distributed. This preliminary mixing prevents the seeds or leavening ingredients from becoming concentrated in one section of the loaf.
Take a moment to make sure the larger sunflower and pumpkin seeds are distributed through the flour rather than collecting at the bottom. An even dry mixture makes the final mixing stage much easier because you will need fewer strokes after adding the liquids. That matters when trying to maintain a soft quick-bread texture.
Preparing the Wet Ingredients
In a separate bowl, combine one and one-quarter cups of room-temperature buttermilk, one large room-temperature egg, one-quarter cup of oil, and one-quarter cup of honey. Whisk until the mixture looks smooth and the honey is thoroughly incorporated.
The oil keeps the finished loaf tender and helps prevent it from drying too quickly, while the egg provides structure and helps hold the bread together. Buttermilk contributes moisture and acidity, and honey supplies sweetness. Mixing these ingredients thoroughly before they are introduced to the flour makes it possible to combine the final batter more gently.
Do Not Overmix the Bread Batter
Pour the wet ingredients into the bowl containing the dry mixture. Stir gently, stopping as soon as the flour has been incorporated and a thick batter has formed. The mixture will not resemble a firm yeast dough, and it does not need to be kneaded on a counter. It should remain soft enough to spread into the loaf pan with a spatula.
Overmixing is one of the easiest ways to make a quick bread heavier than intended. Once you can no longer see dry pockets of flour, additional stirring is unnecessary. The goal is simply to distribute the ingredients evenly while keeping the batter tender. The original recipe specifically emphasizes avoiding overmixing for a soft, light result.
Adding the Seeded Topping
Transfer the prepared batter to the lined loaf pan and use a spatula to spread it evenly. Then scatter the reserved black sesame seeds, sesame seeds, toasted sunflower seeds, and toasted pumpkin seeds over the entire surface. Try to distribute them evenly rather than concentrating all the topping in the center.
The topping is more than decoration. As the bread bakes, these exposed seeds continue to toast, adding a slightly crisp surface and stronger nutty aroma. Their varied sizes and colors also create an attractive rustic finish, making the loaf visually appealing without requiring scoring, shaping, glazing, or other decorative bread-making techniques.
Baking the No-Knead Seeded Bread
Place the loaf pan on the lower two-thirds rack of the preheated oven and bake for approximately 45 minutes. The bread should develop a golden-brown surface, and a toothpick inserted into the center should come out clean when the loaf is fully baked.
If the top begins browning too quickly, wait until approximately 30 minutes of baking before loosely covering it with aluminum foil. The foil helps protect the seeded crust while the center continues cooking. Avoid covering it unnecessarily early because the initial uncovered baking time allows the surface to develop its attractive golden color.
Why Cooling Before Slicing Is Important
After baking, allow the bread to cool completely before cutting it. Although a freshly baked loaf can be tempting to slice immediately, quick breads continue setting internally as they cool. Cutting while the center is still very warm may result in a crumb that feels gummy or breaks apart more easily.
Once completely cool, the loaf becomes easier to cut into neat slices. The original recipe recommends slightly thicker slices because this is a tender quick bread rather than a chewy yeast loaf. Thick slices are also useful for toast and sandwiches because they provide enough structure to hold toppings and fillings without breaking apart.
Is Seeded No-Knead Bread a Healthy Recipe?
This recipe can reasonably be placed within a Healthy Recipes or Healthy Bread Recipes section of a general recipe website, particularly because it combines whole wheat flour with several types of seeds. However, “healthy” should be used as a broad recipe category rather than interpreted as a medical or individualized nutrition claim.
The recipe still contains all-purpose flour, honey, and oil, and the supplied nutrition information lists 313.9 calories and 17.8 grams of fat per serving. It is therefore better to emphasize specific factual features such as seeded bread, contains whole wheat flour, no yeast, homemade quick bread, and 3.2 grams of fiber per serving rather than presenting it as universally healthier than every other type of bread.
Breakfast Ideas for Seeded Bread
For breakfast, slices can be toasted and served with butter, honey, fruit preserves, or nut butter. The bread’s mild sweetness makes it compatible with these toppings without tasting like cake or dessert bread. Fresh banana slices and a small drizzle of honey are another serving idea when you want something naturally sweet alongside the nutty seed flavor.
Because the bread contains a generous quantity of seeds, each slice already provides plenty of texture. It does not need complicated toppings to be enjoyable. Toasting can make the seed-covered surface slightly crisper while warming and softening the center, creating an appealing contrast for breakfast or a simple mid-morning snack.
Using Seeded Bread for Sandwiches
This loaf can also be used for sandwiches because its flavor is mild enough to complement savory fillings. Vegetables, cheese, grilled chicken, turkey, eggs, or avocado are among the suggested choices. Cutting the bread slightly thicker can help the slices support fillings, particularly because the crumb is more tender than traditional kneaded yeast bread.
For lunch, the nutty flavor of sunflower, pumpkin, and sesame seeds can add extra character to a basic sandwich without requiring strongly flavored spreads. The bread can also be lightly toasted before assembling a sandwich if you want a firmer surface and slightly more pronounced seed flavor.
Serving with Soups and Salads
Seeded no-knead bread is an easy accompaniment to soup, salad, and stew. Its relatively neutral flavor means it can be paired with creamy soups, vegetable soups, hearty stews, or fresh salads. A thick slice can be served plain, toasted, or warmed briefly before reaching the table.
This versatility makes the loaf useful for meal preparation because one batch can serve several purposes over a few days. The same bread that appears with breakfast can become sandwich bread at lunchtime and a side for soup at dinner. That flexibility helps make a homemade loaf more practical for everyday cooking.
How to Store Seeded No-Knead Bread
Once the loaf has cooled completely, keep it in an airtight container or wrap it securely. It can be stored at room temperature for up to three days. Keeping air away from the cut surfaces helps slow moisture loss and preserves the bread’s soft texture for longer.
For extended storage, refrigerate the bread for up to seven days. Refrigerated bread can feel firmer when cold, so allow individual slices to return to room temperature or warm them briefly before serving. These storage times come directly from the supplied recipe notes.
Freezing Seeded Bread for Later
This loaf can also be frozen for up to three months. For convenient portions, slice the completely cooled bread before freezing. Wrap the individual slices well and place them inside a suitable freezer-safe airtight container. Separating the portions means you do not have to thaw the entire loaf whenever only one or two slices are needed.
When ready to eat, remove the required number of slices and allow them to thaw at room temperature. They can also be gently warmed afterward. Freezing individual portions can be particularly convenient when making bread for a smaller household or when you want homemade bread available without baking a new loaf every few days.
Notes for the Best Seeded Quick Bread
Measure flour carefully using the spoon-and-level method rather than compressing it into the measuring cup. Toast the specified seeds before incorporating them because this enhances their flavor and aroma. Keep the buttermilk and egg at room temperature, whisk the wet ingredients thoroughly, and stop mixing once the wet and dry ingredients have been combined.
If the loaf becomes dark on top before the center has finished baking, loosely tent it with aluminum foil after approximately 30 minutes. Most importantly, allow the finished loaf to cool completely before slicing. These straightforward details help produce a tender, evenly baked bread with well-distributed seeds and a nicely browned crust.
Flour Substitution Notes
The supplied recipe notes allow whole wheat flour to replace the all-purpose flour in equal amounts if desired. They also state that oat flour can replace the whole wheat flour using the same measurement. These alternatives can change the texture somewhat, so they should be viewed as optional variations rather than requirements for the standard loaf.
For the original recipe, keep the specified combination of one and one-quarter cups all-purpose flour and three-quarters cup whole wheat flour. This pairing is designed to provide a balance between the softness associated with all-purpose flour and the heartier character of whole wheat.
Why This Recipe Works
For readers searching for healthy seeded bread, no-knead bread recipe, no-yeast bread, homemade seed bread, whole wheat seeded bread, easy quick bread, sunflower seed bread, pumpkin seed bread, or healthy homemade bread, this recipe provides a convenient option with simple preparation. The combination of four different seeds, whole wheat flour, buttermilk, and honey gives the loaf plenty of flavor without complicated bread-making techniques.
There is no yeast to activate, no dough to knead, and no proofing schedule to follow. Preparation takes approximately 15 minutes and baking approximately 45 minutes, bringing the total time to about one hour. With its soft crumb, toasted seed topping, slightly nutty flavor, and versatility for breakfast, sandwiches, soups, salads, and snacks, this seeded no-knead bread can easily fit into everyday home cooking.
Healthy Seeded No-Knead Jar Bread
An easy, yeast-free seeded bread packed with toasted sunflower seeds, pumpkin seeds, sesame seeds, and black sesame seeds.
10
servings15
minutes45
minutes313
kcalIngredients
- Seeded Bread
1¼ cups (160 g) all-purpose flour
¾ cup (100 g) whole wheat flour
½ cup (75 g) toasted pumpkin seeds
2 tablespoons toasted sesame seeds
2 tablespoons black sesame seeds
1 teaspoon baking powder
½ teaspoon baking soda
½ teaspoon salt
1¼ cups (310 ml) buttermilk, room temperature
1 large egg, room temperature
¼ cup (60 ml) oil
¼ cup (80 g) honey
- Seed Topping
½ tablespoon black sesame seeds
½ tablespoon sesame seeds
1 tablespoon toasted sunflower seeds
1 tablespoon toasted pumpkin seeds
Instructions
- Preheat the oven to 350°F (175°C) using conventional heat without the fan.
- Grease and line a 5 × 9-inch (13 × 23 cm) or 4.4 × 10-inch (11 × 25 cm) loaf pan.
- Combine both flours, all batter seeds, baking powder, baking soda, and salt.
- In another bowl, whisk buttermilk, egg, oil, and honey until smooth.
- Pour the wet mixture into the dry ingredients.
- Stir gently just until a thick batter forms. Do not overmix.
- Transfer the batter to the prepared loaf pan.
- Smooth the surface with a spatula.
- Sprinkle all topping seeds evenly over the loaf.
- Bake on the lower two-thirds oven rack for 45 minutes.
- If browning quickly, loosely cover with foil after about 30 minutes.
- Check the center with a toothpick; it should come out clean.
- Allow the bread to cool completely before slicing.
Nutrition Facts
10 servings per container
- Amount Per ServingCalories313
- % Daily Value *
- Total Fat
17.8g
22%
- Total Carbohydrate
32g
12%
- Protein 9.3g 18%
* The % Daily Value tells you how much a nutrient in a serving of food contributes to a daily diet. 2,000 calories a day is used for general nutrition advice.