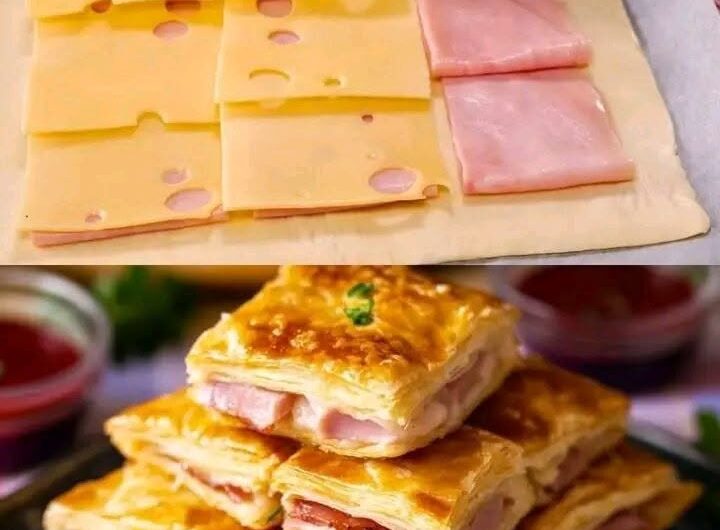
Before you even preheat the oven, it helps to understand what you’re actually building here. This isn’t just “ham and cheese in pastry” — it’s a layered flavor system with three distinct components working together: the honey mustard sauce (sweet, tangy, sharp), the savory ham, and the melty Swiss cheese, all wrapped in a buttery, flaky puff pastry shell. When you understand the role each part plays, assembly becomes intuitive instead of just following steps blindly.
The whole thing comes together in about 40 minutes total — 10 minutes of hands-on prep and 30 minutes of bake time — and yields 6 individual pastries at roughly 418 calories each. That makes this a genuinely quick project, but “quick” doesn’t mean careless. A few small technique choices make the difference between a soggy, leaky pocket and a golden, crisp one that holds its shape.
Mise en Place: Organizing Your Components
Good pastry work is really just good organization. Before you touch the puff pastry, get everything else ready first, because puff pastry is temperature-sensitive and you don’t want it sitting out on the counter while you scramble to whisk a sauce.
Component 1 — The Honey Mustard Sauce
This is your flavor backbone. It’s made from just four items:
- Dijon mustard
- Honey
- Fresh lemon juice
- Salt and black pepper
Whisk these together in a small bowl before you unroll the pastry. The sauce should taste balanced when you dip a spoon in — slightly sweet from the honey, slightly tangy from the lemon, and mildly sharp from the Dijon. If any one flavor dominates too much, it will throw off the whole pastry, since this sauce is the main seasoning agent for the entire filling. There’s no salt or pepper measurement given — it’s a “to taste” situation, so season lightly, taste, and adjust.
Component 2 — The Filling
This is straightforward: ham slices, shredded Swiss cheese, and optional fresh thyme leaves. Have your ham slices separated and ready to lay flat, and your cheese pre-shredded so it’s ready to sprinkle the moment you need it.
Component 3 — The Pastry
One sheet of puff pastry, ideally all-butter for the best flavor, though the type isn’t rigid. Puff pastry needs to stay cold until the moment you use it — this is the single most important technique note in the whole recipe. If it warms up and gets soft or sticky while you’re working, don’t push through it — pop it back in the fridge for 5–10 minutes and let it firm up again. Working with pastry that’s too warm is the number one cause of pastries that don’t puff properly or that tear during sealing.
Component 4 — The Egg Wash
One egg beaten with 2 teaspoons of water (milk or heavy cream can be swapped in for the water if that’s what you have on hand). This is what gives the finished pastries their glossy, bakery-style shine.
Workflow: The Order That Actually Makes Sense
- Oven first. Preheat to 425°F (220°C) and line your baking sheet with parchment. Doing this first means your oven is fully up to temperature by the time your pastries are assembled — no waiting around with filled pastry sitting on the counter.
- Sauce second. Whisk it up while the oven heats. It only takes a minute or two and can sit while you move on.
- Pastry third, and only when you’re ready to assemble immediately. This is the step where timing matters most. Lightly flour your surface, roll the pastry gently into a rectangle just to smooth out any fold creases, then cut into 6 even squares. Space them out on your parchment-lined sheet right away.
- Fill immediately, one square at a time. Ham first, then 3–4 teaspoons of the honey mustard sauce spread over it, then a generous sprinkle of Swiss cheese, then thyme if you’re using it.
- Seal, then egg wash, then bake.
Working in this order — oven, sauce, then pastry only right before filling — keeps the pastry cold for the shortest possible window outside the fridge, which is exactly what you want for a good rise.
Filling Strategy: How Much Is Too Much
The recipe is specific about one thing: don’t overfill. It’s tempting to pile on extra cheese or extra sauce, but every bit of overstuffing raises the odds of a seam splitting open in the oven and the filling leaking onto your baking sheet. Stick to one slice of ham, 3–4 teaspoons of sauce, and a generous — but not mounded — layer of cheese per square. Generous is fine. Overloaded is not.
Sealing Technique
Bring all four corners of each square up toward the center and pinch them together firmly. You have two options here depending on the look you’re going for:
- Fully sealed pockets — neater, more contained, less risk of leaking.
- Rustic, slightly open-top pockets — leave a small gap at the top. This gives a more homemade look and lets a little of the cheese peek through and caramelize as it bakes, but it does carry slightly more risk of filling escaping if the squares were overfilled.
Either way, make sure the pinch points are actually pressed together and not just resting — puff pastry will pop back open in the oven if it isn’t sealed firmly.
The Two-Stage Bake
This recipe uses a temperature drop partway through baking, which is worth understanding rather than just following blindly:
- Stage one: 425°F (220°C) for 15 minutes. This high initial heat is what makes puff pastry actually puff — the water in the butter layers flashes to steam quickly and pushes the layers apart.
- Stage two: drop to 320°F (160°C) for another 10–15 minutes. This gentler second stage lets the inside finish cooking and the cheese melt through fully without scorching the outside, which would happen if you left the oven at the higher temperature the whole time.
Watch closely in the final few minutes of stage two — this is where over-browning creeps in fastest, especially on the corners and edges where the pastry is thinnest.
Approved Variations & Swaps (Straight From the Recipe)
The text doesn’t invite a lot of creative liberty, but it does explicitly allow for a few swaps:
- Ham type: smoked, honey, or black forest ham all work well.
- Egg wash liquid: milk or heavy cream can stand in for the water.
- Thyme: entirely optional — leave it out if you’d rather keep the flavor simple.
No other ingredient substitutions are specified in the source, so if you’re looking to experiment beyond this, you’re outside what’s been tested here.
Serving the Pastries
Serve them warm, right when the cheese is still perfectly melted and gooey — this isn’t a dish that holds well once it cools, so plan your timing so people are ready to eat when these come out of the oven. Good pairings mentioned alongside this recipe:
- A crisp green salad
- Tomato soup
- Fresh fruit
- Sparkling lemonade or iced tea
Make-Ahead and Freezing Notes
A few honest limitations worth knowing before you plan around this recipe:
- These are best baked fresh. They’re not really a make-ahead recipe in the traditional sense.
- Don’t fill and refrigerate unbaked pastries for long — the filling makes the pastry soggy if it sits too long before baking.
- Baked pastries do freeze well, though. Let them cool completely, freeze them on a tray until solid, then transfer to an airtight container or freezer bag for longer storage.
- Reheat straight from frozen at 400°F (200°C) until they’re warmed through and crisp again — no need to thaw first.
Puff Pastry Handling Tips (Worth Repeating)
Since puff pastry is the trickiest part of this whole process, here’s the full list of handling advice, gathered in one place:
- Keep it cold until the moment you’re ready to use it.
- If it gets soft or sticky while you’re working, chill it for 5–10 minutes before continuing.
- Flour your work surface lightly before rolling.
- Thaw frozen puff pastry overnight in the refrigerator — not on the counter.
- All-butter puff pastry is stickier to work with than other varieties, but it delivers better flavor, so it’s worth the slightly extra care.
Ham & Cheese Puff Pastry Pockets with Honey Mustard
Description: Golden, flaky puff pastry pockets filled with savory ham, melty Swiss cheese, and a sweet-tangy honey mustard sauce. Quick to prepare and freezer-friendly.
Duration:
- Prep Time: 10 minutes
- Bake Time: 30 minutes
- Total Time: 40 minutes
- Servings: 6 pastries
- Calories: ~418 kcal per pastry
Ingredients
Honey Mustard Sauce
- 3 tablespoons Dijon mustard
- 1 tablespoon honey
- 1 teaspoon fresh lemon juice
- Salt and black pepper, to taste
Pastries
- 1 sheet puff pastry (10 oz / 285 g), preferably all-butter
- 6 slices ham (smoked, honey, or black forest)
- 1½ cups shredded Swiss cheese (150 g)
- Fresh thyme leaves (optional)
- 1 egg + 2 teaspoons water, for egg wash (milk or heavy cream may be substituted)
Instructions
- Preheat oven to 425°F (220°C). Line a baking sheet with parchment paper.
- Whisk together Dijon mustard, honey, and lemon juice in a small bowl. Season with salt and pepper to taste.
- Lightly flour your surface and roll the puff pastry into a rectangle to smooth out creases. Cut into 6 equal squares and space evenly on the baking sheet.
- On each square, layer one slice of ham, 3–4 teaspoons of honey mustard sauce, a generous sprinkle of Swiss cheese, and thyme if using. Avoid overfilling.
- Bring the four corners of each square to the center and pinch tightly to seal — fully closed or with a small rustic opening at the top.
- Beat the egg with 2 teaspoons of water and brush generously over each pastry.
- Bake at 425°F (220°C) for 15 minutes, then reduce to 320°F (160°C) and bake another 10–15 minutes, until deeply golden and puffed. Watch closely near the end to prevent over-browning.
- Serve warm.
Notes
- Best baked fresh; unbaked filled pastries can turn soggy if refrigerated too long.
- Baked pastries freeze well: cool completely, freeze on a tray until solid, then store in an airtight container or bag. Reheat from frozen at 400°F (200°C) until warmed through and crisp.
- Keep puff pastry cold throughout; chill for 5–10 minutes if it becomes soft or sticky.
- Thaw frozen puff pastry overnight in the refrigerator.
Disclaimer: This content is provided for general informational and culinary purposes only and does not constitute professional dietary, nutritional, or medical advice. Calorie estimates are approximate and may vary based on specific ingredients and portion sizes used. Individuals with food allergies, sensitivities, or specific dietary or medical conditions should consult a qualified healthcare provider or registered dietitian before preparing or consuming this recipe. The author and publisher assume no liability for any adverse effects resulting from the use or preparation of the information provided herein.