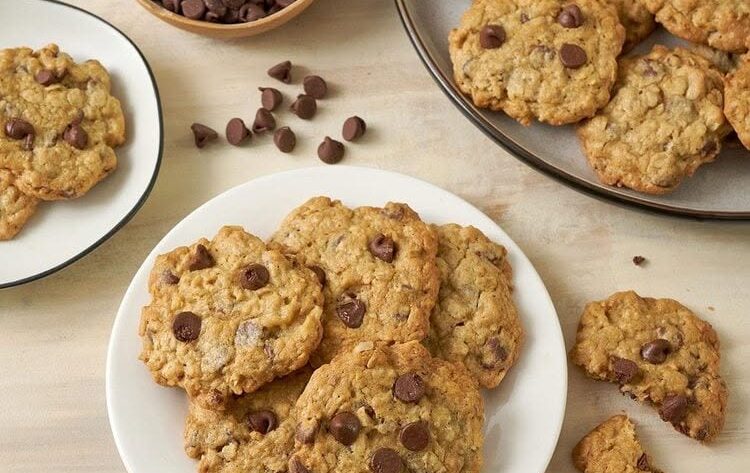
Baking cookies usually means preheating a full-size oven, even if you only want a handful. The air fryer solves that problem neatly — it heats up faster, uses less energy, and its circulating hot air produces the same crisp-edged, chewy-centered result oatmeal cookies are known for, just in smaller, more manageable batches. That makes it a genuinely practical option any time a cookie craving hits without wanting to commit to a full oven-sized batch.
The base recipe here is a classic oatmeal cookie, built to be customized with mix-ins like chocolate chips, raisins, or nuts. The technique closely mirrors traditional cookie baking — creaming butter and sugar, combining wet and dry ingredients, portioning the dough — with a few adjustments specific to how air fryers cook.
Mise En Place: Getting Organized Before You Bake
Cookie dough comes together in stages, so having every ingredient measured and prepped ahead of time keeps the process moving smoothly.
The dry ingredients. Old-fashioned rolled oats, all-purpose flour, baking soda, salt, and ground cinnamon.
The butter and sugars. Softened unsalted butter, brown sugar, and granulated sugar.
The binding ingredients. One large egg (ideally at room temperature) and vanilla extract.
The mix-ins. Chocolate chips, raisins, chopped nuts, or a combination — measured out and ready to fold in near the end.
Equipment. An air fryer, mixing bowls, measuring cups and spoons, a whisk, an electric mixer or wooden spoon, a rubber spatula, perforated parchment paper (or lightly greased parchment with ventilation holes), a cookie scoop or tablespoon, and a cooling rack.
Softened butter should be cool but easily pressed with a finger — cold butter won’t cream properly, and melted butter causes the cookies to spread too much, so getting the butter to the right temperature ahead of time matters more than it might seem.
Why Rolled Oats (Not Instant) Make the Difference
Old-fashioned rolled oats are central to this recipe’s texture — they create the chewy bite and hearty flavor that define a good oatmeal cookie. Instant oats absorb moisture differently during baking, which tends to produce cookies that are softer and less textured overall. If you only have instant oats on hand, the cookies will still bake, but the texture won’t match what this recipe is built around.
Preparing Ingredients Before Mixing
A few small prep steps ahead of time pay off in the final result. Bringing the egg to room temperature, if possible, helps it combine more smoothly into the butter and sugar mixture. If you’re using raisins or dried cranberries, soaking them in warm water for about 10 minutes, then draining and patting them dry, keeps them from pulling moisture out of the dough during baking, which would otherwise leave the surrounding cookie slightly drier.
Workflow: How the Process Flows
- Mix the dry ingredients. In a medium bowl, whisk together the flour, oats, baking soda, salt, and cinnamon until evenly distributed.
- Cream the butter and sugars. Beat the softened butter, brown sugar, and granulated sugar for 3 to 5 minutes until light, fluffy, and pale.
- Add the egg and vanilla. Beat in the egg until fully combined, then stir in the vanilla extract.
- Combine the dough. Gradually add the dry ingredients into the butter mixture, stirring gently after each addition, mixing only until no streaks of flour remain.
- Fold in the mix-ins. Gently fold in the chocolate chips, raisins, nuts, or other add-ins with a spatula, stopping once everything is evenly incorporated.
- Chill if needed. If the dough feels very soft, refrigerate for 20 to 30 minutes — chilled dough spreads less and produces thicker cookies.
- Preheat the air fryer, if your model recommends it, to 320°F (160°C) for 3 to 5 minutes. Line the basket with perforated parchment or lightly greased parchment that allows airflow.
- Shape the cookies. Portion the dough into equal-sized balls using a tablespoon or cookie scoop, placing them at least two inches apart in the basket. For flatter cookies, gently press each ball before baking.
- Air fry. Bake at 320°F (160°C) for 7 to 10 minutes, until the edges are golden brown and the centers look slightly soft.
- Cool. Let the cookies rest in the basket for about 3 minutes, then transfer to a cooling rack to cool completely.
Why Creaming and Mixing Technique Matter
Beating the butter and sugars together for a full 3 to 5 minutes isn’t just about combining them — it’s what incorporates tiny air pockets into the mixture, and those pockets are part of what gives the finished cookies a tender texture rather than a dense one. Rushing this step shortchanges that structure before the dough even comes together.
Once the dry ingredients go in, mixing only until the flour streaks disappear — rather than continuing to stir — matters just as much. Overmixing develops more gluten than a cookie needs, which makes the final texture tougher instead of tender. The same principle applies when folding in mix-ins: gentle folding just until they’re distributed, rather than continued stirring, protects the texture you’ve built up to that point.
Why Chilling the Dough Changes the Result
If the dough feels especially soft — often because of a warm kitchen — refrigerating it for 20 to 30 minutes firms the butter back up. Since butter that’s still cool and firm spreads less rapidly in the heat of the air fryer, chilled dough produces cookies that hold their shape better and end up thicker rather than spreading thin.
Why Spacing and Batch Size Matter in the Air Fryer
Air-fryer cookies spread as they bake, just like conventionally baked ones, which is why leaving at least two inches between dough balls in the basket is important — crowding them leads to cookies that merge together or bake unevenly. Depending on your air fryer’s size, this often means baking only four to six cookies per batch, with the remaining dough refrigerated until it’s its turn.
Because parchment blocks airflow if it’s not designed for an air fryer, using perforated parchment paper (or lightly greased parchment with ventilation holes) is worth the small extra step — solid parchment that blocks the vents interferes with the circulating air the whole cooking method depends on.
How to Tell When the Cookies Are Actually Done
The cookies are ready when the edges turn golden brown and the centers still look slightly soft — not fully firm. This matters because cookies continue cooking from residual heat even after they’re removed from the basket; ones that already look completely firm while still inside the air fryer are likely to turn out dry once they’ve cooled. Resting them in the basket for about 3 minutes before transferring to a cooling rack lets them firm up gradually without falling apart in the process.
Texture Variations
For extra chewy cookies, use slightly more brown sugar than white sugar, and bake for the minimum recommended time.
For crisper cookies, flatten the dough slightly before baking, and extend the cooking time by a minute or two.
For thicker, bakery-style cookies, chill the dough for at least 30 minutes before shaping.
Approved Flavor Variations
This base recipe adapts easily into a number of different directions:
- White chocolate chips and dried cranberries, for a sweet and tangy version
- Chopped pecans with cinnamon, for a nutty, warm flavor
- Dark chocolate chunks, for a richer cookie
- Shredded coconut, for extra texture
- Pumpkin pie spice in place of cinnamon, for an autumn-inspired version
- Chopped dried apricots with walnuts, for a fruity variation
- Orange zest, to brighten the overall flavor
- Butterscotch chips in place of chocolate chips, for a caramel-like sweetness
Common Mistakes and How to Avoid Them
Using melted butter instead of softened. Causes excessive spreading during baking.
Adding too much flour. Creates dense, dry cookies — measuring with the spoon-and-level method rather than scooping directly from the bag helps avoid this.
Skipping the cooling time. Can cause the cookies to break apart when handled too soon.
Overmixing. Develops excess gluten, making the cookies less tender.
Crowding the basket. Prevents even cooking and proper spreading.
Using instant oats instead of rolled oats. Changes the texture significantly.
Serving Ideas
These cookies work well served warm with a glass of cold milk, paired with coffee or tea for an afternoon snack, crumbled over vanilla ice cream, used for homemade ice cream sandwiches, packed into lunchboxes, or served alongside fresh fruit for a more balanced dessert.
Storage and Freezing
Room temperature: Store cooled cookies in an airtight container for up to 5 days.
Refrigerator: Up to 10 days.
Freezer (baked cookies): Freeze in freezer-safe containers for up to 3 months; thaw at room temperature before serving.
Freezer (cookie dough): Shape the dough into balls, freeze on a tray until solid, then transfer to freezer bags. Bake directly from frozen, adding 1 to 2 extra minutes to the cooking time.
Nutritional Information (Approximate Per Cookie)
- Calories: 150
- Protein: 2 grams
- Carbohydrates: 21 grams
- Fat: 6 grams
- Fiber: 2 grams
- Sugar: 11 grams
- Sodium: 85 milligrams
These values will vary depending on the mix-ins chosen.
Air-Fryer Oatmeal Cookies
Description: Crisp-edged, chewy-centered oatmeal cookies baked in small batches in the air fryer, with rich buttery flavor and endless options for customizing with chocolate chips, raisins, nuts, or spices.
Duration:
- Cook Time: 7–10 minutes per batch
Ingredients:
- 1 cup old-fashioned rolled oats
- 1 cup all-purpose flour
- ½ teaspoon baking soda
- ¼ teaspoon salt
- 1 teaspoon ground cinnamon
- ½ cup unsalted butter, softened
- ½ cup packed brown sugar
- ¼ cup granulated sugar
- 1 large egg
- 1 teaspoon vanilla extract
- ½ cup chocolate chips, raisins, chopped nuts, or a combination of your favorite mix-ins
Instructions:
- In a medium bowl, whisk together the flour, oats, baking soda, salt, and cinnamon.
- In a large bowl, beat the softened butter, brown sugar, and granulated sugar for 3–5 minutes until light and fluffy.
- Add the egg and beat until combined. Stir in the vanilla extract.
- Gradually add the dry ingredients into the butter mixture, stirring gently until no flour streaks remain.
- Fold in the chocolate chips, raisins, nuts, or other mix-ins.
- If the dough is very soft, refrigerate for 20–30 minutes.
- Preheat the air fryer to 320°F (160°C) for 3–5 minutes if recommended. Line the basket with perforated parchment paper.
- Scoop the dough into equal-sized balls and place in the basket with at least 2 inches of space between them.
- Bake at 320°F (160°C) for 7–10 minutes, until the edges are golden brown and centers look slightly soft.
- Let the cookies rest in the basket for about 3 minutes, then transfer to a cooling rack to cool completely.
Notes:
- Use old-fashioned rolled oats, not instant, for the intended chewy texture.
- Measure flour with the spoon-and-level method to avoid dense, dry cookies.
- Don’t overcrowd the basket; bake in batches, keeping remaining dough refrigerated.
- Cookies continue to firm up as they cool — avoid overbaking based on how they look while still in the basket.
- Store at room temperature for up to 5 days, refrigerate for up to 10 days, or freeze baked cookies or shaped dough for up to 3 months.
Medical Disclaimer: This content is provided for general informational and educational purposes only and is not intended as, and should not be substituted for, professional medical, nutritional, or dietary advice. This recipe contains raw eggs in its dough; take appropriate precautions if consuming raw dough, and ensure cookies are fully baked before eating. If you have specific dietary restrictions, food allergies (including nut allergies, depending on your chosen mix-ins), or health conditions, consult a qualified healthcare provider or registered dietitian before making changes to your diet. The author and publisher assume no responsibility for any adverse effects resulting from the preparation or consumption of this recipe.