These scones are built around a simple idea: a soft, cheese-loaded dough that goes straight from mixing bowl to air fryer basket in under ten minutes of hands-on work. There’s no resting time, no chilling, no rolling out a big slab of dough and cutting a dozen precise rounds. It’s a fast, forgiving recipe, which makes it a good one to have on hand for a quick breakfast or an afternoon snack when you want something warm and cheesy without committing to a full baking project.
The dough itself is a basic cheese-biscuit style dough — flour, baking powder, a generous amount of shredded cheddar, milk, salt, and seasoning. What makes it come together quickly is that the cheese does double duty: it adds flavor, but it also adds moisture and fat to the dough, which is part of why you don’t need butter or oil worked into the flour the way you would for a traditional scone or biscuit.
The other thing worth understanding upfront is that this recipe gives you two cooking paths — air fryer or conventional oven — and the texture differs slightly between the two. The air fryer’s fast, circulating hot air produces a noticeably crisp exterior while keeping the cheese inside melty, whereas the oven route is a touch gentler and slower. Neither is “correct.” It’s really about what equipment you have on the counter that day.
Prep and Setup
Before you touch the flour, get everything measured and within reach. This dough moves fast once the wet and dry ingredients meet, so having things organized ahead of time keeps the process smooth:
- Dry ingredients station: flour, baking powder, salt, and your seasoning blend of choice, all ready to go into one bowl.
- Cheese: shredded cheddar, measured out. If you’re shredding a block yourself, do this first — freshly shredded cheese melts differently (and more reliably) than pre-shredded bags, which are often coated in anti-caking starch.
- Milk: measured but held back. You’ll add this gradually rather than all at once, so keep it close but don’t pour it in yet.
- Optional mix-ins: minced chives and/or bacon crumbles, prepped and ready if you’re using them.
- Work surface: a light dusting of flour ready for when the dough needs shaping.
- Air fryer or oven: preheating before you start mixing, so it’s ready the moment your dough is shaped.
Getting the appliance heating early matters more than it seems. A cold air fryer basket won’t give you that crisp exterior — you want the scones to hit hot air right away.
Workflow: How the Steps Actually Flow
Here’s the logic behind the order of operations, and why each stage matters:
1. Preheat first, always. Air fryer to 375°F (190°C), or oven to 400°F. This is step one for a reason — everything downstream depends on the heat being ready when the dough is.
2. Combine the dry ingredients. Flour, baking powder, and your seasoning go into a large bowl together. Whisking or stirring these together first (before the cheese and milk enter the picture) makes sure the baking powder is evenly distributed, so you don’t end up with a scone that rises unevenly.
3. Fold in the cheese, then add milk gradually. This is the step that separates a good batch from an overworked one. Stir the shredded cheddar through the dry mix first — this coats the cheese in flour, which actually helps it distribute evenly rather than clumping. Then add the milk a little at a time. The goal is a soft dough that holds together, not a wet, sticky one. Because flour absorbs liquid differently depending on humidity and how it’s packed into the measuring cup, adding milk incrementally protects you from overshooting.
4. Stop mixing the moment it comes together. Overmixing develops gluten, and developed gluten means tough, dense scones instead of light, tender ones. Mix only until the dough holds — don’t keep going for the sake of a “smoother” dough.
5. Knead briefly, then shape. A short 10–15 second knead on a floured surface is enough to bring the dough together for cutting. From there, either use a biscuit cutter (or a glass) for clean rounds, or shape by hand into rough patties about ¾ inch thick. Hand-shaping is the more forgiving option if you don’t have a cutter on hand, and it doesn’t require re-rolling scraps.
6. Space the rounds so air can circulate. In the air fryer basket specifically, this is non-negotiable — scones touching each other will steam rather than crisp on the sides that are pressed together. A light spritz of oil on top helps the exterior brown and crisp evenly.
7. Cook, then check for color, not just time. Times given are a starting point — “golden brown” is your real finish line, since air fryer models vary in strength.
Component Organization: What Each Ingredient Is Doing
It helps to think of the ingredient list in three functional groups:
- Structure: flour and baking powder. Flour gives the dough its body; baking powder is the lift, giving the scones a bit of rise rather than a flat, dense result.
- Flavor and binding: cheddar cheese, milk, salt, and seasoning. The cheese is the star here — it’s what makes this a cheese scone rather than a plain one — and it also contributes fat and moisture that a plain biscuit dough would otherwise get from butter.
- Optional extras: chives and bacon crumbles. These are entirely additions on top of the base dough — they don’t change the core method, they just fold in alongside the cheese.
Understanding it this way makes it easier to see where the approved flexibility in this recipe actually lives (see below) versus where the structure needs to stay intact.
Approved Variations and Swaps (Based Strictly on the Recipe)
The recipe text itself gives you a few explicit points of flexibility:
- Seasoning blend: the recipe calls for ½ teaspoon of “seasoning of choice,” with garlic powder, Italian seasoning, and ranch seasoning blend given as the options actually used. Any one of these — or a combination — fits within the recipe as written.
- Chives: explicitly marked optional. Include them if you want a mild oniony note running through the dough; leave them out for a more straightforward cheese scone.
- Bacon crumbles: also explicitly optional, folded in the same way as the chives, for a smokier, saltier version.
- Cooking method: air fryer or oven — both are given as valid paths in the source recipe, with slightly different timing for each.
- Scaling for height: if you want taller, more dramatic scones, the method is to double the ingredient quantities, double the thickness of the shaped dough, and add three extra minutes to the cook time. This is the one built-in scaling note in the recipe, and it applies specifically to thickness and cook time — not to any other variable.
No ingredients outside of what’s listed should be introduced, and no other adjustments are specified in the original text.
Step-by-Step Assembly Strategy
Putting the workflow above into a single mental checklist:
- Preheat your appliance.
- Whisk dry ingredients (flour, baking powder, seasoning) in a large bowl.
- Stir in the shredded cheese.
- Add milk gradually until a soft dough forms — stop as soon as it holds together.
- Fold in chives and/or bacon, if using.
- Knead gently for 10–15 seconds on a floured surface.
- Cut or hand-shape into rounds about ¾ inch thick.
- Arrange with space between each round; spritz with oil.
- Air fry 3 minutes per side, or bake 12–15 minutes, until golden brown.
- Serve warm with butter and jam.
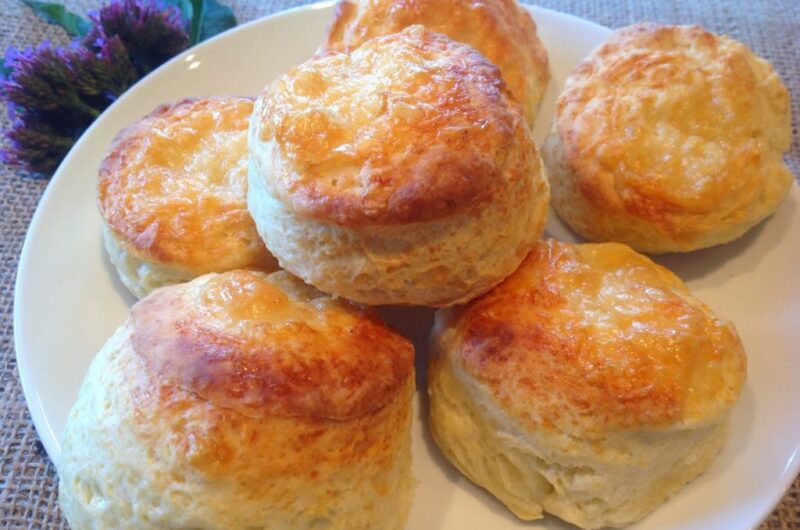
Air Fryer Cheese Scones
Description: These air fryer cheese scones are fluffy on the inside and crispy on the outside, and they only take less than 10 minutes to make, including prep time. Serve them with some butter and jam for a delicious breakfast or afternoon snack.
Duration:
- Prep Time: 3 minutes
- Cook Time: 6 minutes
- Total Time: 6 minutes
Ingredients:
- 1 cup all-purpose flour
- 2 tsp baking powder
- 2 cups shredded cheddar cheese
- 1/2 cup milk
- Pinch of salt, or to taste
- 1/2 tsp seasoning of choice (garlic powder, Italian seasoning, and ranch seasoning blend were used)
- 2 Tbsp minced chives (optional)
- 2 Tbsp bacon crumbles (optional)
Instructions:
- Preheat your air fryer to 375 degrees F (190°C), or your oven to 400 degrees F.
- In a large bowl, mix together 1 cup of flour, 2 teaspoons of baking powder, ½ teaspoon of seasoning of choice, and garlic powder (Italian seasoning and ranch seasoning blend were used).
- Stir in 2 cups of grated cheddar cheese, then add ½ cup of milk. Add the milk in small amounts at a time to ensure the mix isn’t too watery. Mix everything together until it forms a soft dough. Be careful not to overmix the dough or your scones will be tough.
- On a lightly floured surface, knead the dough gently for 10–15 seconds. Use a biscuit cutter (or a glass) to cut out round shapes, or use your hands to form a patty of a round shape you like, about ¾ inch thick.
- Air fryer method: Place the rounds directly in the air fryer basket (or on the tray), making sure they are not touching each other. Spritz each scone with oil spray. Air fry 3 minutes per side, or until golden brown. The air fryer gives the scones a crispy exterior while the cheese stays melty and gooey on the inside.
- Oven method: Place the rounds on an ungreased baking sheet and bake for 12–15 minutes, or until golden brown.
- Serve warm with butter and jam (or your favorite toppings). Enjoy!
Notes: Height: If you would like really tall scones like you see in magazines, double the ingredients and double the thickness of the dough as you add the scones to the air fryer. Then add 3 extra minutes of cook time.
Medical Disclaimer: This recipe and the accompanying content are provided for general informational and culinary purposes only and are not intended as medical, nutritional, or dietary advice. Nutritional needs vary from person to person, and individuals with food allergies, intolerances, medical conditions, or specific dietary requirements should consult a qualified healthcare professional or registered dietitian before preparing or consuming this recipe. Cooking times and temperatures may vary depending on individual equipment; always ensure food is cooked to a safe internal temperature before serving. The creator of this content assumes no liability for any adverse reactions, allergic responses, or health outcomes resulting from the preparation or consumption of this recipe.