introduction
Blooming Onion is a spectacular appetizer that transforms an ordinary onion into a crispy, golden, and flavorful masterpiece. Famous for its eye-catching flower-like appearance, this dish features a large onion that is carefully cut into petals, coated in a seasoned batter, and cooked until perfectly crisp. Each “petal” pulls apart easily, making it a fun and interactive dish to share with family and friends. The contrast between the crunchy exterior and the tender, sweet onion inside creates an irresistible combination of textures and flavors. Whether served as a party appetizer, game-day snack, restaurant-style treat, or special side dish, a Blooming Onion never fails to impress. Paired with a creamy dipping sauce, this iconic appetizer delivers bold flavors, satisfying crunch, and an unforgettable presentation that turns a simple onion into something extraordinary.
- Preparation Time
- Prep Time: 25 minutes
- Soaking Time: 15 minutes
- Cooking Time: 15–20 minutes
- Total Time: About 1 hour
Servings
Serves 4–6 people
Ingredients
- For the Blooming Onion
- 1 large sweet onion (such as Vidalia)
- 2 cups all-purpose flour
- 2 teaspoons paprika
- 1 teaspoon garlic powder
- 1 teaspoon onion powder
- 1 teaspoon dried oregano
- 1 teaspoon dried thyme
- 1 teaspoon salt
- ½ teaspoon black pepper
- ½ teaspoon cayenne pepper (optional)
- 2 large eggs
- 1 cup milk
- Cooking oil for frying
- Optional Add-Ins
- ½ teaspoon smoked paprika
- ½ teaspoon chili powder
- ½ teaspoon Cajun seasoning
- ¼ cup grated Parmesan cheese
- Fresh parsley for garnish
- Extra cayenne pepper for additional heat
- For the Dipping Sauce
- ½ cup mayonnaise
- 2 tablespoons ketchup
- 1 teaspoon prepared horseradish
- ½ teaspoon paprika
- ¼ teaspoon garlic powder
- ¼ teaspoon black pepper
- 1 teaspoon lemon juice
Why This Blooming Onion Is Special
A Blooming Onion is special because it combines visual appeal with incredible flavor and texture. The carefully cut onion opens like a flower during cooking, creating dozens of crispy petals that are perfect for dipping. The seasoned coating adds layers of savory flavor, while the onion itself becomes sweet and tender as it cooks. Unlike many appetizers, a Blooming Onion is as much about presentation as taste, making it a centerpiece at gatherings and celebrations. The combination of crunchy coating, sweet onion, and creamy dipping sauce makes every bite memorable.
Preparing the Ingredients
Begin by selecting a large sweet onion. Sweet onions work best because they become tender and flavorful during cooking without developing excessive sharpness. Prepare the dipping sauce first and refrigerate it while preparing the onion. Measure all seasonings in advance to ensure even distribution throughout the coating. Having all ingredients ready before starting makes the process much smoother and more enjoyable.
Step 1: Prepare the Dipping Sauce
In a small bowl, combine mayonnaise, ketchup, horseradish, paprika, garlic powder, black pepper, and lemon juice. Stir until smooth and fully combined. Cover and refrigerate until serving time.
Step 2: Peel the Onion
Remove the outer skin from the onion while keeping the root end intact. The root helps hold the onion together during cutting and cooking.
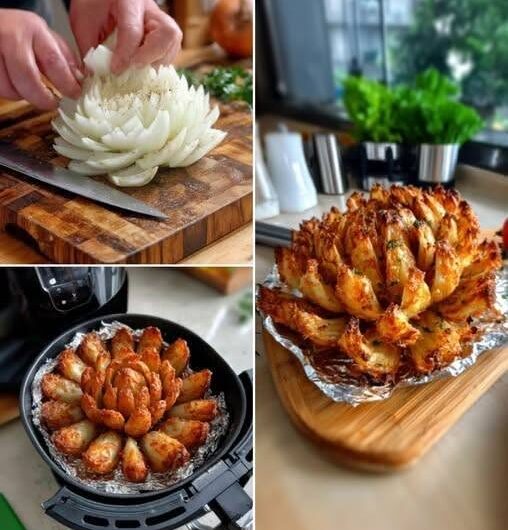
Step 3: Cut the Onion
Place the onion root-side down on a cutting board. Starting about half an inch from the root, cut downward through the onion. Repeat around the onion to create 12 to 16 evenly spaced sections. Be careful not to cut through the root.
Step 4: Separate the Petals
Gently spread the onion petals apart using your fingers. Work carefully to avoid breaking the onion. The onion should begin to resemble a flower opening.
Step 5: Soak the Onion
Place the onion in a bowl of cold water for about 15 minutes. Soaking helps the petals separate further and promotes even coating later.
Step 6: Prepare the Dry Coating
In a large bowl, combine flour, paprika, garlic powder, onion powder, oregano, thyme, salt, black pepper, and cayenne pepper. Whisk thoroughly until evenly mixed.
Step 7: Prepare the Wet Mixture
In another bowl, whisk together the eggs and milk until smooth. This mixture helps the coating adhere to the onion.
Step 8: Coat the Onion
Remove the onion from the water and pat dry thoroughly. Sprinkle the flour mixture over and between every petal. Take your time to ensure all surfaces are coated.
Step 9: Dip into the Wet Mixture
Carefully lower the onion into the egg mixture, allowing the liquid to reach all the petals. Lift and allow excess liquid to drip off.
Step 10: Apply the Second Coating
Return the onion to the flour mixture and coat thoroughly once again. The second coating creates the signature crispy crust.
Step 11: Rest the Onion
Allow the coated onion to rest for 10 minutes. This helps the coating adhere better during cooking.
Step 12: Heat the Oil
Fill a deep pot with enough oil to fully cover the onion. Heat the oil to 375°F (190°C). Maintaining the correct temperature is essential for achieving a crisp exterior.
Step 13: Fry the Onion
Carefully lower the onion into the hot oil with the petals facing upward. Fry for approximately 8 to 10 minutes or until deep golden brown and crispy.
Step 14: Drain Excess Oil
Remove the Blooming Onion using a slotted spoon or wire basket. Place it on a wire rack or paper towels to drain excess oil.
Step 15: Garnish and Serve
Sprinkle with fresh parsley if desired. Place the dipping sauce in the center or alongside the onion and serve immediately.
Creating the Perfect Texture
The secret to a great Blooming Onion is achieving a crisp, golden coating while keeping the onion tender inside. Double coating the onion helps build a crunchy crust. Proper oil temperature is equally important. Oil that is too cool results in a greasy coating, while oil that is too hot can burn the exterior before the onion cooks through. Taking time to coat between every petal ensures consistent texture and flavor throughout the entire onion.
Flavor Variations
Spicy Blooming Onion
Increase cayenne pepper and add chili powder for extra heat.
Cajun Blooming Onion
Use Cajun seasoning throughout the flour mixture for bold Southern flavors.
Garlic Parmesan Blooming Onion
Sprinkle grated Parmesan and garlic seasoning over the hot onion before serving.
Smoky Blooming Onion
Add smoked paprika for a deeper, richer flavor.
Herb Blooming Onion
Increase thyme, oregano, and parsley for a more herb-forward version.
Air Fryer Blooming Onion
Prepare the onion as directed and cook in an air fryer for a lighter alternative.
Cheesy Blooming Onion
Top the cooked onion with melted cheese and fresh herbs for added indulgence.
Storage Instructions
- Blooming Onion is best enjoyed immediately after cooking. However, leftovers can be stored in an airtight container in the refrigerator for up to two days.
- To reheat, place the onion in an oven or air fryer at 350°F (175°C) until warmed and crispy. Avoid microwaving, as it can soften the coating.
- Freezing is not recommended because the texture may become soggy after thawing.
Serving Ideas
Serve Blooming Onion as a party appetizer, game-day snack, or restaurant-style starter. Pair it with burgers, sandwiches, grilled meats, barbecue dishes, or salads. Offer a variety of dipping sauces such as spicy mayo, ranch dressing, garlic aioli, honey mustard, or cheese sauce. It also makes an impressive centerpiece for casual gatherings and celebrations.
Nutritional Benefits
Onions provide vitamin C, antioxidants, and beneficial plant compounds. They also contain dietary fiber and naturally occurring nutrients that support overall health. Preparing a Blooming Onion at home allows greater control over ingredients and seasonings. While this appetizer is considered an indulgent treat, serving it alongside fresh vegetables and balanced meals can help create a satisfying dining experience.
Helpful Tips
- Choose a large sweet onion for best results.
- Keep the root intact while cutting.
- Use a sharp knife for clean cuts.
- Soak the onion to encourage petal separation.
- Coat thoroughly between every petal.
- Maintain proper oil temperature throughout frying.
- Allow the onion to rest after coating.
- Serve immediately for maximum crispness.
- Use a wire rack instead of paper towels for better airflow.
- Prepare the dipping sauce ahead of time for convenience.