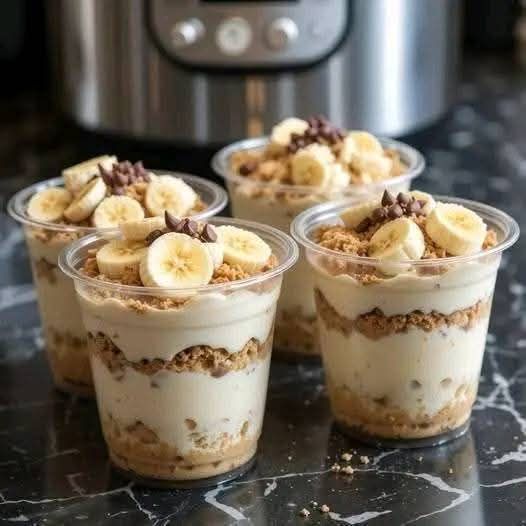
This is a no-bake, no-cook dessert that comes together in a matter of minutes using a small handful of simple ingredients. Unlike traditional banana pudding, which typically leans on condensed milk, heavy cream, and a good amount of sugar, this version builds its creamy texture from Greek yogurt and gets its sweetness mainly from vanilla protein powder. The result is a lighter, protein-rich take on a classic dessert that still delivers the familiar banana cream flavor.
Because there’s no cooking involved at all, this is a genuinely fast recipe — good for busy weekdays, meal prep, or any time you want a quick homemade treat without turning on the stove or oven. It’s also a layered dessert, so despite how little effort it takes, it looks considerably more impressive than the time investment would suggest.
Why This Recipe Works
Every ingredient here is doing a specific job, which is part of why the recipe stays so simple while still delivering a satisfying result:
- Greek yogurt creates a rich, creamy base while adding a substantial amount of protein.
- Vanilla protein powder naturally sweetens the mixture, cutting down the need for added sugar.
- A small amount of almond milk loosens the mixture just enough to reach the right pudding consistency, without making it runny.
- Crushed vanilla wafers and fresh banana slices, layered through the pudding, create the visual and textural contrast that makes this dessert feel special rather than plain.
The result is a dessert where creamy pudding, soft banana, and slightly crunchy cookie come together in every spoonful.
Prep and Setup
Because this recipe moves quickly and doesn’t involve any cooking, having everything measured and ready before you start mixing keeps the whole process smooth:
- Non-fat Greek yogurt: cold, straight from the fridge — cold ingredients help the pudding stay thick.
- Whey vanilla protein powder: measured and ready to stir in.
- Sugar-free banana cream instant pudding mix: measured — even a small amount transforms the base into a banana-flavored filling.
- Unsweetened almond milk: cold, and kept nearby to be added gradually rather than all at once.
- Sugar-free vanilla wafers: crushed into small pieces — not fine crumbs, since slightly larger pieces give a better bite.
- Fresh banana: peeled and sliced into even rounds, so each layer gets a consistent amount of fruit. Choose bananas that are yellow and firm rather than very ripe with lots of brown spots, since overripe bananas turn overly soft and release extra moisture into the layers.
- Serving jars or dessert glasses: ready for layering and chilling.
Workflow: How the Steps Actually Flow
1. Combine the Greek yogurt, protein powder, and pudding mix first. These three dry-and-creamy components are stirred together in a mixing bowl before any liquid is added, so they’re evenly blended as a base.
2. Add the almond milk gradually, whisking continuously. Rather than pouring it all in at once, adding it a little at a time while whisking keeps the mixture thick and smooth instead of thin. Every protein powder absorbs liquid a bit differently, so this gradual approach protects against ending up with a runny pudding.
3. Whisk until completely smooth. After a minute or two of mixing, the pudding should be creamy with no lumps remaining, and thick enough to hold its shape when spooned.
4. Prepare the layering ingredients while the pudding rests. Crush the vanilla wafers into small (not fine) pieces, and slice the banana into even rounds. Having both ready before you start layering keeps the assembly quick and neat.
5. Layer the dessert. Spoon some of the protein pudding into the bottom of a serving jar or dessert glass, then add a layer of crushed vanilla wafers, followed by a layer of fresh banana slices. Repeat the same order — pudding, wafers, bananas — until all the ingredients are used, creating two complete layers.
6. Chill before serving. About 15 to 30 minutes in the refrigerator lets the pudding firm up slightly while the vanilla wafers soften just enough to resemble classic banana pudding. The dessert becomes even creamier after this short rest, and the banana flavor develops further.
Component Organization: What Each Ingredient Is Doing
- Creamy base and protein: non-fat Greek yogurt and whey vanilla protein powder. Together they form the thick, protein-rich body of the pudding, with the protein powder also providing natural sweetness.
- Classic banana flavor: sugar-free banana cream instant pudding mix. A small amount is enough to give the base its familiar banana pudding taste.
- Consistency control: unsweetened almond milk, added gradually to loosen the mixture to the right pudding thickness without thinning it too much.
- Texture and visual layering: crushed vanilla wafers and fresh banana slices, which add crunch, natural sweetness, and the classic layered look of banana pudding.
Helpful Tips for the Best Results
- Use cold Greek yogurt and cold almond milk — cold ingredients help the pudding stay thick.
- Add the almond milk gradually instead of all at once, since protein powders absorb liquid differently and adjusting slowly prevents the mixture from becoming too thin.
- Whisk thoroughly until completely smooth, to remove any small lumps from the protein powder.
- Choose ripe bananas that are yellow and firm — very ripe bananas with lots of brown spots become overly soft and release extra moisture.
- Taste the pudding after mixing — depending on the sweetness of the protein powder, a small amount of stevia can be added without changing the consistency.
Storage Tips
- Cover the jars, or transfer the pudding to an airtight container, before refrigerating.
- Stays fresh for up to one week when stored properly in the refrigerator.
- Because fresh bananas are included, it’s best enjoyed within the first few days for the freshest appearance.
- The pudding shouldn’t remain at room temperature for more than a couple of hours.
Ingredient Alternatives
A few substitutions are noted as workable if needed, without changing the basic method:
- Regular vanilla wafers or graham crackers can replace the sugar-free wafers.
- Coconut yogurt may be used instead of Greek yogurt, if preferred.
- Any milk can replace the almond milk.
- Regular banana-flavored instant pudding mix can be substituted for the sugar-free version, if needed.
Step-by-Step Assembly Strategy
- Combine the Greek yogurt, protein powder, and banana cream pudding mix in a mixing bowl. Stir until evenly blended.
- Gradually add the almond milk, whisking continuously, until the mixture is thick, smooth, and lump-free.
- Crush the vanilla wafers into small pieces and slice the banana into even rounds.
- Spoon a layer of protein pudding into the bottom of a serving jar or dessert glass.
- Add a layer of crushed vanilla wafers, then a layer of fresh banana slices.
- Repeat the layers — pudding, wafers, bananas — until all ingredients are used.
- Cover and refrigerate for 15–30 minutes.
- Serve chilled, or store leftovers in an airtight container in the refrigerator for up to one week.
High Protein Banana Pudding
Description: This Healthy Protein Banana Pudding is a creamy, no-bake dessert made with Greek yogurt, vanilla whey protein powder, sugar-free banana cream pudding mix, fresh banana slices, and crushed vanilla wafers. It delivers the classic flavor of banana pudding without condensed milk or added sugar, making it a great choice for a high-protein snack or light dessert.
Course: Breakfast | Cuisine: American | Difficulty: Easy
Duration:
- Prep Time: 5 minutes
- Cooking Time: 0 minutes
- Total Time: 5 minutes
- Servings: 2
- Calories: 177kcal per serving
Ingredients:
- ⅔ cup non-fat Greek yogurt (150g)
- ⅓ cup whey vanilla protein powder (30g)
- 4 teaspoons sugar-free banana cream instant pudding mix (11g)
- 2 teaspoons unsweetened almond milk (10ml)
- 3–4 sugar-free vanilla wafers, crushed (14g)
- ½ medium banana, sliced (60g)
Instructions:
- In a medium mixing bowl, combine the non-fat Greek yogurt, vanilla whey protein powder, and sugar-free banana cream instant pudding mix. Stir until the ingredients are evenly blended.
- Gradually add the unsweetened almond milk, mixing continuously after each small addition. Continue whisking until the mixture becomes thick, smooth, and creamy with no lumps.
- Crush the vanilla wafers into small pieces and slice the banana into thin, even rounds.
- Spoon a layer of the protein pudding into the bottom of a serving jar or dessert glass.
- Sprinkle a layer of the crushed vanilla wafers over the pudding.
- Arrange a layer of fresh banana slices on top of the wafers.
- Repeat the layers in the same order—protein pudding, crushed vanilla wafers, and banana slices—until all the ingredients have been used.
- Cover the jars and refrigerate for 15–30 minutes. Chilling allows the pudding to thicken slightly and softens the wafers for the best texture.
- Serve chilled and enjoy immediately, or store any leftovers in an airtight container in the refrigerator for up to one week.
Notes:
- Use cold Greek yogurt and almond milk for the creamiest consistency.
- Add the almond milk gradually until the desired pudding thickness is reached.
- Whisk well to remove any lumps from the protein powder.
- Choose ripe bananas that are yellow and firm rather than overripe.
- If you prefer a sweeter pudding, add a small amount of stevia without changing the texture.
- Store leftovers in an airtight container in the refrigerator for up to 1 week.
- The pudding should not remain at room temperature for more than a few hours.
Nutrition Facts (per serving, of 2): Calories: 177kcal | Fat: 1.9g | Saturated Fat: 1g | Carbohydrates: 20.9g | Fiber: 1.2g | Sugar: 7.9g | Protein: 19.4g
Medical Disclaimer: This recipe and the accompanying content are provided for general informational and culinary purposes only and are not intended as medical, nutritional, or dietary advice. Nutritional needs vary from person to person, and individuals with food allergies, intolerances, medical conditions, or specific dietary requirements should consult a qualified healthcare professional or registered dietitian before preparing or consuming this recipe. Cooking times and temperatures may vary depending on individual equipment; always ensure food is cooked to a safe internal temperature before serving. The creator of this content assumes no liability for any adverse reactions, allergic responses, or health outcomes resulting from the preparation or consumption of this recipe.