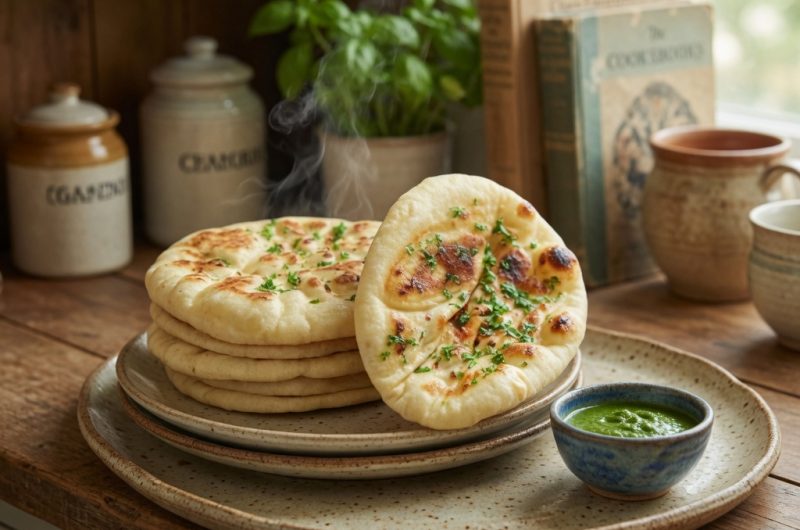
Air fryer Turkish flatbread is a simple way to make soft, warm homemade bread without yeast or a long rising period. This easy flatbread uses self-rising flour, plain yogurt, and olive oil to create a tender dough that cooks quickly. The air fryer gives the bread a lightly golden outside while keeping the center soft and flexible. With only a few basic ingredients, this Turkish flatbread recipe is useful for breakfast, lunch, dinner, snacks, and casual gatherings.
Why Make Turkish Flatbread in an Air Fryer
Traditional flatbread recipes can require yeast, resting, kneading, and a hot oven or cooking surface. This air fryer version keeps the process much shorter. The air fryer heats quickly and circulates hot air around the dough, helping the bread cook evenly. The recipe takes about 13 minutes from preparation through cooking when the air fryer is used as directed. It is especially useful when you want fresh bread without waiting for yeast dough to rise.
What Makes This Flatbread Different
The main difference in this recipe is the use of self-rising flour and plain yogurt instead of yeast. Self-rising flour already contains the ingredients needed to help the dough rise, while yogurt provides moisture and gives the bread a mild tang. The result is a soft and flexible flatbread with a pleasant texture. It is not complicated to prepare, which makes it suitable for cooks who are new to homemade bread.
Self-Rising Flour for Quick Bread
Self-rising flour is especially useful when making quick flatbread because it removes the need to measure separate raising ingredients. The recipe uses 2 cups of self-rising flour as its main dry ingredient. If you do not have self-rising flour, the source recipe notes that it can be prepared from all-purpose flour, baking powder, and salt. However, for this recipe, keeping the listed self-rising flour quantity unchanged gives the intended dough consistency.
How Yogurt Improves the Dough
Plain yogurt gives this homemade flatbread the moisture needed to form a soft dough. It also adds a slight tang that makes the bread more flavorful than a dough made with water alone. Both low-fat and full-fat plain yogurt can be used according to the source recipe. The yogurt also helps create a pliable texture, which is useful when rolling the dough into small circles for the air fryer.
Olive Oil for Flavor and Browning
Olive oil is used in two ways in this Turkish flatbread recipe. One teaspoon is mixed directly into the dough, while 1 tablespoon is used for brushing the flatbreads before cooking. The oil adds a mild richness and helps the surface develop a golden appearance. Brushing the dough lightly rather than soaking it keeps the bread from becoming greasy while still giving the outside a pleasant cooked texture.
Making the Flatbread Dough
Start by placing the self-rising flour, plain yogurt, and 1 teaspoon of olive oil into a large mixing bowl. Use your hands to combine the ingredients until they form a soft dough. The mixing and kneading process should take around 2 to 3 minutes. Avoid working the dough for much longer than necessary. The goal is simply to bring everything together into a smooth, manageable dough that can be divided and shaped.
Getting the Right Dough Texture
The finished dough should feel soft and workable rather than stiff or excessively sticky. Flour and yogurt can differ slightly between brands, so the dough may feel a little different from one batch to another. Work it gently until the ingredients are fully combined. If the work surface is lightly floured, the dough will be easier to handle. Avoid adding large amounts of extra flour because this can make the finished flatbread less tender.
Dividing the Dough
Once the dough is ready, transfer it to a lightly floured work surface and divide it into 8 equal portions. Keeping the pieces similar in size helps them cook at roughly the same rate. Roll each portion into a smooth ball before flattening it. This gives you a more even starting point for rolling. Dividing the dough into eight pieces also creates convenient individual flatbreads for wraps, dipping, sandwiches, or serving with a meal.
Rolling the Flatbread
Use a rolling pin to flatten each dough ball into a circle about 4 inches across. Try to keep the thickness reasonably even from the center to the edges. Very thick sections may take longer to cook, while extremely thin areas can become dry or crisp. A simple circular shape works well in an air fryer basket because it allows the hot air to move around the bread. The source recipe specifically recommends approximately 4-inch circles.
Preheating the Air Fryer
Preheat the air fryer to 300°F for 3 minutes before cooking the flatbread. Preheating gives the dough immediate exposure to the intended cooking temperature and helps create more consistent results. Air fryers vary between models, so your appliance may cook slightly faster or slower. The first batch is a good opportunity to check the color and texture and make small timing adjustments if needed. The original method uses 300°F and a 3-minute preheat.
Brushing with Olive Oil
Lightly brush both sides of each rolled flatbread with the reserved olive oil. This step helps the surface brown and adds a small amount of richness. You do not need a heavy coating. A thin layer spread across the surface is enough. If you want to keep the flavor simple, use only olive oil. The flatbread can also be finished with optional seasonings such as sesame seeds, za’atar, garlic powder, or dried herbs, although these are not part of the original ingredient list.
Cooking Turkish Flatbread
Place the prepared flatbreads into the air fryer basket, making sure there is enough room for the hot air to circulate. Depending on the size of your basket, you may need to cook them in batches. Cook the flatbreads for 8 minutes, turning them halfway through the cooking time. Flipping after 4 minutes helps both sides cook evenly. The finished bread should have a lightly golden surface and a soft center.
Avoiding an Overcrowded Basket
Overcrowding the air fryer basket can affect how evenly the bread cooks. When several pieces are pressed against each other, the circulating air cannot reach all surfaces equally. If your basket is small, cook the flatbreads in separate batches rather than forcing all eight pieces inside at once. This may take a little longer overall, but it gives the bread more space and makes the cooking results more consistent.
Keeping the Flatbread Soft
Freshly cooked Turkish flatbread is best while warm because the center remains soft and flexible. Once each batch is finished, place the flatbreads on a plate and cover them loosely with a clean kitchen towel. This helps prevent the surface from drying too quickly while you finish cooking the remaining pieces. Keeping the bread covered is particularly helpful when cooking several batches because it allows the first pieces to remain pleasant to eat while the rest finish.
Serving Air Fryer Turkish Flatbread
There are many ways to serve this homemade flatbread. It can be placed beside soups, stews, grilled meats, roasted vegetables, or salads. Its mild flavor also makes it useful with dips. Hummus, baba ganoush, tzatziki, and garlic yogurt are natural pairings. Because the bread is small and flexible, it is easy to tear into pieces and use for dipping. The original recipe also suggests using the bread as a pizza base or sandwich bread.
Turkish Flatbread as a Pizza Base
One useful way to use leftover flatbread is to turn it into a quick personal pizza. Add tomato sauce, cheese, and your preferred toppings to a cooked flatbread, then return it to the air fryer until the cheese melts. This works well for individual portions because each person can choose different toppings. The flatbread is already cooked, so the second air-frying stage only needs to heat the toppings and create a crispier surface.
Using Flatbread for Sandwiches
The soft texture also makes this bread suitable for sandwiches and wraps. Fill it with grilled chicken, cooked meat, falafel, roasted vegetables, salad greens, or fresh vegetables. Sauces such as yogurt dressing or garlic sauce can add moisture and flavor. Because the flatbread is only about 4 inches wide, it is best suited to smaller wraps or folded sandwiches rather than very large portions. Warm the bread slightly before filling if it has been stored.
Serving with Dips
For a quick snack or appetizer, serve warm flatbread with a selection of dips. Hummus provides a creamy chickpea-based option, while tzatziki adds cool yogurt and cucumber flavor. Baba ganoush brings a smoky eggplant taste. The bread’s mild flavor works with all of these choices without overpowering them. A plate of warm flatbread and dips can also be used as a simple starter when serving several people.
Adding Flavor to Individual Batches
The basic recipe has a mild flavor, which makes it easy to adapt for different meals. If you want variation, toppings can be added before cooking. Sesame seeds provide a nutty texture, while za’atar gives the bread an herbal Middle Eastern flavor. Garlic powder can add a savory note, and dried herbs can work well with soups or pasta dishes. These are optional serving ideas and should not be confused with the original ingredient list.
Cooking in Different Air Fryers
Air fryer models differ in basket size, heating element placement, and air circulation. The listed cooking temperature is 300°F and the cooking time is 8 minutes, with a flip at the halfway point. If your particular model cooks quickly, begin checking the bread before the full cooking time has passed. If the bread remains pale or soft, it may need a little additional cooking. Small adjustments are normal when moving between different appliances.
Avoiding Dry Flatbread
One of the easiest ways to make flatbread dry is to add too much extra flour while shaping. The dough only needs enough flour on the work surface to prevent sticking. Another issue is overcooking. Because these flatbreads are relatively small, they do not need a long time in the air fryer. Checking the first batch around the end of the 8-minute cooking period helps you understand how your air fryer handles the dough.
Avoiding Uneven Cooking
Uneven thickness is another common reason flatbread cooks poorly. Try to roll each piece to a similar thickness and keep the center from becoming much thicker than the edges. Dividing the dough evenly also helps. Turning each flatbread halfway through the 8-minute cooking period gives both sides direct exposure to the circulating heat. If your basket has hot spots, rotating the pieces when flipping can also help produce more even browning.
Making the Dough Without Yeast
This recipe does not require yeast, which is one of its biggest practical advantages. There is no need to activate yeast, wait for dough to rise, or plan several hours ahead. The self-rising flour and yogurt allow the dough to be prepared and cooked within a short period. This makes the recipe useful for people who want homemade bread but do not regularly work with yeast-based dough.
Storing Cooked Flatbread
Once the flatbreads have cooled, place them in an airtight container. The source recipe recommends keeping cooked flatbreads for up to 3 days. When you are ready to serve them again, reheat them in the air fryer or microwave. Reheating helps restore warmth and makes the bread more enjoyable than eating it straight from the refrigerator. Avoid leaving the bread uncovered for long periods because the surface can gradually become dry.
Freezing the Dough
If you want to prepare ahead, the dough can be divided into portions and frozen for later use. Wrap each portion tightly before placing it in the freezer. The source recipe recommends freezing the dough for up to 2 months and thawing it overnight in the refrigerator before rolling and cooking. This approach can make future batches easier because the dough is already portioned and ready to shape once thawed.
Air Fryer Flatbread for Busy Days
The short preparation makes this an easy choice when you need bread without spending a long time in the kitchen. The dough uses only three listed ingredients, and there is no yeast-rising stage. Once the dough is mixed, it is divided, rolled, brushed with oil, and air fried. The source recipe describes the complete process as taking about 13 minutes, although cooking in multiple batches may increase the actual time depending on the air fryer basket size.
Notes for Best Results
Keep the work surface lightly floured, but avoid adding unnecessary flour to the dough. Preheat the air fryer before cooking, and leave enough room between pieces for air circulation. Turn the flatbreads halfway through the cooking period so both sides cook evenly. If preparing several batches, cover the cooked bread with a clean towel to help retain softness. These simple steps make the recipe easier to repeat successfully.

Turkish bread
Turkish flatbread is a versatile and flavorful bread that complements a variety of dishes. Whether you’re using it as a pizza base, sandwich bread, or a side dish for soups
5
minutes8
minutes13
minutesIngredients
2 cups self-rising flour
1 cup plain yogurt (low-fat or full-fat)
1 teaspoon olive oil (plus 1 tablespoon for brushing)
Instructions
- Combine flour, yogurt, and 1 teaspoon olive oil in a large bowl. Knead until a soft dough forms.
- Place the dough on a floured surface, divide into 8 portions, and roll each into a ball. Flatten each ball into a 4-inch circle.
- Preheat the air fryer to 300°F (150°C) for 3 minutes.
- Brush both sides of each flatbread with olive oil and place them in the air fryer basket. Cook for 8 minutes, flipping halfway through.
- Enjoy warm with your favorite dips, as a pizza base, or as sandwich bread.