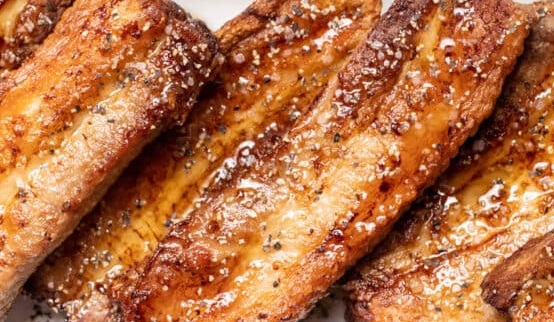
Crispy pork belly looks like restaurant-level cooking, but it comes down to two simple mechanics: rendering the fat slowly, and drying the skin thoroughly before blasting it with high heat. The air fryer makes both of these easier than traditional oven roasting because it cooks evenly, circulates hot air around the entire piece, and shortens the whole process considerably.
Rather than drying the skin overnight in the fridge or babysitting it under a grill, this method uses a salt crust to pull moisture out of the rind before the temperature is increased for the final roast. The seasoning itself stays deliberately simple — garlic powder, sugar, salt, and Chinese five-spice — so the pork’s natural richness stays front and center instead of getting buried under a heavy spice mix.
This guide breaks the process into its real kitchen stages: preparing the rind, seasoning the meat, building the salt crust, the two-stage air fry, and the rest-and-slice finish.
Why This Method Works
Two things determine whether pork belly crackling turns out right: how dry the skin is going in, and how the fat renders during cooking.
The first cooking stage is a low, gentle heat. During this time the meat starts cooking through while the fat underneath slowly softens and renders. At the same time, the salt layer sitting on top of the skin is actively drawing moisture out of it. Moisture is the enemy of crisp crackling — any dampness left on the rind will steam instead of crackle once the heat goes up.
Once that salt crust is removed, the skin gets a light brushing of oil, and the temperature is increased. This second, hotter stage finishes cooking the meat while transforming the now-dry skin into golden, crunchy crackling. Because the air fryer circulates hot air around the entire surface, browning happens evenly rather than in patches.
Choosing the Right Cut
The quality of the pork belly you start with matters more than any technique later in the process.
- Look for a boneless piece with the skin still attached.
- Choose even thickness — this lets the meat cook consistently from one end to the other rather than drying out in the thin spots while the thick end is still underdone.
- Aim for a balanced meat-to-fat ratio. Too much fat leaves the slices greasy; too little reduces tenderness. A center-cut piece typically gives the best of both.
- Before you season anything, check that the skin is smooth and free of excess moisture, then pat it completely dry with paper towels. This one step has an outsized effect on how crisp the final crackling turns out.
Workflow: Building the Dish Stage by Stage
Stage One — Preparing the Rind
Pat the pork belly completely dry with paper towels, then place it skin-side up on a cutting board. Using a sharp metal skewer or another pointed tool, prick small holes all over the rind — not into the meat underneath, just the skin itself.
These tiny holes matter more than they seem to. As fat renders during cooking, it escapes through these holes and effectively fries the skin from within, which is what produces that bubbly, blistered crackling texture. Take your time here; even, well-distributed holes across the whole surface lead to even crisping later.
Once the rind is prepared, flip the pork over so the meat side faces up. This keeps the prepared skin clean while you move on to seasoning.
Stage Two — Seasoning the Meat
The seasoning blend is short but purposeful:
- Fine salt brings out the pork’s natural flavor.
- Sugar balances the savory richness and encourages a little caramelization at the edges.
- Garlic powder adds mild, savory depth.
- Chinese five-spice contributes warm, aromatic notes that pair naturally with roasted meat.
Mix these together thoroughly, then rub the blend evenly over every exposed part of the meat — but keep it off the skin entirely. Seasoning left on the rind can burn during the high-heat stage and interfere with even crackling. If you’ve cut the belly into two smaller pieces, season every exposed side carefully, then reassemble the pieces into their original shape before moving on.
Stage Three — Building the Salt Crust
Form a shallow tray out of a sheet of aluminum foil, folding the edges upward so they sit slightly higher than the meat — this keeps the salt contained during cooking.
Brush the skin evenly with white vinegar; this preps the surface and supports the drying process. Then cover the entire rind with a generous, even layer of fine salt, enough to completely hide the skin underneath. Let the pork rest for about 5 minutes — this short pause is when the salt starts actively pulling moisture out of the skin, which is one of the biggest factors behind genuinely crisp crackling.
Stage Four — The First Air Fry
Transfer the pork carefully into the air fryer basket. If you’re using one, a paper liner placed underneath the basket (not inside it) makes cleanup far easier by catching rendered fat without blocking air circulation.
Cook at a low 120°C (248°F) for about 30 minutes. This gentle heat lets the meat begin cooking through while giving the salt time to absorb moisture from the skin. By the end of this stage, the salt should have hardened into a firm crust. If it still looks loose or grainy, give it another 5-minute interval or two until it firms up properly.
Stage Five — Removing the Salt and Prepping for the Final Roast
Lift away the hardened salt crust and discard it along with the foil. Wipe the skin and sides of the pork thoroughly with kitchen paper to remove any remaining salt grains — leftover salt at this stage can make the finished pork too salty.
Return the pork to the air fryer basket, skin facing up, and brush the rind with a thin, even layer of vegetable oil. Only a small amount is needed since the pork will release more of its own fat as it roasts. This oil layer helps the skin brown evenly and develop that attractive golden color, and because it’s already been dried out in the first stage, it’s primed to crisp properly under higher heat.
Stage Six — The Final Roast
Increase the air fryer to 200°C (392°F) and cook for 30 to 40 minutes. During this stage the meat finishes cooking while the fat continues rendering, and the skin gradually shifts from pale to deep golden brown as it puffs into crackling.
Every air fryer runs a little differently, so start checking around the 20-minute mark. If one section is browning faster than the rest, loosely cover just that area with a small piece of foil while the remaining skin keeps crisping. The pork is done when the crackling looks deep golden, feels hard, and sounds crisp when lightly tapped — while the meat underneath stays juicy rather than dry.
Stage Seven — Resting
As tempting as it is to cut in right away, resting is non-negotiable here. Move the pork to a wooden cutting board and let it sit undisturbed for about 15 minutes. This gives the juices time to settle back into the meat instead of running out onto the board, and it also firms the meat up slightly, which makes for cleaner slicing. Skipping this step is one of the most common reasons pork belly ends up drier than it should be.
Stage Eight — Slicing Without Breaking the Crackling
Turn the pork belly upside down so the meat faces up and the crackling rests against the cutting board. Using a very sharp knife, slice through the meat first, then apply firm, steady pressure with both hands once the blade reaches the crispy skin, pushing through it in one clean motion. This technique keeps the crackling attached to each slice instead of shattering it unevenly.
Serving Strategy
This dish is genuinely versatile once it’s sliced:
- Serve alongside steamed rice and simple vegetables for an easy weeknight dinner.
- Pair it with vermicelli noodles, crisp lettuce, cucumber, herbs, and a dipping sauce for a lighter meal.
- Wrap slices in rice paper with fresh herbs and noodles for a combination of crunchy, fresh, and savory textures in one bite.
- Leftovers reheat well — thin slices crisp back up nicely in the air fryer and can be added to rice bowls, noodle dishes, or salads.
Make-Ahead Strategy
Although the active cooking process takes about an hour and fifteen minutes total, this recipe also works well prepped a day in advance. The evening before, pierce the skin and season the meat as usual, then leave the pork uncovered in the refrigerator overnight. This gives the seasoning more time to penetrate the meat while the skin dries naturally in the fridge air. When you’re ready to cook, simply pick up at the salt bake step and continue as normal — this extra lead time often produces even crispier crackling and deeper flavor.
Common Mistakes to Avoid
- Leaving moisture on the skin. Drying the rind thoroughly before cooking isn’t optional — it’s the foundation of crisp crackling.
- Seasoning the skin directly. Spices left on the rind can burn during roasting and disrupt even crisping. Keep all seasoning strictly on the meat side.
- Starting at high heat. Skipping the low-temperature first stage means the fat doesn’t get time to render properly before the crackling stage begins.
- Slicing immediately after cooking. Cutting in without resting first leads to drier meat and messier slices.
Air Fryer, Pork Belly Strips
Description
This air fryer crispy pork belly features tender, juicy meat topped with irresistibly crunchy crackling. A simple seasoning blend flavors the pork while a salt bake helps dry the skin for consistently crisp results. The two-stage cooking method creates evenly cooked pork with golden, crunchy crackling without the lengthy preparation of traditional roasting.
Duration
- Course: Dinner
- Cuisine: American
- Difficulty: Easy
- Servings: 4
- Prep Time: 15 minutes
- Cooking Time: 1 hour
- Total Time: 1 hour 15 minutes
- Calories: 592 kcal
Ingredients
- 1 kg (2.2 lb) pork belly, with rind
- 1 teaspoon fine salt
- 1 teaspoon sugar
- 1 teaspoon garlic powder
- 1 teaspoon Chinese five spice powder
- 15 ml (1 tablespoon) white vinegar
- 180 g (½ cup) fine salt
- 15 ml (1 tablespoon) vegetable oil
Instructions
1. Prepare the Rind Pat the pork belly dry with paper towels. Place it on a cutting board with the skin facing up. Using a sharp metal skewer or piercing tool, prick small holes all over the rind without piercing into the meat.
2. Season the Pork Turn the pork belly over so the meat side faces up. Leave the pork whole or cut it in half lengthwise if preferred. Mix the fine salt, sugar, garlic powder, and Chinese five spice powder in a small bowl. Rub the seasoning evenly over all sides of the meat, avoiding the skin.
3. Prepare the Salt Bake Turn the pork skin-side up. If cut into two pieces, place them back together. Set the pork on a large sheet of foil and fold the edges upward to create a shallow tray. Brush the skin evenly with the white vinegar. Cover the entire rind with an even layer of fine salt. Let it rest for 5 minutes.
4. First Air Fry Place a paper liner underneath the air fryer basket if using. Carefully transfer the pork to the basket. Air fry at 120°C (248°F) for 30 minutes. If the salt has not hardened completely, continue cooking in 5-minute intervals until a firm crust forms.
5. Remove the Salt Lift off the hardened salt crust. Wipe away any remaining salt from the skin and sides of the pork using kitchen paper. Discard both the foil and salt.
6. Final Roast Return the pork belly to the air fryer basket. Brush the skin lightly with vegetable oil. Air fry at 200°C (392°F) for 30–40 minutes, or until the crackling is golden and crisp.
7. Rest and Slice Transfer the pork belly to a cutting board. Rest for 15 minutes before slicing. Turn the pork meat-side up and cut with a sharp knife, pressing firmly through the crackling for clean slices.
8. Serve Serve immediately with rice, noodles, fresh vegetables, or your favorite side dishes.
Notes
- Choose a boneless, skin-on pork belly with an even thickness for the best results.
- Keep the skin as dry as possible before cooking.
- Pierce only the skin, not the meat.
- The salt layer helps remove moisture from the rind and is not intended to season the meat.
- Check the crackling after about 20 minutes during the second cook, as air fryers vary.
- If one area browns too quickly, loosely cover it with a small piece of foil while the remaining skin continues to crisp.
- Resting the pork before slicing helps keep the meat juicy.
- For extra flavor and even crispier crackling, season the meat and pierce the skin the night before, then refrigerate uncovered overnight.
Nutrition Facts (per serving, based on 5 servings): Calories: 592kcal | Fat: 60g | Saturated Fat: 22g | Polyunsaturated Fat: 6g | Monounsaturated Fat: 28g | Cholesterol: 82mg | Sodium: 1632mg | Potassium: 216mg | Carbohydrates: 11g | Fiber: 0.1g | Sugar: 1g | Protein: 11g | Vitamin A: 12mcg | Vitamin C: 0.5mg | Calcium: 14mg | Iron: 1mg
Medical Disclaimer: This recipe and accompanying information are provided for general informational and educational purposes only and are not intended as medical, nutritional, or dietary advice. Nutritional needs vary from person to person, and individuals with food allergies, dietary restrictions, high blood pressure, cardiovascular concerns, or other health conditions should consult a qualified physician, registered dietitian, or other healthcare professional before preparing or consuming this recipe. This information is not a substitute for professional medical advice, diagnosis, or treatment, and the creator of this content assumes no liability for any adverse effects resulting from the use or preparation of this recipe.