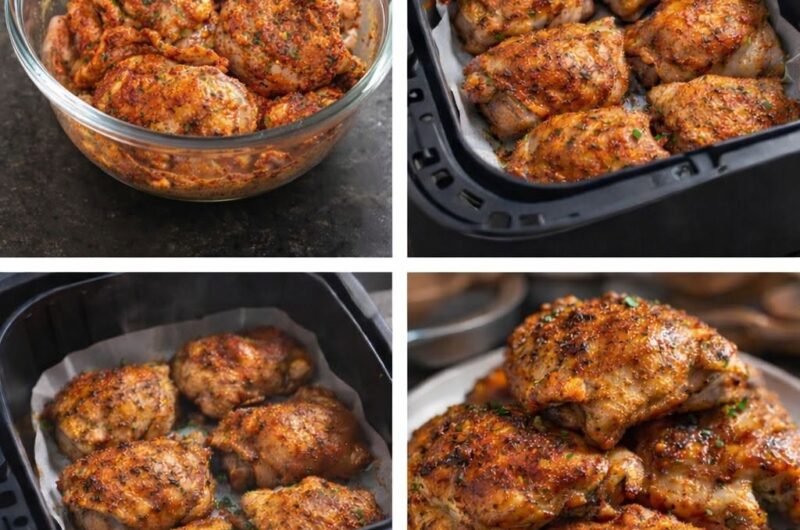
This recipe delivers everything people love about traditional fried chicken — a crunchy golden coating, juicy meat, and rich flavor — while using much less oil than deep frying. The air fryer creates a beautifully crisp exterior while keeping the inside moist and tender, and the secret lies in the combination of flavorful seasonings, a buttermilk marinade, and a special coating made from flour, cornstarch, and baking powder.
Many air fryer fried chicken recipes turn out dry or lack the crunchy texture of the deep-fried version. This one solves that problem through a few specific techniques rather than any single trick: buttermilk tenderizes the chicken while adding moisture, hot sauce adds flavor and helps the coating stick, cornstarch keeps the coating light and crisp, and baking powder creates tiny air pockets that make the crust extra crunchy. Together, these elements produce chicken that looks and tastes like traditional fried chicken while being easier and cleaner to prepare.
This is a solid choice for family dinners, weekend gatherings, picnics, game nights, or any time you want a comforting homemade meal — and it holds up well for meal prep and leftovers too.
Equipment Needed
- Air fryer
- Small mixing bowl
- Large mixing bowl
- Whisk
- Measuring cups
- Measuring spoons
- Tongs
- Mixing spoon
- Meat thermometer
- Tray or plate for coating chicken
Prep and Setup
Getting the seasoning, chicken, and coating organized in stages keeps this multi-step recipe manageable:
Seasoning Mix:
- 1 tablespoon kosher salt
- 1/2 tablespoon ground black pepper
- 1 tablespoon garlic powder
- 1 tablespoon onion powder
- 1/2 tablespoon smoked paprika
- 1 teaspoon cayenne pepper, optional
Chicken:
- 3 pounds bone-in chicken, skin-on thighs and drumsticks (about 4 thighs and 4 drumsticks)
- 1/2 cup buttermilk
- 1/4 cup hot sauce (Frank’s Red Hot or Louisiana Hot Sauce), optional; if omitting, add another 1/4 cup buttermilk
Dry Batter:
- 1 cup all-purpose flour
- 1 cup cornstarch
- 1 tablespoon baking powder
- Half of the seasoning mix
- Neutral oil spray
Workflow: How the Steps Actually Flow
Step 1: Prepare the seasoning blend. In a small bowl, combine the kosher salt, black pepper, garlic powder, onion powder, smoked paprika, and cayenne pepper if using, mixing until evenly combined. This single blend does double duty, flavoring both the chicken directly and the dry coating later, so every bite ends up seasoned consistently.
Step 2: Season the chicken. Place the chicken thighs and drumsticks on a tray or large plate, sprinkle half of the seasoning mixture evenly over both sides of each piece, and gently rub it into the meat so the flavors begin to absorb.
Step 3: Marinate the chicken. Transfer the seasoned chicken to a large mixing bowl, pour the buttermilk and hot sauce over it, and mix until every piece is fully coated. Let it marinate for at least 15 minutes while you prepare the coating — or, for even better flavor and tenderness, cover and refrigerate overnight. The buttermilk works by breaking down proteins in the meat, which is what creates that tender texture while keeping the chicken juicy during cooking.
Step 4: Prepare the dry coating. In a large bowl, combine the all-purpose flour, cornstarch, baking powder, and the remaining half of the seasoning mixture, whisking until evenly mixed. Add 2 tablespoons of water or some of the chicken marinade, then use your hands to work the liquid into the dry ingredients until small clumps form throughout. These craggy little bits are what create the crispy texture that makes fried chicken so irresistible — this step shouldn’t be rushed or skipped.
Step 5: Coat the chicken. Remove one piece of chicken from the marinade, place it in the dry coating mixture, cover it completely, and press firmly with your hands to help the breading stick. Repeat with each piece. Taking your time here — pressing the coating on rather than just dusting it — helps create a thicker, crunchier crust after cooking.
Step 6: Apply the oil spray. Place the coated chicken pieces on a tray and spray both sides generously with neutral oil spray. This step matters more than it might seem: the oil helps the coating brown properly and become crispy during cooking, and also prevents the breading from looking dry, helping the finished chicken achieve a genuinely fried appearance.
Step 7: Preheat the air fryer. 375°F (190°C). Preheating means the chicken starts cooking immediately once it goes in, which improves both browning and crispiness.
Step 8: Cook the chicken. Arrange the pieces in the air fryer basket skin side down, without overcrowding — leaving space between pieces lets hot air circulate properly, so cook in batches if necessary. Air fry for 12 minutes.
Step 9: Flip and continue cooking. After 12 minutes, carefully flip each piece, spray the top side again with oil spray, and continue cooking for another 6 to 8 minutes. The chicken is done when the internal temperature reaches 165°F (74°C) and the coating is golden brown and crispy.
Step 10: Rest before serving. Remove the chicken from the air fryer and let it rest for a few minutes before serving. This resting period allows the juices to settle inside the meat, making every bite more flavorful and moist.
Component Organization: What Each Ingredient Is Doing
- Flavor foundation: the seasoning mix — kosher salt, black pepper, garlic powder, onion powder, smoked paprika, and optional cayenne — used both directly on the chicken and folded into the dry coating, so the flavor runs through the whole piece rather than sitting only on the surface.
- Tenderizing and moisture: buttermilk, which breaks down proteins in the meat for a tender, juicy result, with hot sauce adding flavor and helping the coating adhere.
- The crispy structure: flour, cornstarch, and baking powder together. Cornstarch keeps the coating light and crisp rather than heavy, while baking powder creates small air pockets that add extra crunch as the chicken cooks.
- Browning and fried appearance: neutral oil spray, applied generously both before the first cook and again after flipping — this is what allows the coating to brown properly and develop that classic fried-chicken look and texture without deep frying.
What Makes This Recipe Special
The combination of techniques here is what sets this recipe apart from air fryer fried chicken that comes out dry or soft. The buttermilk marinade tenderizes the meat, the hot sauce adds flavor while helping the coating stick, cornstarch lightens the crust, and baking powder aerates it — each ingredient solving a specific problem rather than being included just for flavor.
Serving Suggestions
This crispy air fryer fried chicken pairs well with:
- French fries
- Mashed potatoes
- Macaroni and cheese
- Coleslaw
- Cornbread
- Biscuits
- Baked beans
- Corn on the cob
- Potato salad
- Garden salad
- Ranch dressing
- Honey mustard sauce
- Barbecue sauce
- Buffalo sauce
Tips & Tricks
- Use plenty of oil spray. A generous coating is one of the most important steps for a crispy, golden result and helps prevent sticking.
- Choose the right oil. Avocado oil spray works very well because of its high smoke point; canola or vegetable oil sprays are also good choices.
- Marinate longer for better flavor. 15 minutes works fine, but marinating overnight allows the chicken to absorb more flavor and become even more tender.
- Use bone-in, skin-on chicken. This combination provides the best flavor and texture — the skin crisps up beautifully while the bone helps keep the meat juicy.
- Do not crowd the basket. Cooking too many pieces at once reduces airflow and can lead to uneven cooking.
- Check the internal temperature. Always use a meat thermometer to confirm the chicken has reached 165°F (74°C).
- Make it spicier. Add extra cayenne pepper or more hot sauce if you enjoy a spicier fried chicken.
- Let the chicken rest. A few minutes of resting before serving helps keep the juices inside the meat.
Storage Instructions
Store leftover chicken in an airtight container in the refrigerator for up to 3 to 4 days, allowing it to cool completely before storing.
Reheating Instructions
Air Fryer Method (for the crispiest results):
- Preheat the air fryer to 375°F (190°C).
- Cook for 6 to 8 minutes.
- Serve immediately.
Microwave Method: Place chicken on a microwave-safe plate and heat until warmed through. The microwave is quick, but the coating may not stay as crispy.
Step-by-Step Assembly Strategy
- Mix all seasoning ingredients together.
- Season the chicken with half of the seasoning blend.
- Mix the chicken with buttermilk and hot sauce; marinate for 15 minutes or overnight.
- Combine flour, cornstarch, baking powder, and the remaining seasoning.
- Add 2 tablespoons of water or marinade and mix to form small crumbs.
- Coat the chicken completely in the dry mixture.
- Spray both sides generously with oil spray.
- Preheat the air fryer to 375°F (190°C).
- Cook skin-side down for 12 minutes.
- Flip the chicken and spray again with oil.
- Cook another 6–8 minutes, until the internal temperature reaches 165°F (74°C).
- Rest for a few minutes before serving.
Air Fryer Fried Chicken
Description: This Air Fryer Fried Chicken is crispy, golden, and packed with flavor. A seasoned buttermilk marinade and crunchy coating create juicy chicken with a delicious fried texture, all without deep frying.
Duration:
- Prep Time: 15 minutes
- Cook Time: 20 minutes
- Total Time: 35 minutes
Ingredients:
Seasoning Mix:
- 1 tablespoon kosher salt
- 1/2 tablespoon ground black pepper
- 1 tablespoon garlic powder
- 1 tablespoon onion powder
- 1/2 tablespoon smoked paprika
- 1 teaspoon cayenne pepper (optional)
Chicken:
- 3 pounds bone-in chicken, skin-on thighs and drumsticks
- 1/2 cup buttermilk
- 1/4 cup hot sauce (optional)
Dry Batter:
- 1 cup all-purpose flour
- 1 cup cornstarch
- 1 tablespoon baking powder
- Half of the seasoning mix
- Neutral oil spray
Instructions:
- Mix all seasoning ingredients together.
- Season chicken with half of the seasoning blend.
- Mix chicken with buttermilk and hot sauce.
- Let marinate for 15 minutes or overnight.
- Combine flour, cornstarch, baking powder, and remaining seasoning.
- Add 2 tablespoons water or marinade and mix to create small crumbs.
- Coat chicken completely in the dry mixture.
- Spray both sides generously with oil spray.
- Preheat air fryer to 375°F (190°C).
- Cook skin-side down for 12 minutes.
- Flip chicken and spray again with oil.
- Cook another 6–8 minutes until internal temperature reaches 165°F (74°C).
- Rest for a few minutes before serving.
Notes:
- Use plenty of oil spray for the crispiest coating.
- Avocado oil spray works especially well.
- Marinate overnight for extra flavor.
- Use bone-in, skin-on chicken for the best texture.
- Avoid overcrowding the air fryer basket.
- Check the internal temperature before serving.
- Adjust the spice level by adding or reducing cayenne pepper and hot sauce.
Nutrition Information (per serving): Calories: 909kcal | Carbohydrates: 60g | Protein: 52g | Fat: 50g | Saturated Fat: 14g | Polyunsaturated Fat: 10g | Monounsaturated Fat: 20g | Trans Fat: 0.2g | Cholesterol: 287mg | Sodium: 2720mg | Potassium: 771mg | Fiber: 2g | Sugar: 2g | Vitamin A: 942 IU | Vitamin C: 12mg | Calcium: 256mg | Iron: 4mg
Medical Disclaimer: This recipe and the accompanying content are provided for general informational and culinary purposes only and are not intended as medical, nutritional, or dietary advice. Nutritional needs vary from person to person, and individuals with food allergies, intolerances, medical conditions, or specific dietary requirements should consult a qualified healthcare professional or registered dietitian before preparing or consuming this recipe. Cooking times and temperatures may vary depending on individual equipment; always ensure food is cooked to a safe internal temperature before serving. The creator of this content assumes no liability for any adverse reactions, allergic responses, or health outcomes resulting from the preparation or consumption of this recipe.