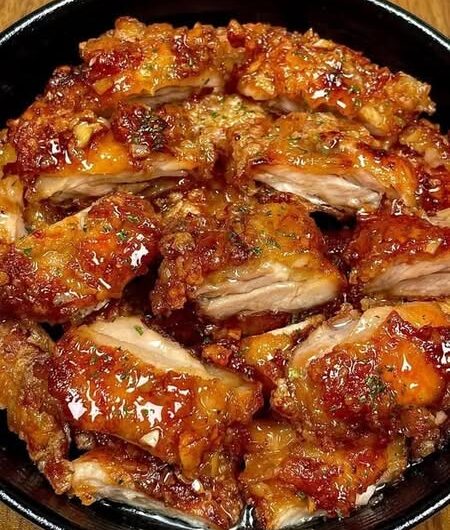
This dish takes two components that are cooked separately and then brings them together at the end: crispy, cornstarch-coated chicken from the air fryer, and a sticky, sweet-savory honey garlic sauce made on the stovetop. The chicken gets its crunch from a light cornstarch coating rather than deep frying, and the sauce gets its body from a second small amount of cornstarch used as a thickener — a detail worth keeping straight, since cornstarch shows up in two different roles in this recipe.
The result is a dish that’s sweet, savory, and sticky all at once, with a thick honey garlic glaze coating crispy chicken pieces. It uses very little oil compared to a traditional fried version, and it can easily be made gluten-free by swapping in gluten-free soy sauce. It’s built to be served over rice with vegetables, making it a complete meal rather than just a protein component.
Prep and Setup
Because this recipe runs two processes in parallel — the air fryer cooking the chicken while the sauce comes together on the stove — getting organized ahead of time keeps both moving smoothly:
- Chicken: 6 boneless, skinless chicken thighs, cut into small, cube-shaped pieces.
- Coating: cornstarch or potato starch, enough to coat all the chicken pieces evenly.
- Sauce ingredients: honey, soy sauce (or gluten-free soy sauce), brown sugar, ketchup, crushed garlic, and ground ginger — measured and ready to go into a saucepan.
- Thickener: a separate tablespoon of cornstarch, kept apart from the coating cornstarch, for whisking into the sauce once it’s simmering.
- Air fryer basket: oil spray on hand, in case the chicken needs a light coating to prevent sticking.
- Serving components: cooked rice, cooked green beans, and sliced green onions, ready to go once the chicken and sauce are combined.
Workflow: How the Steps Actually Flow
1. Cut and coat the chicken first. Cutting the thighs into small, cube-shaped pieces before anything else means they’re ready to go into the air fryer as soon as it’s time. Tossing them in cornstarch or potato starch in a bowl, until every piece is evenly coated, is what gives the chicken its crispy exterior once air fried — this step stands in for a traditional breading or deep-fry batter.
2. Air fry the chicken according to your air fryer’s chicken settings. The recipe gives an example of 390°F for 24 minutes, turning the pieces halfway at the 12-minute mark. A light spray of oil in the basket can help prevent sticking if needed.
3. Make the sauce while the chicken cooks. This is the parallel step that saves time — rather than waiting for the chicken to finish before starting the sauce, they happen simultaneously. Combine honey, soy sauce, brown sugar, ketchup, crushed garlic, and ground ginger in a small saucepan.
4. Heat the sauce gently until it simmers. Low to medium heat, just enough for the mixture to gently boil — not a hard, rolling boil.
5. Whisk in the cornstarch to thicken. Adding it slowly while stirring continuously prevents lumps, and the sauce should be kept on the heat, stirring, until it thickens properly. If it’s still too thin after the first addition, a little more cornstarch can be whisked in until it reaches the right consistency.
6. Combine the cooked chicken with the sauce. Once the chicken is fully cooked, it goes into the sauce, where everything is warmed together and mixed well so every piece is fully coated. The finished sauce will be thick and sticky, clinging to the chicken rather than pooling loosely.
7. Serve over rice with green beans, garnished with green onions. This is the final assembly — plating the sauced chicken alongside the rice and vegetables, with sliced green onions sprinkled on top just before serving.
Component Organization: What Each Ingredient Is Doing
- The protein and its crisp coating: chicken thighs and the first portion of cornstarch (or potato starch). This coating is what crisps up in the air fryer, giving the chicken its texture before it ever meets the sauce.
- The sauce’s flavor base: honey, soy sauce, brown sugar, ketchup, crushed garlic, and ground ginger. Together these create the sweet, savory, slightly tangy glaze that defines the dish.
- The sauce’s thickener: the separate tablespoon of cornstarch, whisked in during cooking to turn the sauce from a thin liquid into a thick, sticky glaze.
- Serving components: cooked rice and green beans round out the meal, while sliced green onions add a fresh, sharp garnish at the end.
Two Uses of Cornstarch — Worth Understanding
This recipe uses cornstarch (or potato starch) twice, in two different roles:
- As a coating on the raw chicken pieces before air frying — this is what gives the chicken its crispy exterior.
- As a thickener in the sauce, whisked in separately once the honey-soy mixture is simmering — this is what turns the sauce thick and sticky rather than thin and runny.
Keeping these two uses separate in your prep (not accidentally combining them) is part of what makes the final texture come out right on both the chicken and the sauce.
Tips & Tricks
- Chicken breast cooks faster than chicken thighs, so reduce the cooking time accordingly if you’re using breast instead of thighs.
- If the sauce becomes too thick, add a small amount of water and stir to loosen it back up.
- Use gluten-free soy sauce to keep the recipe gluten-free.
Serving Ideas
The recipe is built to be served as a complete meal:
- Over cooked rice, which soaks up the sticky sauce.
- Alongside cooked green beans for a vegetable component.
- Garnished with sliced green onions for a fresh, sharp finishing note.
Step-by-Step Assembly Strategy
- Cut chicken thighs into small cube-shaped pieces and coat evenly with cornstarch or potato starch.
- Air fry the coated chicken according to your air fryer’s chicken settings (example: 390°F for 24 minutes, turning halfway at 12 minutes), spraying lightly with oil if needed.
- While the chicken cooks, combine honey, soy sauce, brown sugar, ketchup, crushed garlic, and ground ginger in a small saucepan.
- Heat on low to medium until it gently boils.
- Slowly whisk in the tablespoon of cornstarch, stirring until the sauce thickens (adding more cornstarch if still too thin).
- Once the chicken is cooked, add it to the sauce and mix well until fully coated.
- Serve over cooked rice with green beans, garnished with sliced green onions.
Air Fryer Honey Glazed Chicken
Description: Sweet and sticky honey garlic chicken made crispy in the air fryer and coated with a thick homemade sauce. Made with very little oil and easily adapted to be gluten-free using gluten-free soy sauce. The chicken comes out crispy on the outside and coated in a thick honey garlic sauce — tastes great with rice and vegetables.
Duration:
- Prep Time: 10 minutes
- Cook Time: 25 minutes
- Total Time: 35 minutes
- Servings: 4
- Calories: 629 kcal per serving
Ingredients:
- 6 boneless, skinless chicken thighs
- Cornstarch or potato starch (for coating chicken)
- 1/2 cup honey
- 1/2 cup soy sauce or gluten-free soy sauce
- 2 tablespoons brown sugar
- 2 tablespoons ketchup
- 1 clove garlic, crushed
- 1/2 teaspoon ground ginger
- 1 tablespoon cornstarch
- Cooked rice (for serving)
- Cooked green beans (for serving)
- Sliced green onions (for garnish)
Instructions:
- Cut the chicken thighs into small cube-shaped pieces. Put them into a bowl and add cornstarch or potato starch. Mix well until all chicken pieces are evenly coated.
- Place the coated chicken into the air fryer basket. Cook the chicken following your air fryer’s instructions for chicken. (Example: Cook at 390°F for 24 minutes, turning halfway at 12 minutes.) If needed, lightly spray the air fryer basket with oil to stop the chicken from sticking.
- While the chicken is cooking, take a small saucepan and add honey, soy sauce, brown sugar, ketchup, crushed garlic, and ground ginger.
- Heat the sauce on low to medium heat until it gently boils. Slowly whisk in the cornstarch and keep stirring until the sauce becomes thick. If the sauce is still thin, add a little more cornstarch and stir until thick.
- Once the chicken is fully cooked, add it to the sauce. Warm everything together and mix well so the chicken is fully coated. The sauce will be sticky.
- Serve the honey garlic chicken over cooked rice with green beans.
- Sprinkle sliced green onions on top before serving.
Notes:
- Chicken breast cooks faster than chicken thighs, so reduce cooking time if using breast.
- If sauce becomes too thick, add a small amount of water and stir.
- Use gluten-free soy sauce to keep the recipe gluten-free.
Medical Disclaimer: This recipe and the accompanying content are provided for general informational and culinary purposes only and are not intended as medical, nutritional, or dietary advice. Nutritional needs vary from person to person, and individuals with food allergies, intolerances, medical conditions, or specific dietary requirements should consult a qualified healthcare professional or registered dietitian before preparing or consuming this recipe. Cooking times and temperatures may vary depending on individual equipment; always ensure food is cooked to a safe internal temperature before serving. The creator of this content assumes no liability for any adverse reactions, allergic responses, or health outcomes resulting from the preparation or consumption of this recipe.