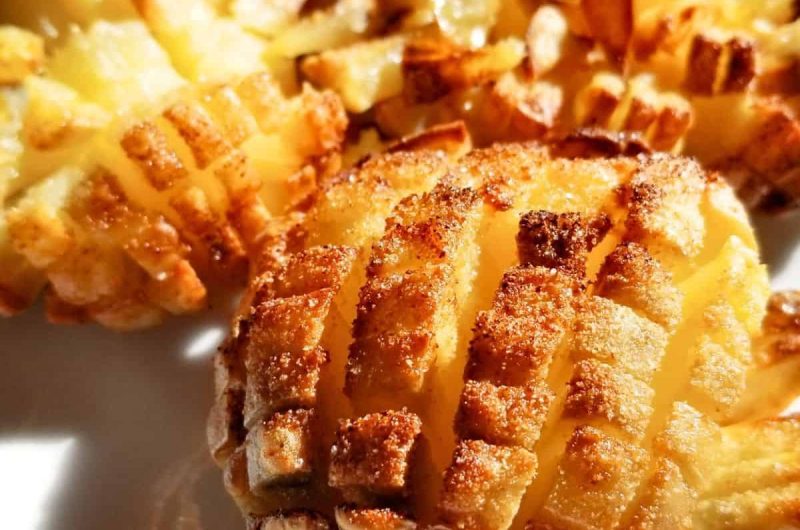
These blooming potatoes are a showstopping alternative to regular baked potatoes and Hasselback potatoes. Instead of the usual single row of cuts, these are sliced both lengthwise and crosswise while still attached at the base, so as they cook, the individual “petals” fan out and open into a bloom-like shape. Air fried, they come out crispy on the outside and fluffy and soft in the middle, with plenty of surface area for cheesy, savory toppings to work their way into every crevice.
This is a genuinely quick recipe for how impressive it looks on a plate — with a combined prep and cook time of under 20 minutes, most of that visual payoff comes from the cutting technique rather than any complicated cooking process.
Prep and Setup
Getting the potatoes properly sliced is really the technical heart of this recipe, so having a sharp knife and a steady hand ready matters more here than usual:
- Potatoes: 2 medium, washed, scrubbed, and dried.
- Olive oil or spray oil: 1 tablespoon, for brushing over the sliced potatoes.
- Seasoning: salt and pepper to taste, garlic powder, dried thyme, and dried rosemary.
- Fresh parsley: finely chopped, for garnish.
- Optional toppings: butter, bacon crumbles, shredded cheese, chives or green onions, and sour cream.
- A microwave: for partially cooking the potatoes before they go into the air fryer.
- Air fryer: preheated to 390°F (195°C).
How to Cut a Blooming Hasselback Potato
The key to this recipe is slicing the potatoes thinly and evenly so they cook through and become properly crispy. Start by placing the potato on a cutting board, then use a sharp knife to make thin slices along the potato, and then across the potato, being careful not to cut all the way through — the goal is for the potato “petals” to stay attached to the base rather than falling apart into separate pieces. Aim for squares roughly 5–7 mm in size (about 0.197–0.276 inches); consistent sizing here is what allows the potato to cook evenly and open into that signature bloom shape once it’s cooked.
Workflow: How the Steps Actually Flow
1. Wash, scrub, and dry the potatoes. Starting with clean, dry potatoes makes for easier, safer slicing and better seasoning adhesion later.
2. Slice crosswise and lengthwise, without cutting all the way through. This is the defining technique of the recipe — the potato petals need to remain attached to the base so the potato holds together while still opening up as it cooks.
3. Microwave until soft. 5–7 minutes on high. This pre-cooking step gets the potato most of the way to tender before it ever goes into the air fryer, which is important given how thin and delicate the sliced sections are — the air fryer alone likely wouldn’t cook the interior through without either overcooking the exterior or taking considerably longer.
4. Preheat the air fryer. 390°F (195°C), so it’s ready the moment the potatoes are seasoned.
5. Season the potatoes. Brush the microwaved potatoes with olive oil or melted butter, then sprinkle with salt, pepper, garlic powder, rosemary, thyme, or your seasoning of choice. Brushing the oil into the sliced sections helps it and the seasoning reach between the petals rather than sitting only on the surface.
6. Air fry until golden and crispy. 10–12 minutes, until the potatoes are tender with golden, crispy skin. This final stage is what builds the crispy exterior the recipe is named for, using the direct, circulating heat of the air fryer after the interior has already softened in the microwave.
7. Top and serve. Sprinkle with your favorite toppings and serve immediately while still hot and crisp.
Component Organization: What Each Ingredient Is Doing
- The potato itself: sliced into a bloom pattern, providing maximum surface area for both crisping and holding toppings.
- Pre-cooking: the microwave step, which softens the interior before the air fryer takes over — a practical shortcut for a potato that’s been cut into such thin sections.
- Crisping and flavor: olive oil or melted butter, brushed on to help the exterior brown and the seasoning stick.
- Seasoning: salt, pepper, garlic powder, dried thyme, and dried rosemary, providing a savory, herby base flavor.
- Finishing touches: fresh parsley for garnish, plus optional toppings like butter, bacon crumbles, shredded cheese, chives or green onions, and sour cream — all added after cooking, letting you customize each potato to taste.
Why the Microwave Step Matters
Because these potatoes are sliced so thinly and left attached only at the base, cooking them entirely in the air fryer risks either an undercooked center or an overly dark, dry exterior by the time the inside finally softens. Microwaving first gets the potato most of the way to tender, so the air fryer’s job becomes primarily about crisping the exterior rather than fully cooking the interior — a much shorter and more controlled final step.
Step-by-Step Assembly Strategy
- Wash and scrub the potatoes, then pat dry.
- Slice crosswise and lengthwise into thin sections, without cutting all the way through the base.
- Microwave on high for 5–7 minutes, until soft.
- Preheat the air fryer to 390°F (195°C).
- Brush the potatoes with olive oil or melted butter, then season with salt, pepper, garlic powder, rosemary, and thyme.
- Air fry for 10–12 minutes, until tender, golden, and crispy.
- Top with your favorite toppings and serve.
Air Fryer Blooming Baked Potatoes
Description: These Air Fryer Blooming Baked Potatoes are a showstopping alternative to regular baked potatoes and Hasselback potatoes. Sliced lengthwise and crosswise while still attached at the base, then air-fried to perfection, they come out crispy on the outside and fluffy and soft in the middle — with cheesy toppings making them irresistible.
Duration:
- Prep Time: 5 minutes
- Cook Time: 12 minutes
- Total Time: 17 minutes
- Yield: 2
Ingredients:
- 2 medium potatoes, sliced crosswise and lengthwise
- 1 tbsp olive oil or spray oil
- Salt and pepper, to taste
- ¼ teaspoon garlic powder
- ¼ teaspoon dried thyme
- ¼ teaspoon dried rosemary
- 1 tbsp fresh parsley, finely chopped (for garnishing)
- Optional toppings: butter, bacon crumbles, shredded cheese, chives or green onions, sour cream
Instructions:
- Start by washing and scrubbing your potatoes, then pat them dry.
- Slice them crosswise and lengthwise into thin slices. Be careful not to cut all the way through — the potato petals must still be attached to the base of the potato.
- Place the potatoes in the microwave and cook on high for 5–7 minutes, until soft.
- Preheat the air fryer to 390°F (195°C).
- Remove potatoes from the microwave and brush them with olive oil or melted butter, then sprinkle with salt and pepper, to taste, garlic powder, rosemary, thyme, and/or seasoning of choice.
- Place the potatoes in the air fryer and cook on the air fry setting for 10–12 minutes, or until they are tender and golden brown with crispy skin.
- The blooming potatoes are ready to be served. Sprinkle with your favorite toppings and enjoy!
Notes:
How to Cut a Blooming Hasselback Potato: To cut a Hasselback potato, place it on a cutting board, then use a sharp knife to make thin slices along the potato, then across the potato, being careful not to cut all the way through. Aim to make the squares (potato petals) approximately 5–7 mm in size (0.197–0.276 inches).
Medical Disclaimer: This recipe and the accompanying content are provided for general informational and culinary purposes only and are not intended as medical, nutritional, or dietary advice. Nutritional needs vary from person to person, and individuals with food allergies, intolerances, medical conditions, or specific dietary requirements should consult a qualified healthcare professional or registered dietitian before preparing or consuming this recipe. Cooking times and temperatures may vary depending on individual equipment; always ensure food is cooked to a safe internal temperature before serving. The creator of this content assumes no liability for any adverse reactions, allergic responses, or health outcomes resulting from the preparation or consumption of this recipe.