Scrambled eggs look like one of the simplest things you can cook, and in a way, they are — but the gap between an ordinary plate of eggs and a genuinely great one comes down to a handful of small details, not extra ingredients or fancy equipment. With the right approach, it takes about a minute of actual cooking time to get soft, creamy eggs that stay tender instead of turning dry and rubbery.
The whole idea behind this method is restraint. You’re not adding a long list of extras or cooking the eggs for a long time — you’re using gentle heat, slow, deliberate movement, and pulling the eggs off the heat at exactly the right moment. Those three things, done consistently, are what produce soft folds of egg with a creamy texture that pairs beautifully with warm buttered toast.
Why This Method Works
A lot of people assume scrambled eggs need to be stirred constantly over high heat to cook properly. That does cook them fast, but it almost always results in dry, crumbly pieces that lack the smooth texture most people are actually after.
This method takes the opposite approach: gentle heat, and instead of constant stirring, the eggs are slowly pushed across the pan so they naturally form soft curds. Larger folds like this hold onto their moisture much better than eggs broken down into tiny fragments.
A small amount of milk helps soften the texture further, though the eggs still work well without it if you’d rather skip it. Butter does double duty here — it adds flavor and it keeps the eggs from sticking to the pan as they cook.
The other key piece of this method is understanding carryover cooking: the eggs keep cooking from residual heat even after they leave the stove. That’s exactly why pulling them off just slightly before they look “done” is what prevents the single most common mistake in scrambled eggs — overcooking.
Mise en Place: Organizing Your Components
Because scrambled eggs cook so quickly once they hit the pan, this is a recipe where having everything ready before you turn on the heat makes a real difference. There’s no time to go hunting for the pepper mill once the eggs are in the skillet.
Component 1 — The Eggs
Eggs are the star here, and freshness matters more than it does in most recipes because there are so few other ingredients to mask anything. A general guide is two eggs per person for a satisfying breakfast serving. Fresh eggs give a smoother texture and richer flavor, and depending on what the hens were fed, yolks can range from pale yellow to deep orange — either is fine, though the more vibrant yolks tend to make the finished eggs look richer.
Component 2 — Milk (Optional)
A small amount of milk is optional but recommended if you like your eggs extra creamy. It gets whisked in with the eggs and helps soften the texture. The key word is “small” — too much milk makes the eggs watery instead of creamy, so this is a case where more is not better.
Component 3 — Butter
Butter serves two jobs at once: it coats the pan to stop sticking, and it adds a rich, buttery flavor that complements the eggs. As it melts in the skillet, it creates the base the egg mixture cooks in.
Component 4 — Salt and Black Pepper
Salt gets mixed into the eggs before cooking, not sprinkled on after, so the seasoning distributes evenly through every bite. Black pepper adds a bit of a kick and balances out the richness — you can also add a little extra on top once the eggs are plated, if you like.
Component 5 — Bread for Serving
Warm, toasted, buttered bread is the classic partner for this dish. The contrast between crisp toast and soft, creamy eggs is a big part of what makes this combination work so well.
Equipment That Makes This Easier
Non-Stick Skillet
This lets the eggs move freely across the surface without sticking, and it makes cleanup fast. If you’re using cast iron instead, make sure it’s well seasoned first.
Rubber Spatula
A flexible rubber spatula reaches into every corner of the pan, gently lifting cooked egg while letting the uncooked portion spread into the empty space. A flat wooden spoon can work in a pinch, but a rubber spatula gives the smoothest results.
Mixing Bowl
Whisking the eggs in a bowl before they hit the pan makes sure the yolks and whites fully combine, which is what gives you an even texture all the way through.
Workflow: Getting Everything Lined Up
- Prep first, cook second. Crack the eggs into a bowl, add the milk, salt, and black pepper, and whisk until the mixture is smooth and evenly colored with no visible streaks of egg white left.
- Warm the pan while you whisk. Place the skillet over medium heat and let it warm for about a minute.
- Melt the butter. Once the pan is warm, add the butter and let it melt completely, coating the bottom of the skillet without browning.
- Have everything ready before the eggs go in. Once the egg mixture hits the pan, things move fast — there’s no time to prep once you’ve started cooking.
Assembly Strategy: How the Cooking Actually Happens
Once the eggs are whisked and the butter has melted, the process moves quickly, so keep your spatula close and have the toast ready to go before you start.
Step 1 — Let it sit. Pour the egg mixture into the warm skillet and let it sit undisturbed for about five seconds. A thin layer will begin to set on the bottom — this is intentional, and it’s what creates the soft folds that make good scrambled eggs.
Step 2 — Push, don’t stir. Using a rubber spatula, slowly push the cooked egg from one side of the pan toward the center. As you move the cooked portion, uncooked egg flows into the empty space and begins to cook. Keep using long, gentle strokes rather than quick circular stirring.
Step 3 — Start folding. After about thirty seconds, begin folding the eggs as well — gently lifting sections of cooked egg and turning them over so everything cooks evenly. The goal isn’t to break the eggs into tiny pieces, but to build large, soft curds that hold their moisture.
Step 4 — Pull them early. Within about a minute, the eggs are nearly fully cooked. At this point, they should still look glossy and slightly soft. Remove the skillet from the heat before they look completely done — the pan’s remaining warmth will finish the job over the next several seconds. This one step is what keeps the eggs creamy instead of dry.
Step 5 — Rest if needed. If you’d prefer the eggs a touch firmer, just let them sit in the warm pan a few extra seconds before serving. It’s much easier to cook them a little more than to rescue eggs that have already gone dry.
How to Tell When They’re Ready
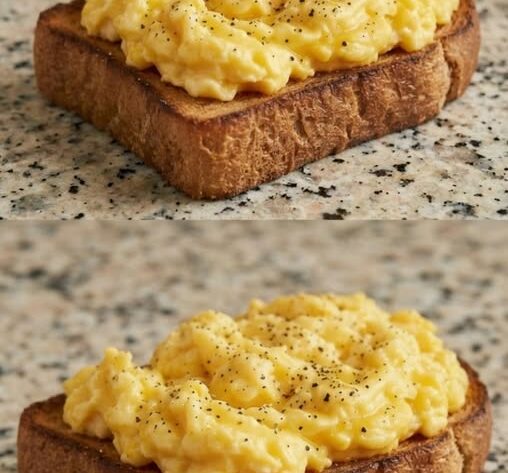
Rather than watching the clock, pay attention to appearance. The eggs should gather into soft folds that hold together without liquid running across the pan, while still keeping a slight shine on the surface — that glossy look is your best sign that they’re moist and tender.
If the eggs look dull, dry, or start turning golden brown, they’ve been on the heat too long. Properly cooked scrambled eggs stay bright yellow with no crispy edges. Another simple check: gently lift a portion with the spatula — it should hold together softly rather than falling apart into dry crumbs.
Approved Variations & Swaps (Straight From the Recipe)
- Milk: optional — the eggs work well with or without it, so leave it out if you prefer.
- Pan type: non-stick is recommended, but well-seasoned cast iron also works.
- Firmness: if you like your eggs a bit firmer, let them rest a few extra seconds in the warm pan off the heat before serving.
No other ingredient swaps are specified, so it’s best to stay within what’s described here rather than introducing anything else.
Serving Suggestions
These eggs are versatile and fit into almost any breakfast. The classic pairing is hot buttered toast, where the crisp bread balances the creamy eggs perfectly. For a heartier spread, they also pair well with:
- Crispy bacon
- Breakfast sausages or sausage patties
- Sautéed spinach
- Garlic mushrooms
- Fresh sliced tomatoes
- Hash browns or roasted potatoes
- Avocado slices
- Fresh fruit on the side
Common Mistakes to Avoid
- Cooking over high heat — firms the eggs up too fast, before soft curds have a chance to form, leaving them dry and rubbery.
- Stirring too aggressively — chops the eggs into tiny fragments instead of allowing larger, creamier folds to develop.
- Leaving the eggs on the stove too long — since they keep cooking after leaving the heat, waiting until they look fully done on the stove usually means they’re overcooked by the time they hit the plate.
- Using too much milk — a small amount improves texture, but too much makes the eggs watery.
- Letting the butter brown — it should melt gently without darkening; browned butter changes the flavor and can leave brown spots on the eggs.
Storing and Reheating
Scrambled eggs are best enjoyed immediately, when the texture is at its softest. If you do have leftovers, let them cool completely before transferring to an airtight container — they’ll keep in the refrigerator for up to two days. Reheat slowly in a skillet over low heat, stirring gently, or use a microwave in short intervals to avoid turning the eggs rubbery. Freezing isn’t recommended, since the texture changes after thawing and the eggs lose their creaminess.
Soft, Fluffy & Creamy Scrambled Eggs
Description: Gently cooked scrambled eggs with soft folds and a creamy texture, made with just eggs, milk, butter, salt, and black pepper — no special equipment or complicated technique required.
Duration: Quick-cooking — the eggs cook in about one minute once in the pan, with a short prep time for whisking and warming the skillet beforehand.
Ingredients
- Eggs (a general guide is two per person)
- A small amount of milk (optional, for extra creaminess)
- Butter (enough to coat the bottom of the skillet)
- Salt, to taste
- Freshly ground black pepper, to taste
- Bread, for serving (toasted and buttered)
Instructions
- Crack the eggs into a bowl, add the milk, salt, and black pepper, and whisk until smooth and evenly colored with no visible streaks of egg white.
- Place a non-stick skillet over medium heat and let it warm for about a minute.
- Add the butter and let it melt completely, coating the bottom of the pan without browning.
- Pour the egg mixture into the warm skillet and let it sit undisturbed for about five seconds to let a thin layer set on the bottom.
- Using a rubber spatula, slowly push the cooked egg from one side of the pan toward the center in long, gentle strokes, letting uncooked egg flow into the empty space.
- After about thirty seconds, begin gently folding the eggs, turning sections over so everything cooks evenly, forming large, soft curds.
- After about one minute total, remove the skillet from the heat while the eggs still look glossy and slightly soft — they will finish cooking from residual heat.
- If you prefer firmer eggs, let them rest a few extra seconds in the warm pan before serving.
- Serve immediately with warm buttered toast.
Notes
- Fresh eggs give the smoothest texture and richest flavor.
- Milk is optional; use only a small amount if included, as too much makes the eggs watery.
- If using cast iron instead of non-stick, make sure it’s well seasoned first.
- Leftovers can be refrigerated in an airtight container for up to two days; reheat gently over low heat or in short microwave intervals.
- Freezing is not recommended, as the texture becomes less creamy after thawing.
Disclaimer: This content is provided for general informational and culinary purposes only and does not constitute professional dietary, nutritional, or medical advice. Individuals with food allergies, sensitivities, or specific dietary or medical conditions should consult a qualified healthcare provider or registered dietitian before preparing or consuming this recipe. The author and publisher assume no liability for any adverse effects resulting from the use or preparation of the information provided herein.