Introduction
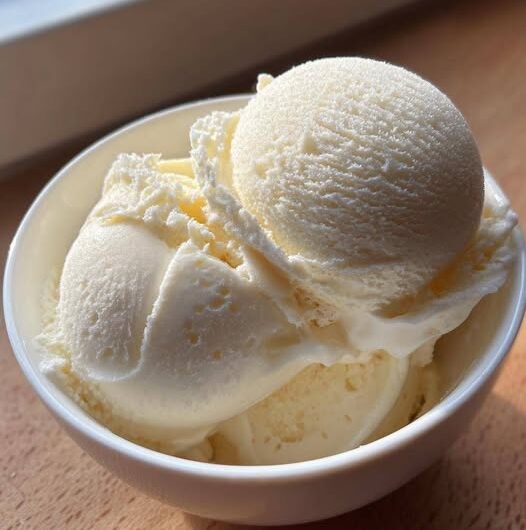
Vanilla Ice Cream is one of the most beloved desserts in the world, cherished for its smooth, creamy texture and rich yet delicate vanilla flavor. While store-bought ice cream is convenient, nothing compares to the taste of homemade vanilla ice cream prepared with fresh cream, real vanilla, and simple pantry ingredients. Homemade ice cream has a luxurious richness, a velvety mouthfeel, and an authentic vanilla aroma that transforms an ordinary dessert into something truly memorable.
This classic Vanilla Ice Cream recipe uses a traditional custard base made with egg yolks, cream, and milk. The result is an ultra-creamy frozen dessert with a soft, scoopable texture and deep vanilla flavor. Whether served in a bowl, on top of warm pie, alongside brownies, or as the foundation for elaborate sundaes, this homemade ice cream is endlessly versatile and always impressive.
Making ice cream from scratch may seem intimidating, but the process is surprisingly simple. With a little patience and proper chilling time, you can create a dessert that rivals the finest ice cream shops.
Preparation Time
- Active Preparation Time: 25 minutes
- Cooking Time: 15 minutes
- Chilling Time: 4 to 12 hours
- Churning Time: 20 to 30 minutes
- Freezing Time: 4 to 6 hours
- Total Time: Approximately 9 to 18 hours
Yield
- Makes: About 1½ quarts
- Servings: 8 to 10 servings
Ingredients
For the Ice Cream Base
- 2 cups heavy cream
- 1 cup whole milk
- ¾ cup granulated sugar
- 5 large egg yolks
- 1 tablespoon pure vanilla extract
- 1 whole vanilla bean, split lengthwise (optional)
- ¼ teaspoon fine salt
Optional Ingredients for Enhanced Flavor
- 2 tablespoons honey
- 1 tablespoon vanilla bean paste
- 1 teaspoon almond extract
- 2 tablespoons powdered milk for extra creaminess
Optional Mix-Ins
You can customize your vanilla ice cream with any of the following:
- Chocolate chips
- Crushed chocolate sandwich cookies
- Brownie pieces
- Chopped nuts
- Caramel swirls
- Toffee bits
- Fresh strawberries
- Blueberries
- Crushed candy bars
- Mini marshmallows
- Peanut butter ribbons
- Cookie dough pieces
Why You’ll Love This Recipe
Rich and Creamy
The combination of egg yolks, heavy cream, and whole milk creates an exceptionally smooth and creamy texture.
Authentic Vanilla Flavor
Using pure vanilla extract and real vanilla bean produces an intense and natural vanilla flavor that simply cannot be replicated with artificial flavorings.
Easy to Customize
Vanilla ice cream serves as the perfect base for countless flavor variations and mix-ins.
No Artificial Ingredients
Homemade ice cream contains only ingredients you recognize and trust.
Perfect for Any Occasion
Serve it at birthday parties, summer gatherings, holiday celebrations, or simply as an everyday treat.
Equipment Needed
- Medium saucepan
- Mixing bowls
- Whisk
- Fine-mesh strainer
- Rubber spatula
- Ice cream maker
- Airtight freezer container
- Measuring cups and spoons
Step-by-Step Instructions
Step 1: Prepare the Dairy Mixture
- Place the heavy cream, whole milk, and half of the sugar into a medium saucepan.
- If using a vanilla bean, split it lengthwise using a sharp knife and scrape out the tiny seeds. Add both the seeds and the empty pod to the saucepan.
- Place the saucepan over medium heat.
- Stir occasionally until the sugar dissolves completely and the mixture becomes hot and steamy. Avoid boiling.
- The mixture should reach approximately 170°F (77°C), just below a simmer.
- Remove from heat.
- Allow the vanilla bean to steep in the warm cream for about 15 minutes to maximize flavor extraction.
Step 2: Prepare the Egg Yolks
- In a separate large mixing bowl, add:
- Egg yolks
- Remaining sugar
- Salt
- Whisk vigorously for 2 to 3 minutes.
- The mixture should become pale yellow, smooth, and slightly thick.
- Whisking properly helps create a silky custard texture.
Step 3: Temper the Eggs
- Tempering gradually raises the temperature of the eggs and prevents scrambling.
- Slowly pour approximately 1 cup of the hot cream mixture into the egg yolks while whisking continuously.
- Continue adding another cup slowly while whisking constantly.
- The eggs should now be warm and fully incorporated.
Step 4: Cook the Custard
- Pour the tempered egg mixture back into the saucepan containing the remaining cream.
- Place the saucepan over low heat.
- Cook gently while stirring continuously with a wooden spoon or silicone spatula.
- Stir especially around the edges and bottom of the pan.
- Continue cooking for 5 to 8 minutes.
- The custard is ready when:
- It thickens slightly.
- It coats the back of a spoon.
- A finger drawn across the spoon leaves a clear line.
- Do not allow the custard to boil.
- Boiling may curdle the eggs and ruin the texture.
Step 5: Strain the Custard
- Remove the saucepan from heat.
- Discard the vanilla pod.
- Pour the custard through a fine-mesh strainer into a clean bowl.
- This step ensures an exceptionally smooth finished ice cream.
- Stir in the vanilla extract.
- Allow the mixture to cool at room temperature for about 20 minutes.
Step 6: Chill Thoroughly
- Cover the bowl with plastic wrap.
- Place it in the refrigerator.
- Chill for at least 4 hours.
- For the absolute best texture, refrigerate overnight.
- A thoroughly chilled base churns faster and creates smaller ice crystals, resulting in creamier ice cream.
Step 7: Churn the Ice Cream
- Pour the cold custard into your ice cream maker.
- Churn according to the manufacturer’s instructions.
- Most machines require between 20 and 30 minutes.
- The ice cream is ready when it resembles soft-serve consistency.
- If using mix-ins, add them during the final 5 minutes of churning.
Step 8: Freeze Until Firm
- Transfer the freshly churned ice cream into a freezer-safe container.
- Smooth the top using a spatula.
- Press parchment paper or plastic wrap directly onto the surface.
- Seal tightly with a lid.
- Freeze for 4 to 6 hours or until firm.
Texture Notes
This Vanilla Ice Cream is:
- Rich and creamy
- Smooth and velvety
- Dense yet scoopable
- Soft without being icy
- Luxuriously silky
The custard base prevents the formation of large ice crystals and provides a premium ice cream texture.
Flavor Variations
French Vanilla Ice Cream
Increase egg yolks to 7 and use a whole vanilla bean for a richer custard flavor.
Honey Vanilla Ice Cream
Replace ¼ cup sugar with honey.
Vanilla Bean Ice Cream
Use two whole vanilla beans for extra vanilla intensity.
Cinnamon Vanilla Ice Cream
Add one cinnamon stick while heating the cream mixture.
Maple Vanilla Ice Cream
Substitute ¼ cup sugar with pure maple syrup.
Cookies and Cream Ice Cream
Fold in crushed chocolate sandwich cookies after churning.
Chocolate Chip Vanilla Ice Cream
Add 1 cup mini chocolate chips during the last few minutes of churning.
Serving Suggestions
Serve Vanilla Ice Cream:
- In waffle cones
- In bowls topped with fresh fruit
- With warm brownies
- Alongside apple pie
- Over peach cobbler
- With chocolate cake
- Drizzled with caramel sauce
- Topped with hot fudge
- In milkshakes
- In ice cream sandwiches
- As a sundae with nuts and whipped cream
Storage Instructions
Store ice cream in an airtight container in the freezer.
For best quality, consume within 2 weeks.
To minimize ice crystals:
- Press plastic wrap directly on the surface.
- Keep the container tightly sealed.
- Store at the back of the freezer where temperature is most stable.
Allow ice cream to sit at room temperature for 5 minutes before scooping.
Nutritional Benefits
Although an indulgent dessert, homemade vanilla ice cream provides several nutrients:
- Calcium for healthy bones.
- Protein from milk and eggs.
- Vitamin A from cream and egg yolks.
- Energy from healthy fats.
- Phosphorus and potassium from dairy.
Approximate nutrition per serving:
- Calories: 320
- Protein: 5g
- Carbohydrates: 24g
- Fat: 23g
- Sugar: 22g
Helpful Tips
- Always use full-fat dairy for the creamiest results.
- Chill the ice cream base thoroughly before churning.
- Never boil the custard.
- Strain the mixture for maximum smoothness.
- Use high-quality vanilla extract.
- Freeze your storage container beforehand.
- Add mix-ins only near the end of churning.
- Store ice cream in shallow containers for easier scooping.
- Allow ice cream to soften slightly before serving


All the best