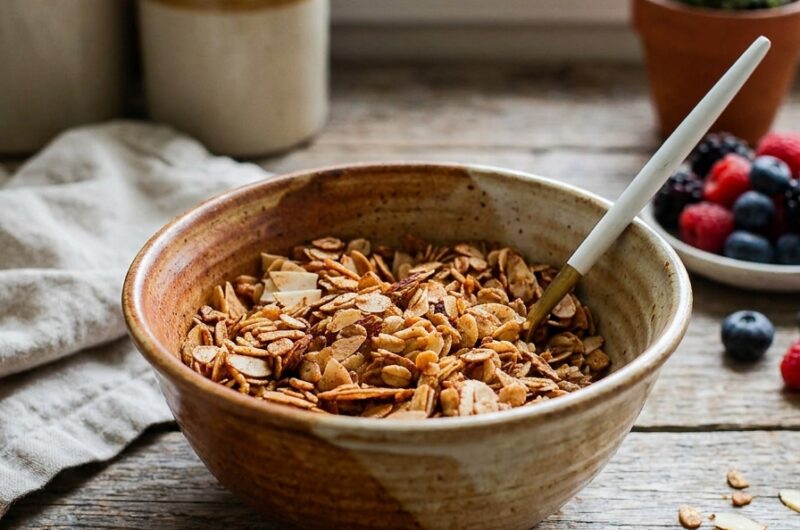
This granola takes a lighter approach to a breakfast staple by swapping the traditional butter or coconut oil for extra virgin olive oil. The result is a granola with a lighter, more delicate crunch and a subtly nutty, warm flavor that’s different from heavier, more traditional versions. Maple syrup provides natural sweetness while helping the oats caramelize and crisp as they bake, and sliced almonds add protein and crunch throughout.
What makes this recipe appealing for regular meal prep is its simplicity and lower sugar content compared to most store-bought granola. It comes together with a short ingredient list, requires only one baking step, and produces a large batch that stores well for weeks. Because the technique is straightforward — combine, coat, spread, and bake — the main variables that affect the final result are oven timing and how the granola is handled while it cools.
Below is a full breakdown of the workflow, ingredient roles, and technique needed to get a consistently crisp, golden batch, along with the approved variations for adjusting flavor and dietary needs.
Kitchen Workflow: How the Process Is Organized
This recipe breaks into three stages: combining the dry and wet mixtures separately, coating and baking, and cooling.
Stage 1 — Prepare the Dry and Wet Mixtures Separately. The dry ingredients — oats, chopped almonds, cinnamon, and salt — are combined either in a large bowl or directly in the baking dish. In a separate bowl, the wet ingredients — extra virgin olive oil, maple syrup, vanilla extract, and maple extract — are whisked together until fully combined. Keeping these separate until the last step ensures the wet mixture is evenly blended before it ever touches the oats, which leads to more consistent coating.
Stage 2 — Combine and Bake. The wet mixture is poured over the dry ingredients and mixed until everything is evenly coated. This coated mixture is then spread into an even layer on a baking sheet or dish and baked at 325°F for 35–40 minutes. The granola is stirred once, about halfway through baking, which helps it toast evenly on all sides rather than only browning on the surface facing the heat source.
Stage 3 — Cool Completely. Once baked to a golden brown, the granola needs to cool fully on the baking sheet before being stored or eaten. This cooling stage is what allows the granola to reach its final crisp texture — granola that’s still warm will feel softer than it actually is once fully cooled.
Component Breakdown
It’s useful to think of this recipe in terms of three functional components.
1. The Base — Rolled Oats Rolled oats form the hearty, textured foundation of the granola. Their structure is what gives the finished product its characteristic chew and bite once toasted.
2. The Crunch and Protein — Sliced Almonds Sliced almonds add both crunch and a boost of protein throughout the granola, toasting alongside the oats to develop their own golden color and nutty flavor.
3. The Binding and Flavor Layer — Olive Oil, Maple Syrup, Vanilla, and Maple Extract This wet mixture serves two purposes: it binds the dry ingredients together so they clump and crisp properly in the oven, and it delivers the core flavor of the granola. Olive oil keeps the texture light rather than heavy, maple syrup provides natural sweetness and caramelization, and the vanilla and maple extracts round out the flavor with warmth and depth.
4. The Warm Spice — Cinnamon and Sea Salt Cinnamon brings a cozy warmth to the granola, while sea salt balances the sweetness from the maple syrup, keeping the overall flavor from tasting flat or one-dimensional.
Approved Variations and Swaps
Based strictly on the details provided, the following substitutions can be made within this recipe:
- Rolled oats can be swapped for quick oats if needed, though the texture will be less chunky and crisp. For a gluten-free version, be sure to use certified gluten-free oats.
- Sliced almonds can be replaced with chopped raw pecans, walnuts, or cashews. For a nut-free version, raw sunflower seeds, raw pumpkin seeds, or sesame seeds work as substitutes.
- Cinnamon can be swapped for ground nutmeg, pumpkin pie spice, or cardamom for a different but equally cozy flavor.
- Sea salt can be replaced with table salt in a pinch, though the amount should be reduced slightly since table salt is finer and more concentrated by volume.
- Olive oil can be swapped for coconut oil, avocado oil, or melted butter, though each of these will change the flavor slightly.
- Maple syrup can be replaced with honey or agave nectar, though the flavor will be less deep and caramel-like than what maple syrup provides.
- Vanilla extract can be swapped for almond extract for a different flavor note, or omitted entirely.
- Maple extract is optional, and butter extract or a bit of extra vanilla extract can be used in its place if it’s not on hand.
For a lower-sugar version: Reduce the maple syrup to 1/4 cup and increase the vanilla or maple extract slightly to make up for the reduced sweetness with extra flavor.
Step-by-Step Assembly Strategy
To bake a well-crisped, evenly golden batch of granola, follow this sequence:
- Preheat the oven to 325°F and line a large rimmed baking sheet with parchment paper, or set aside a 9×13 baking dish.
- Combine the dry ingredients first — oats, chopped almonds, cinnamon, and salt — either in a large bowl or directly in the baking dish you plan to use.
- Whisk the wet ingredients together in a separate bowl — olive oil, maple syrup, vanilla extract, and maple extract — until fully combined.
- Pour the wet mixture over the dry ingredients and mix thoroughly until every bit of oats and almonds is evenly coated.
- Spread the coated mixture into an even layer on the prepared baking sheet or dish, avoiding thick clumps that could bake unevenly.
- Bake for 35–40 minutes, stirring once about halfway through. This midway stir is what ensures even toasting rather than one side browning faster than the other.
- Watch for a golden brown color as your cue that the granola is done. If your oven tends to run hot, consider reducing the bake time by about 5 minutes to avoid burnt edges.
- Allow the granola to cool completely on the baking sheet before handling it. This cooling period is essential — it’s what allows the granola to reach its final crisp texture.
For bigger, chunkier clusters, gently press the granola down with a piece of parchment paper during the last 10 minutes of baking, then let it cool completely without stirring, which helps it hold together in larger pieces.
Storage Guidance
Homemade granola holds up well when stored properly, making it a strong option for meal prep. At room temperature, it can be kept in an airtight container for about 2–3 weeks while staying fresh and crunchy. For longer storage, it can be refrigerated for up to 6 weeks, or frozen in zip-top bags for up to 6 months.
It’s important to let the granola cool completely before sealing it into storage — trapping in warmth can create moisture inside the container, which softens the texture over time. If granola does soften after storage, it can be re-toasted in a 300°F oven for 5–10 minutes to bring back the crunch.
Serving Ideas
This granola is versatile enough to work in a variety of ways:
- Sprinkle over yogurt, such as chocolate protein yogurt, almond butter Greek yogurt, or homemade crockpot yogurt, along with fresh berries.
- Stir into cottage cheese or kefir for a high-protein breakfast.
- Layer into a smoothie bowl for added crunch.
- Top warm baked apples or pears with a handful for an easy dessert.
- Mix into trail mix along with chocolate chips and dried fruit for a grab-and-go snack.
- Use it as a cereal with your favorite milk or nut milk.
Part 2: Recipe Card
Low Sugar Maple Almond Olive Oil Granola Recipe
Description: A lighter, lower-sugar granola made with olive oil instead of butter or coconut oil, sweetened naturally with maple syrup and packed with crunchy almonds. Easy to prep and perfect for meal planning.
Duration:
- Prep Time: 5 minutes
- Cook Time: 40 minutes
- Servings: 14
Ingredients:
- 4 cups rolled oats
- 2 cups slivered almonds
- 1.5 tsp cinnamon
- 1 tsp sea salt
- 1/2 cup extra virgin olive oil
- 1/3 cup maple syrup
- 1 tsp vanilla extract
- 1/2 tsp maple extract
Instructions:
- Preheat the oven to 325°F and line a large rimmed baking sheet with parchment paper, or set aside a 9×13 baking dish.
- In a large bowl or directly in the baking dish, combine the oats, chopped almonds, cinnamon, and salt.
- In a separate bowl, whisk together the olive oil, maple syrup, vanilla extract, and maple extract. Pour over the dry ingredients and mix until evenly coated.
- Spread the mixture into an even layer on the baking sheet. Bake for 35–40 minutes, stirring once halfway through, until golden brown.
- Allow the granola to cool fully on the baking sheet — this helps it crisp up even more.
Notes:
- Serving size is about 1/3 cup.
- If your oven runs hot, reduce baking time by about 5 minutes to avoid burnt edges.
- For bigger clusters, gently press the granola down with parchment during the last 10 minutes of baking, then let it cool completely without stirring.
- If granola softens after storage, re-toast in a 300°F oven for 5–10 minutes to restore crunch.
- For a lower-sugar version, reduce the maple syrup to 1/4 cup and increase the vanilla or maple extract for extra flavor.
- Store at room temperature in an airtight container for 2–3 weeks, refrigerate for up to 6 weeks, or freeze for up to 6 months. Let cool completely before sealing to avoid trapped moisture.
- Nutrition (per serving, approximate, about 1/3 cup): Calories: 203kcal, Carbohydrates: 24g, Protein: 6g, Fat: 17g, Saturated Fat: 1g, Sodium: 168mg, Potassium: 216mg, Fiber: 4g, Sugar: 6g, Vitamin A: 1IU, Vitamin C: 0.01mg, Calcium: 64mg, Iron: 2mg.
Medical and Nutritional Disclaimer
The information provided in this recipe and guide is intended for general informational and educational purposes only and does not constitute medical, dietary, or nutritional advice. Nutritional values listed are automatically calculated estimates and should be used as an approximation only; actual values may vary based on specific ingredient brands, substitutions, and portion sizes used. This recipe is not intended to diagnose, treat, cure, or prevent any disease or health condition. Individuals with food allergies, dietary restrictions, or specific medical conditions should consult with a qualified healthcare provider or registered dietitian before making dietary changes or preparing this recipe. The author and publisher assume no responsibility for any adverse effects resulting from the use or application of the information contained herein.