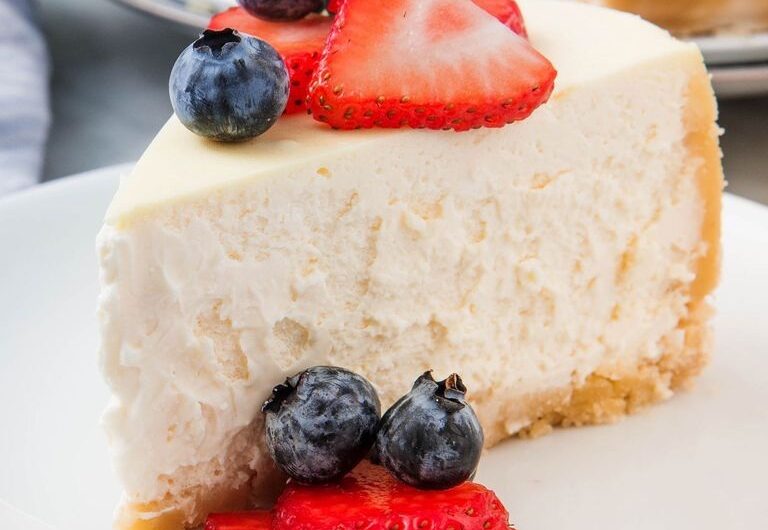
This Keto Cheesecake is built to deliver a smooth, creamy, classic cheesecake texture while staying low in carbohydrates, using stevia glycerite in place of sugar. It’s a genuinely simple ingredient list — cream cheese, sour cream, vanilla, stevia, and eggs — but the technique behind getting a smooth, crack-free cheesecake is where the real craft of this recipe lives.
Cheesecake, unlike most baked goods, isn’t really about rising or developing structure through flour and leavening — it’s a custard. That means the entire process is about protecting a delicate, egg-based mixture from the kind of temperature shock and overmixing that causes cracking, sinking, or a grainy texture. This guide walks through why each step exists, so the process feels less like a rigid checklist and more like something you understand.
Understanding Why Cheesecake Technique Matters So Much
Before getting into the workflow, it’s worth understanding the core challenge with any cheesecake: because it’s essentially a baked custard, it’s far more sensitive to heat and mixing than a typical cake.
Overmixing introduces air, and air causes cracks. Unlike a sponge cake, where air incorporated during mixing is desirable, a cheesecake batter that has too much air whipped into it will expand during baking and then collapse as it cools — and that collapse is what causes the surface to crack.
Sudden temperature changes cause cracking too. This is why the cake isn’t removed from the oven the moment it’s done, and why it’s not moved straight from a warm oven into a cold fridge. Every cooling stage in this recipe is designed to be gradual.
A water bath (even an indirect one, as used here) moderates the oven’s heat. Placing a pan of water on the rack below the cheesecake helps create gentler, more humid heat around the cake, which reduces the risk of the edges overbaking before the center sets.
Understanding these three principles explains almost every unusual-seeming step in this recipe — the slow mixing, the specific baking and cooling stages, and the long chill time before serving.
Mise en Place: Setting Up Before You Bake
Room temperature is non-negotiable for this recipe. Remove the cream cheese, sour cream, and eggs from the refrigerator at least 2 hours before you start mixing. Cold ingredients don’t blend smoothly, and forcing them together with more mixing to compensate is exactly the overmixing this recipe is trying to avoid.
Prepare your oven and water pan before you start the batter. Preheat to 300°F, boil a kettle of water, let it cool slightly, and pour it into a 9×13-inch pan placed on the lowest oven rack. Having this ready before you mix means your cheesecake can go straight into the oven once the batter is done, rather than sitting out while you scramble to set up the water bath.
Butter your springform pan generously. Coating the sides and bottom of a 9-inch nonstick springform pan with soft butter helps the cake release cleanly later and is one less thing to worry about during assembly.
Workflow: How Everything Comes Together
Preparing the Ingredients and Pan
Make sure the cream cheese, sour cream, and eggs have been out of the refrigerator for at least 2 hours before starting. Preheat the oven to 300°F. Boil a kettle of water, let it cool slightly, then pour it into a 9×13-inch pan and place that pan on the lowest oven rack. Generously butter the sides and bottom of a 9-inch nonstick springform pan.
Mixing the Batter
Place the cream cheese in a large bowl and, using a handheld mixer on the lowest speed, lightly beat until smooth. Add the sour cream (including any liquid that may have separated if it was at room temperature), vanilla, and stevia. Mix just until incorporated — don’t over-mix. Add the eggs one at a time, beating after each addition only long enough to reach a smooth batter, then stopping. Finish with a final stir using a rubber spatula to make sure everything is well incorporated.
Pour the batter into the prepared pan, smooth the top with a spatula, and gently tap the pan on the counter to release any trapped air bubbles.
Baking the Cake
Place the pan on the middle rack, directly above the water pan. Bake without opening the oven door until the edges are slightly puffed and the center is still sunken but not liquid — this takes about 50 to 60 minutes. If you gently shake the pan at this point, the center should jiggle slightly.
Cooling the Cake
Turn the oven off and leave the cheesecake inside with the oven door ajar for one hour. This gradual cooling is essential for preventing cracks. Remove the cake from the oven and place it on a cooling rack. If the edges haven’t pulled away from the pan on their own, gently run a knife around the rim to loosen them — this also helps prevent cracking as the cake continues to cool. Let the cake cool completely in the pan on the counter for about 2 more hours.
Once fully cool, transfer the cake, still in its pan, to the refrigerator. Refrigerate uncovered (to prevent condensation from forming on the surface) for at least 8 hours, and ideally 24 hours, before slicing and serving.
Slicing the Cake
Remove the cheesecake from the fridge 30 minutes before serving. Gently remove the springform pan’s outer rim. Use a very sharp, non-serrated knife, dipping it in hot water and wiping it clean between each cut to prevent messy slices. Use a cake server to gently lift each slice from the pan.
Topping the Cake (Optional)
Toppings like blueberry compote, strawberry compote, or keto chocolate mousse can be added at serving time if desired.
Getting the Technique Right
- Use blocks of cream cheese, not tubs of cream cheese spread. This matters for both texture and how the batter sets — spreadable cream cheese has a different consistency that isn’t suited to this recipe.
- Mix minimally at every stage. Every mixing instruction in this recipe emphasizes stopping as soon as the ingredients are combined — this isn’t a suggestion, it’s the main defense against a cracked or overly airy cheesecake.
- Respect every cooling stage. The hour in the turned-off oven, the two hours cooling on the counter, and the long refrigeration period are all doing real work to prevent cracking and to let the texture fully set.
- Don’t skip the long chill time before slicing. At least 8 hours, and ideally 24, is what allows the cheesecake to firm up properly for clean slices.
- Expect cracks to happen sometimes anyway. Even with careful technique, cracks are a common and normal occurrence with cheesecake — toppings like blueberry compote or keto whipped cream can cover them easily if it happens.
Storage and Freezing
Storage: Place leftover slices in sealed containers in the fridge for up to 5 days, lining the containers with wax or parchment paper. Remove leftovers from the fridge about one hour before serving (30 minutes if your house is warm) — cheesecake tastes best at room temperature.
Freezing: The cake should be completely cool before freezing. Remove the springform pan’s outer rim, leaving the cake on the base of the pan. Wrap it in two layers of plastic wrap, then add a layer of foil. It can be frozen for up to three months. Thaw overnight in the fridge, then let it sit on the counter for an hour before slicing, carefully removing the foil and plastic wrap.
The Best Keto Cheesecake
Description
Detailed step-by-step instructions and tips for making a smooth, creamy keto cheesecake — a classic custard-style cheesecake sweetened with stevia glycerite instead of sugar.
Duration
- Prep Time: 5 minutes
- Cook Time: 1 hour
- Cool Time: 11 hours
- Total Time: 12 hours 15 minutes
Ingredients
- 1 tablespoon soft unsalted butter, for the pan
- 32 ounces cream cheese, at room temperature
- 1½ cups (12 ounces) sour cream, at room temperature
- 1 tablespoon pure vanilla extract
- 1 tablespoon stevia glycerite (equals 1 cup of sugar)
- 4 large eggs, at room temperature
Instructions
- Prepare the ingredients and pan: Remove the cream cheese, sour cream, and eggs from the fridge at least 2 hours before starting, so they reach room temperature. Preheat the oven to 300°F. Boil a kettle of water, let it cool slightly, then carefully pour it into a 9×13-inch pan and place it on the lowest oven rack. Generously butter the sides and bottom of a 9-inch nonstick springform pan.
- Mix the batter: Place the cream cheese in a large bowl and beat on the lowest mixer speed until smooth. Add the sour cream (including any separated liquid), vanilla, and stevia, mixing just until incorporated — don’t over-mix. Add the eggs one at a time, beating briefly after each until smooth, then stopping. Finish with a final stir using a rubber spatula.
- Pour the batter into the prepared pan, smooth the top with a spatula, and gently tap the pan on the counter to remove air bubbles.
- Bake the cake: Place the pan on the middle rack, above the water pan. Bake without opening the oven door until the edges are slightly puffed and the center is still sunken but not liquid, 50–60 minutes. The center should jiggle slightly if you shake the pan gently.
- Cool the cake: Turn the oven off and leave the cake inside with the door ajar for one hour. Remove and place on a cooling rack, running a knife around the rim if the edges haven’t pulled away from the pan. Let cool completely on the counter for about 2 more hours.
- Transfer the fully cooled cake, still in its pan, to the fridge. Refrigerate uncovered for at least 8 hours, preferably 24 hours, before slicing.
- Slice the cake: Remove from the fridge 30 minutes before serving. Remove the springform pan’s outer rim. Use a very sharp, non-serrated knife, dipping it in hot water and wiping clean between cuts. Use a cake server to lift slices from the pan.
- Top the cake (optional): Add blueberry compote, strawberry compote, or keto chocolate mousse if desired.
Notes
- Use blocks of cream cheese, not tubs of cream cheese spread.
- Cracks are common — toppings such as blueberry compote or keto whipped cream can hide them.
- Storage: Keep leftover slices in sealed containers, lined with wax or parchment paper, in the fridge for up to 5 days. Remove from the fridge about an hour before serving (30 minutes if warm) — cheesecake is best at room temperature.
- Freezing: Cool completely, remove the pan’s outer rim, wrap in two layers of plastic wrap plus a layer of foil, and freeze for up to three months. Thaw overnight in the fridge, then rest on the counter for an hour before unwrapping and slicing.
- Nutrition (per slice): Calories: 366kcal | Carbohydrates: 6g | Protein: 9g | Fat: 35g | Saturated Fat: 20g | Sodium: 263mg | Sugar: 5g
Medical Disclaimer: The nutritional information provided with this recipe is for general informational purposes only and is not intended as medical or dietary advice. It should not be used to diagnose, treat, cure, or prevent any disease or health condition, and it is not a substitute for professional medical guidance. Nutritional values are approximate and may vary based on specific ingredients, brands, and portion sizes used. Individuals with allergies, dietary restrictions, or medical conditions — including those following a ketogenic or low-carbohydrate diet for medical reasons — should consult a qualified healthcare provider or registered dietitian before making changes to their diet. Reliance on any information provided in this recipe is solely at your own risk.


