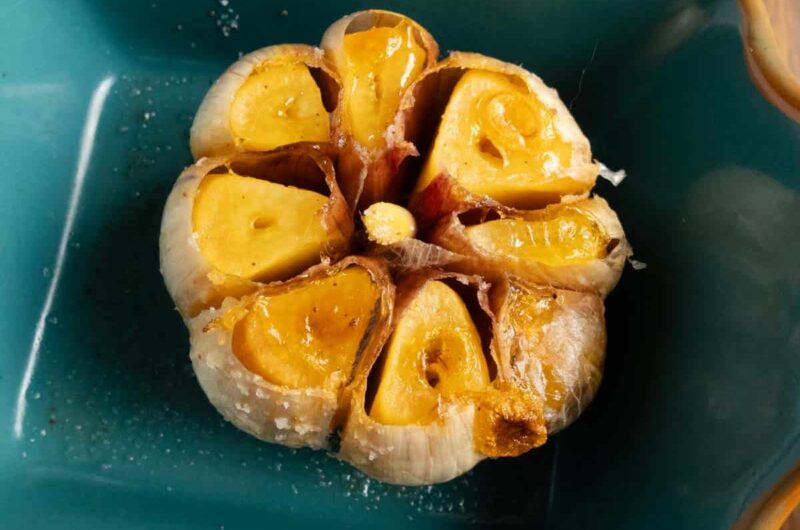
Garlic is a culinary powerhouse, and roasting it transforms its sharp, pungent raw flavor into something sweet, caramelized, and mellow — perfect for pastas, roasted vegetables, bread, and countless other dishes. While roasting garlic in the oven traditionally takes a fair amount of time, the air fryer offers a faster, more efficient route to that same soft, spreadable, caramelized result, all in under 30 minutes.
This is about as low-effort as flavor-building gets: two ingredients, a few minutes of prep, and the air fryer does the rest. The result is garlic with a rich, buttery texture and a sweet, caramelized flavor that’s ready to squeeze straight out of its skin and into whatever dish you’re making.
Why Use an Air Fryer for Roasting Garlic?
The air fryer cooks food quickly and evenly by circulating hot air, which makes it especially well-suited for roasting garlic — the bulb cooks evenly all the way through, turning the cloves into soft, golden-brown gems that slide easily out of their skins. It also takes considerably less time than a conventional oven roast, and doesn’t heat up the kitchen the way a full oven would, which is a real advantage on a hot day or when you’re already using the oven for something else.
Ingredients for Roasted Garlic
Just two components are needed:
- Garlic bulb: choose a whole bulb with firm, unblemished cloves — fresh garlic gives the best flavor once roasted.
- Olive oil: helps the garlic roast evenly and prevents it from drying out, while adding a subtle richness. Extra virgin olive oil offers the best flavor, though regular olive oil works fine too.
Prep and Setup
- 1 garlic bulb
- 1 tablespoon olive oil
- Aluminum foil, large enough to wrap the entire bulb
- Tongs or oven mitts, for safely removing the hot, foil-wrapped garlic
Workflow: How the Steps Actually Flow
Step 1: Prepare the garlic bulb. Cut off the top of the garlic bulb — the part where the cloves are exposed — slicing carefully so the inner cloves are visible without removing too much of the bulb. This cut is what allows the olive oil to reach and coat the exposed cloves directly, which is essential for even cooking and proper caramelization. Leaving enough of the bulb intact keeps it holding together as a single piece.
Step 2: Wrap the garlic in foil. Place the bulb in the center of a piece of foil large enough to fully enclose it. Drizzle about a tablespoon of olive oil over the cut side, letting it soak into the exposed cloves and drip down into the outer layers of the bulb. Once well-coated, wrap the garlic tightly and fully seal the foil. This sealed wrap traps both heat and moisture, which is what allows the garlic to roast evenly and soften properly rather than drying out.
Step 3: Air fry the garlic. Preheat the air fryer to 390°F (198°C) — this temperature is specifically suited to roasting garlic, since it’s hot enough to caramelize the cloves without burning the exterior. Place the foil-wrapped bulb into the air fryer basket; overcrowding isn’t really a concern for a single bulb, since the air fryer’s circulating heat surrounds the wrapped package regardless. Set the timer for 20 to 25 minutes, checking halfway through to confirm even roasting. After about 20 minutes, the garlic should begin turning golden brown and caramelized — you’ll know it’s done when the outside is crispy and the cloves are soft enough to squeeze easily from their skins.
Step 4: Cool and squeeze the garlic. Carefully remove the foil-wrapped bulb using tongs or oven mitts, since it will be quite hot, and let it cool for a few minutes before handling. Once cooled enough to touch, gently squeeze the bulb, and the roasted cloves will slide right out of their skins — rich, buttery, and sweetly caramelized, ready for pasta, bread, roasted vegetables, or spreading directly onto toast.
Step 5: Store any leftovers. Leftover roasted garlic can be refrigerated for up to 10 days, or frozen for up to 6 months. To freeze, place the cloves in an airtight container or freezer bag; thaw in the fridge or at room temperature whenever you’re ready to use them, and they’ll taste just as good as freshly roasted.
Component Organization: What Each Ingredient Is Doing
- The garlic itself: the entire point of the recipe — raw, sharp garlic transformed by heat into something sweet, soft, and caramelized.
- Olive oil: coats the exposed cloves to prevent drying out during the roast, while also contributing a subtle richness to the final flavor.
- The foil wrap: traps heat and moisture around the bulb, which is what allows the garlic to roast evenly and soften all the way through rather than drying out or cooking unevenly.
Why Wrapping in Foil Matters
Sealing the garlic tightly in foil creates a small, enclosed cooking environment around the bulb — trapping the steam and heat generated as the garlic cooks. This is what allows the interior cloves to soften properly through gentle, moist heat, while the exposed, oil-coated top still caramelizes and browns. Skipping the foil wrap, or leaving it loosely sealed, risks the garlic drying out before the cloves have a chance to soften all the way through.
Tips for the Best Roasted Garlic
- Use fresh garlic: for the best flavor and texture, avoid bulbs with signs of sprouting or soft spots.
- Adjust cooking time for larger bulbs: a larger bulb may need an extra 5–10 minutes; check doneness by gently squeezing the cloves to see if they’ve softened.
- Make more at once: multiple bulbs can be roasted together — just wrap each one individually in its own foil and leave enough space in the basket for proper air circulation.
- Customize the oil: while olive oil is the standard choice, avocado oil or infused oils can be used for a different flavor twist.
Health Benefits of Roasted Garlic
Garlic is known to support immune function, help fight inflammation, and contribute to heart health. Roasting mellows its strong raw flavor into something sweeter and milder, making it easier to work into a wider range of dishes without overwhelming the other flavors. Roasted garlic is also generally easier to digest than raw garlic, making it a good option for anyone who finds the pungency of raw garlic difficult to tolerate.
Popular Ways to Use Roasted Garlic
- Pasta dishes: stir roasted cloves into pasta sauces for a rich, caramelized depth of flavor, or mash the garlic with olive oil and herbs for a quick garlic bread spread.
- Vegetable dishes: roasted garlic pairs beautifully with roasted potatoes, carrots, and Brussels sprouts — simply squeeze it over the vegetables before serving.
- Dipping oil: mash roasted garlic with olive oil, salt, and pepper for a savory dip served alongside crusty bread.
- Sandwiches and toast: spread roasted garlic directly onto toasted bread or into sandwiches for an extra burst of flavor.
Step-by-Step Assembly Strategy
- Slice the top off the garlic bulb to expose the inner cloves.
- Drizzle olive oil over the cut garlic and wrap tightly in aluminum foil.
- Preheat the air fryer to 390°F (198°C).
- Place the foil-wrapped garlic in the air fryer basket and cook 20–25 minutes, checking halfway through.
- Remove using tongs or oven mitts once golden and soft.
- Let cool, then gently squeeze out the cloves and use as desired.
Air Fryer Roasted Garlic
Description: A quick, efficient way to roast garlic in the air fryer, achieving that same beautifully caramelized flavor and soft, spreadable texture as traditional oven roasting — in less than 30 minutes.
Ingredients:
- 1 garlic bulb
- 1 tablespoon olive oil
Instructions:
- Prepare the Garlic: Slice the top off the garlic bulb to expose the inner cloves.
- Wrap the Garlic: Drizzle olive oil over the cut garlic and wrap it tightly in aluminum foil.
- Air Fry: Preheat the air fryer to 390°F (198°C). Place the foil-wrapped garlic in the air fryer basket and cook for 20–25 minutes.
- Check for Doneness: The garlic should be golden and soft. Remove it from the air fryer using tongs or mitts.
- Squeeze and Serve: Allow the garlic to cool, then gently squeeze out the cloves. Use in pasta, bread, vegetables, or as a spread.
Notes:
- Use fresh garlic bulbs for the best flavor and texture — avoid any with signs of sprouting or soft spots.
- Larger bulbs may need an extra 5–10 minutes of cooking time.
- Multiple bulbs can be roasted at once; wrap each individually and leave space for air circulation.
- Leftover roasted garlic keeps in the fridge for up to 10 days, or in the freezer for up to 6 months.
Medical Disclaimer: This recipe and the accompanying content are provided for general informational and culinary purposes only and are not intended as medical, nutritional, or dietary advice. Nutritional needs vary from person to person, and individuals with food allergies, intolerances, medical conditions, or specific dietary requirements should consult a qualified healthcare professional or registered dietitian before preparing or consuming this recipe. Cooking times and temperatures may vary depending on individual equipment; always ensure food is cooked to a safe internal temperature before serving. The creator of this content assumes no liability for any adverse reactions, allergic responses, or health outcomes resulting from the preparation or consumption of this recipe.