These fluffy pancakes are soft, light, tender, and beautifully golden, making them an excellent choice for an easy homemade breakfast or weekend brunch. The recipe uses everyday ingredients, including all-purpose flour, sugar, baking powder, baking soda, milk, butter, vanilla, and one egg. When these simple ingredients are combined with the right mixing and cooking technique, they produce thick homemade pancakes with a soft center and lightly golden surface.
The secret to making the best fluffy pancakes is not adding complicated ingredients. Instead, success depends on batter consistency, gentle mixing, a short resting period, and careful control of the cooking temperature. Baking powder and baking soda help the pancakes rise, while milk provides moisture and melted butter creates richness. Most importantly, the batter should not be mixed until perfectly smooth. A few small lumps are desirable because excessive mixing can make pancakes tougher rather than light and tender.
Why You Love This Recipe
This easy pancake recipe is useful whenever you want a classic breakfast made entirely from scratch without complicated preparation. The batter takes only a few minutes to mix, and the complete recipe is ready in approximately 25 minutes. It produces around eight pancakes, making it suitable for approximately four servings. The recipe can also be doubled when preparing breakfast for a larger family or brunch gathering.
Another advantage is that the flavor is simple enough to work with many different toppings. You can serve these pancakes with butter and maple syrup for a traditional breakfast or pair them with fresh berries, bananas, peaches, honey, yogurt, fruit compote, or other favorite toppings. Because the pancakes themselves have a mild vanilla flavor, they provide a flexible base for both simple and more indulgent breakfast combinations.
What Makes Pancakes Light and Fluffy?
A fluffy pancake needs enough structure to hold its shape while also containing tiny air pockets that expand during cooking. In this recipe, four teaspoons of baking powder provide most of the leavening, while one-quarter teaspoon of baking soda supports the rise. Together, they help produce the light interior associated with thick, fluffy pancakes.
Batter consistency matters just as much as the leavening ingredients. A batter that is extremely thin can spread too quickly across the skillet, resulting in wide, flat pancakes. An overly thick batter may not cook evenly and can produce a heavy center. The desired consistency is thick and creamy but still pourable, allowing each portion to spread gently while maintaining enough height.
Why All-Purpose Flour Works Well
Two cups of all-purpose or plain flour form the structural base of these homemade pancakes. Flour absorbs the liquid ingredients and provides enough body for the batter to hold the air created by the leavening agents. This structure allows the pancakes to rise rather than simply spreading across the cooking surface.
How you mix the flour is important. Once flour becomes wet, continued mixing develops more gluten. Some gluten is necessary for structure, but too much can make pancakes chewy and dense. This is why the recipe recommends mixing only until the major dry patches disappear. Small lumps should remain rather than being aggressively whisked away.
Baking Powder and Baking Soda for Extra Rise
The recipe uses both baking powder and baking soda. Four teaspoons of baking powder serve as the primary leavening ingredient, while a quarter teaspoon of baking soda provides additional support. These ingredients help form the small air pockets that expand when the batter reaches the heated skillet.
Accurate measuring is important when working with leavening agents. Too little may produce flat pancakes, while unnecessarily increasing the amount can affect both flavor and texture. Use the exact quantities listed in the original recipe. Also make sure your baking powder and baking soda are fresh enough to work effectively, particularly if the containers have been sitting in the pantry for a long time.
Sugar Adds Gentle Sweetness
One-quarter cup of granulated sugar or sweetener provides gentle sweetness without turning the pancakes into an overly sweet breakfast. This amount allows the pancakes to work equally well with sweet toppings or simply a small amount of butter.
Sugar also contributes to the overall flavor and appearance of cooked pancakes. As the batter cooks against the heated pan, it helps support the attractive golden surface associated with freshly prepared pancakes. Since toppings such as maple syrup, honey, fruit, or chocolate can add more sweetness, keeping the basic batter moderately sweet creates a more balanced finished breakfast.
Why Salt Is Important in Pancake Batter
Half a teaspoon of salt may seem like a very small component compared with two cups of flour, but it plays an important role in the overall flavor. Salt balances the sweetness and enhances the vanilla, butter, and other ingredients.
Without enough salt, pancakes can taste somewhat flat even when the sugar and vanilla quantities are correct. Mix the salt thoroughly into the dry ingredients before introducing any liquid. This helps ensure it is distributed throughout the entire batch rather than concentrated in one section of the batter.
Milk Creates the Right Batter Consistency
The recipe uses one and three-quarter cups of milk. This liquid hydrates the flour and helps create the thick but pourable batter needed for soft pancakes. The milk also contributes to the tender interior and allows the remaining wet ingredients to distribute throughout the mixture.
After mixing, evaluate the consistency rather than immediately adding more liquid. The batter is supposed to be fairly thick. If it is genuinely too stiff to pour, the original instructions permit adding a small amount of extra milk, one or two tablespoons at a time. Add only what is necessary because making the batter excessively thin can reduce the height of the pancakes.
Melted Butter Adds Richness
One-quarter cup of melted and slightly cooled butter contributes moisture, richness, and familiar buttery flavor. Cooling the butter slightly before adding it is useful because extremely hot melted butter should not be poured directly onto the egg.
Butter is also used lightly on the skillet or griddle during cooking. Only a thin coating is necessary. Too much butter can collect around the edges of the pancakes and brown or burn before the centers have finished cooking. A lightly greased nonstick surface provides enough fat for flavor and attractive browning without making the pancakes greasy.
Vanilla Gives the Pancakes a Warm Flavor
Two teaspoons of pure vanilla extract provide the main aromatic flavor in the batter. Vanilla works particularly well in a basic pancake recipe because it complements butter, sugar, milk, fruit, maple syrup, honey, and many other common breakfast toppings.
The quantity is enough to give the pancakes a noticeable vanilla aroma without dominating the recipe. Add it to the wet ingredients with the milk, melted butter, and egg. Combining these ingredients in the center of the dry mixture helps distribute the vanilla evenly throughout the batter.
The Egg Helps Bind the Pancake Batter
One large egg helps hold the ingredients together and contributes to the soft structure of the pancakes. It is added with the milk, melted butter, and vanilla before these wet ingredients are gradually incorporated into the flour mixture.
Only one egg is needed for the proportions in this recipe. The objective is to provide enough binding and richness without making the pancakes taste overly eggy. Once the egg has been incorporated, avoid unnecessary whisking. Gentle handling after the flour becomes wet is more important for achieving the desired fluffy texture.
How to Mix Pancake Batter Correctly
Begin by placing the flour, sugar or sweetener, baking powder, baking soda, and salt in a large mixing bowl. Stir them together thoroughly before making a well in the center. This initial dry mixing helps distribute the leavening ingredients evenly throughout the flour.
Pour the milk, melted butter, vanilla extract, and egg into the well. Whisk the wet ingredients first, then gradually incorporate the surrounding dry mixture. Stop mixing when you have a thick, creamy batter with no large dry flour pockets. Small lumps should remain. Continuing until every lump disappears can overwork the batter and negatively affect the texture.
Why You Should Never Overmix Pancake Batter
Overmixing is one of the most common reasons homemade pancakes become tough or chewy. When flour is combined with liquid and repeatedly stirred, gluten development increases. This can create more elasticity than you want in a tender breakfast pancake.
The batter does not need to look perfectly smooth. Small lumps are completely normal and often preferable. Once no significant dry patches remain, stop mixing. The batter will continue hydrating during its short resting period, so some of those small lumps may naturally soften without additional stirring. Gentle mixing is one of the simplest ways to improve homemade pancake texture.
Why Resting the Batter Matters
Allow the pancake batter to rest briefly while the skillet or griddle heats. During this period, the flour absorbs moisture more completely, and the batter develops a more settled consistency. The leavening ingredients also begin working within the mixture.
Resting can additionally help relax some of the gluten created during mixing. This contributes to a softer texture once the pancakes are cooked. There is no need for a lengthy resting period; simply preparing the batter first and allowing it to stand while you preheat and lightly grease the cooking surface provides a useful pause before cooking.
Choosing the Best Pan for Pancakes
A nonstick skillet or flat griddle is ideal for cooking these fluffy pancakes. A wide, flat surface makes it easier to maintain round shapes and slide a spatula underneath when the pancakes are ready to flip.
Preheat the cooking surface before adding the batter. The pan should be hot enough to begin cooking the pancake promptly but not so hot that the bottom becomes dark before the center sets. Lightly grease the surface with butter. A thin coating is enough to promote golden browning and make flipping easier.
How Much Batter to Use Per Pancake
Measure approximately one-quarter cup of batter for each pancake. Using a consistent amount makes the pancakes similar in size, which helps them cook at approximately the same rate.
Pour the batter gently into the center of the heated pan and allow it to spread naturally. If necessary, use the back of the measuring cup or ladle to guide the batter slightly into a round shape, but avoid flattening it aggressively. The batter needs enough thickness to rise and develop the soft interior that makes these pancakes especially fluffy.
Avoid Overcrowding the Skillet
If your skillet can comfortably hold only one or two pancakes, cook them in smaller batches rather than trying to fit too many onto the surface. Each pancake needs enough space for the batter to spread and for a spatula to slide underneath during flipping.
Crowding can make turning the pancakes difficult and may lead to uneven shapes. It can also affect heat distribution, particularly when a large amount of cool batter is added to the pan at once. Working in manageable batches may take a little longer, but it generally produces more consistent pancakes.
How to Know When Pancakes Are Ready to Flip
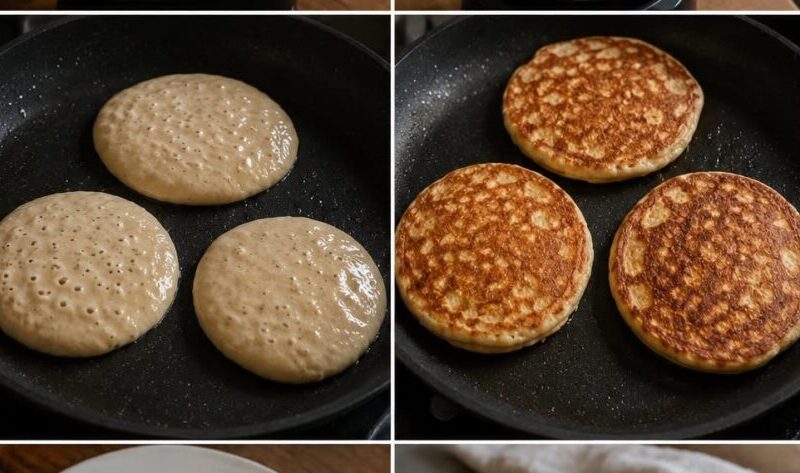
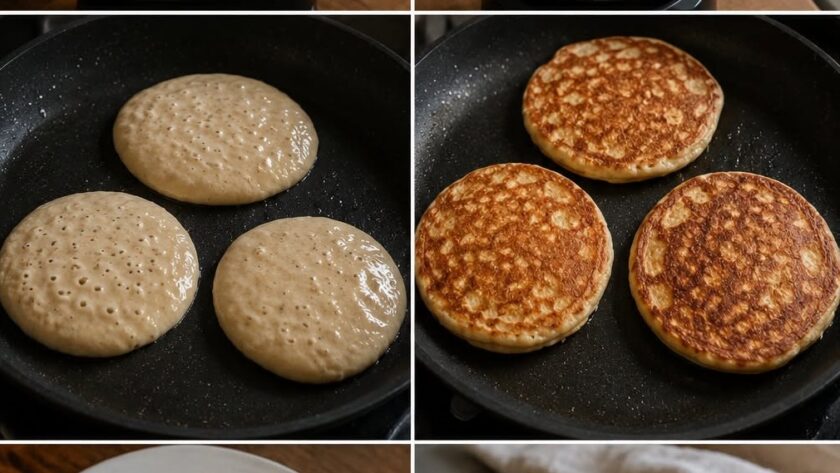
Visual cues are more reliable than cooking by time alone. As the first side cooks, small bubbles will begin appearing across the upper surface. The edges should also start looking slightly drier and more set than the wet center.
Once these signs appear and the underside is golden, slide a spatula completely underneath the pancake and turn it in one smooth motion. Avoid flipping too early because the pancake may not have developed enough structure to hold together. The second side generally requires less cooking time than the first.
Why Pancakes Should Be Flipped Only Once
Repeated flipping is unnecessary and can interfere with the soft texture and even shape of homemade pancakes. Wait until the first side has properly set, then flip once and allow the second side to become lightly golden.
Do not press down on the pancake with the spatula after flipping. Pressing may force out some of the air that contributes to the fluffy interior. Simply allow the heat from the pan to cook the second side naturally. Once the center is cooked and the bottom is golden, transfer the pancake to a plate and continue with the remaining batter.
Getting the Cooking Temperature Right
Heat control is one of the most important parts of making pancakes from scratch. If the pan is too hot, the outside can brown rapidly while the center remains undercooked. If the temperature is too low, the pancakes may take too long to cook and can become dry before developing a good golden surface.
Start with low to medium heat and adjust as needed based on how the first pancake cooks. If the surface darkens before bubbles have time to develop, lower the temperature. If the pancake remains very pale for an unusually long time, increase the heat slightly.
Common Reasons Pancakes Turn Out Flat
Flat pancakes can result from several different issues. A batter that is too thin will spread rapidly and have difficulty maintaining height. Old or ineffective baking powder may also reduce the amount of rise. Excessive mixing can develop too much gluten and interfere with the intended tender texture.
Another common problem is flipping too early. The pancake needs time for the first side to set and for bubbles to develop across the surface. Following the original ingredient quantities, keeping the batter thick but pourable, and waiting for the correct visual cues can help produce consistently thicker pancakes.
Easy Pancake Flavor Variations
Once the basic pancake batter is prepared, additional ingredients can be used to create different flavors. Fresh blueberries, sliced bananas, diced strawberries, or chocolate chips can be sprinkled onto the batter immediately after it has been poured into the skillet.
Cinnamon or a small amount of nutmeg can provide warmer flavor, while chopped walnuts or pecans add crunch. Shredded coconut is another option for changing the texture and aroma. These additions are variations rather than ingredients in the standard recipe, so the original pancake formula remains unchanged in the recipe card below.
Best Toppings for Fluffy Pancakes
Warm maple syrup and butter remain classic pancake toppings because their simple flavors complement the vanilla batter without hiding it. Fresh strawberries, blueberries, sliced bananas, peaches, and other fruits can provide color, freshness, and additional sweetness.
Honey can be used instead of syrup, while yogurt, whipped cream, fruit compote, nuts, or chocolate chips provide additional options. The supplied recipe even suggests frozen yogurt or ice cream when the pancakes are being served as a more indulgent breakfast or dessert-style treat.
How to Keep Pancakes Warm
When preparing several batches, the first pancakes may begin cooling before the final ones leave the skillet. You can place cooked pancakes on a plate and keep them covered loosely while finishing the remaining batter.
Avoid sealing very hot pancakes tightly in a container because trapped steam can make their surfaces moist. For a large breakfast, pancakes can also be kept briefly in a warm oven on an oven-safe plate or baking sheet. The goal is simply to keep them pleasantly warm without continuing to cook them enough to become dry.
How to Store Leftover Pancakes
Allow cooked pancakes to cool completely before placing them in an airtight container. Refrigerated pancakes can be stored for several days and reheated when needed.
For longer storage, place small sheets of parchment paper between the cooled pancakes before freezing them. The parchment prevents the pancakes from sticking together, making it easier to remove only the number required for breakfast. Frozen pancakes can then be reheated without necessarily waiting for them to thaw completely.
How to Reheat Homemade Pancakes
Leftover pancakes can be reheated in several ways depending on convenience and the texture you prefer. A microwave is fast and helps keep pancakes soft, while a toaster can provide slightly firmer edges. A skillet can also be used when you want to warm only a few pancakes at a time.
When reheating, use only enough time to warm the center. Excessive reheating can gradually remove moisture and make pancakes dry. Frozen pancakes can also be reheated directly from the freezer, making them useful for preparing quick breakfasts ahead of time.
Notes for the Best Fluffy Pancakes
Keep a few simple rules in mind for consistently fluffy pancakes. Measure the ingredients carefully, distribute the baking powder and baking soda thoroughly through the flour, and avoid excessive mixing once the wet and dry ingredients meet. The finished batter should be thick and creamy with a few small lumps.
Allow the batter to rest briefly while the pan heats. Use approximately one-quarter cup for each pancake and cook over controlled low to medium heat. Wait for bubbles and slightly dry edges before flipping. Turn each pancake only once and never press it down with the spatula after flipping. These small details can make a noticeable difference in the final texture.
Why This Fluffy Pancake Recipe Works
This recipe naturally targets popular search terms such as fluffy pancakes recipe, best fluffy pancakes, easy homemade pancakes, pancakes from scratch, thick fluffy pancakes, easy breakfast pancakes, homemade pancake recipe, soft pancakes, classic pancakes, and weekend breakfast recipes. These phrases accurately describe the recipe and can be used naturally without making the article repetitive.
The formula works because every ingredient contributes to the final result. Flour supplies structure, baking powder and baking soda provide lift, milk creates moisture, butter adds richness, the egg helps bind the batter, sugar contributes sweetness, vanilla adds aroma, and salt balances the flavors. Gentle mixing, a short rest, controlled heat, and correct flipping then help turn those basic ingredients into tall, tender pancakes.
Best Fluffy Pancakes
Soft, light, and golden homemade pancakes with a tender, fluffy center. Made from scratch with everyday ingredients, these easy fluffy pancakes are ideal for family breakfasts, weekend brunches, or serving with your favorite fruit, syrup, honey, or other breakfast toppings.
4
servings5
minutes20
minutes156
kcal25
minutesIngredients
2 cups all-purpose or plain flour
¼ cup granulated sugar or sweetener
4 teaspoons baking powder
¼ teaspoon baking soda
½ teaspoon salt
1¾ cups milk
¼ cup butter, melted and slightly cooled
2 teaspoons pure vanilla extract
1 large egg
Instructions
- Combine flour, sugar or sweetener, baking powder, baking soda, and salt in a large bowl.
- Make a well in the center of the dry ingredients.
- Add milk, melted butter, vanilla extract, and egg.
- Whisk the wet ingredients first, then gently incorporate the dry mixture.
- Stop mixing when a thick, creamy batter forms. Leave small lumps.
- If necessary, add extra milk 1–2 tablespoons at a time until thick but pourable.
- Rest the batter while heating a nonstick skillet or griddle.
- Lightly grease the cooking surface with butter.
- Pour approximately ¼ cup batter into the pan for each pancake.
- Cook until bubbles appear and the underside is golden.
- Flip once and cook the second side until lightly golden.
- Repeat with the remaining batter.
- Serve the pancakes warm with your preferred toppings.
Nutrition Facts
4 servings per container
- Amount Per ServingCalories156
- % Daily Value *
- Total Fat
6g
8%
- Total Carbohydrate
22g
8%
- Protein 4g 8%
* The % Daily Value tells you how much a nutrient in a serving of food contributes to a daily diet. 2,000 calories a day is used for general nutrition advice.