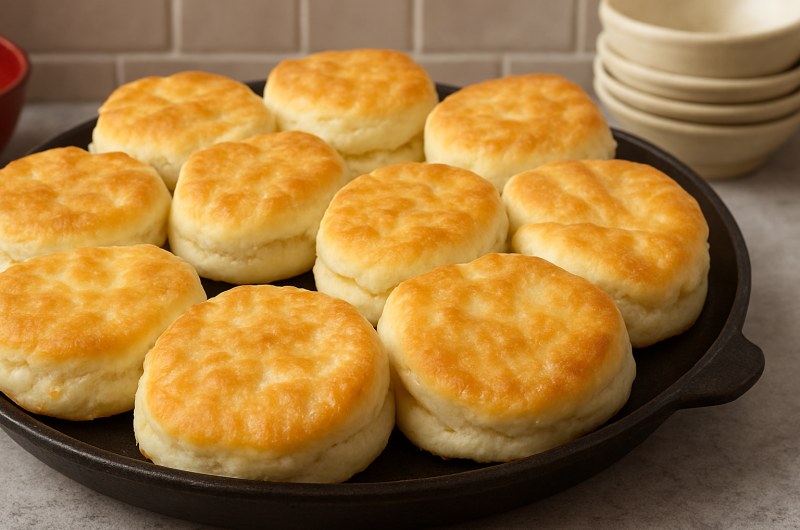
Finding a gluten-free biscuit that is soft inside, crisp around the edges, and easy to handle can be difficult. This recipe focuses on the details that make a good biscuit successful without wheat flour. Cold butter, eggs, buttermilk, and a gluten-free flour blend with xanthan gum create a dough that holds together while still baking into a tender, flaky biscuit. The result is useful for breakfast, brunch, or dinner and can be served with both sweet and savory toppings.
The Appeal of Homemade Gluten-Free Biscuits
Homemade gluten-free biscuits are worth making because you can control the texture from the first mix to the final bake. Many packaged options can be dry, overly firm, or crumbly, while a freshly baked biscuit can have a soft center and a lightly crisp surface. The key is not complicated equipment or unusual ingredients. Instead, this recipe depends on cold ingredients, gentle mixing, correct shaping, and a fully heated oven. Those simple steps help the biscuits rise and keep their shape.
Choosing the Right Gluten-Free Flour
The gluten-free flour blend is especially important because wheat flour normally provides gluten, which gives biscuit dough strength and elasticity. This recipe uses a gluten-free flour blend that includes xanthan gum. Xanthan gum helps the dough hold together and gives the finished biscuits enough structure to be lifted and split. If your flour blend does not contain xanthan gum, the texture may not be the same. For the most reliable result, use the type of blend specified for this recipe.
How the Leavening Ingredients Help
Baking powder and baking soda provide the lift needed for tall gluten-free biscuits. Baking powder creates gas as the dough heats, while baking soda works with the acidity in buttermilk. Together, they help the biscuits expand in the oven rather than staying heavy or flat. Salt is also important because it balances the flavor of the flour, butter, and buttermilk. Measuring these ingredients carefully helps maintain the intended texture and prevents the biscuits from becoming too dense or overly salty.
The Role of Cold Butter
Cold butter is one of the most important parts of a flaky biscuit recipe. When small pieces of cold butter are mixed into the flour, they remain separate instead of blending completely into the dough. During baking, the butter melts and releases moisture, creating steam that helps push apart the layers. If the butter becomes soft while you are mixing, the dough can lose some of that separation. Keep the butter chilled and work efficiently so it stays firm until the biscuits go into the oven.
Why Cold Buttermilk and Eggs Matter
Cold buttermilk and eggs help keep the dough cool while also supplying moisture and structure. Buttermilk adds a mild tang and contributes tenderness, while the eggs help bind the ingredients so the biscuits are less likely to fall apart. Keeping both ingredients cold supports the same goal as using cold butter: slowing down the softening of the fat before baking. Add the wet ingredients after the dry ingredients and butter have been combined, then mix only until the dough comes together.
How to Mix the Biscuit Dough
Begin by combining the gluten-free flour blend, baking powder, salt, and baking soda in a large bowl. Whisk them together so the leavening and salt are spread evenly through the flour. Add the cold butter and cut it into the dry mixture with a pastry cutter or your fingertips. Stop when the mixture resembles coarse crumbs with small pieces of butter still visible. Those pieces are useful because they can help create a lighter, layered texture as the biscuits bake.
Adding the Wet Ingredients
Whisk the eggs and buttermilk together in a separate bowl before adding them to the flour mixture. Pour the wet ingredients into the dry mixture gradually, using a gentle hand to combine everything. The dough should become soft and cohesive without being worked for a long time. Avoid trying to make it perfectly smooth. Biscuit dough should still have some texture, and excessive mixing can make the baked result heavier. Gluten-free dough also benefits from gentle handling because it can become sticky or difficult to shape when overworked.
Why a Short Chill Improves Texture
Once the dough has formed, chilling it briefly gives the butter a chance to firm again. Mixing and shaping naturally warm the dough, so a short refrigerator rest can make a noticeable difference in the final bake. Chilling also makes the dough easier to handle and helps the cut biscuits keep their shape on the baking sheet. This step is especially useful when your kitchen is warm. The goal is a cool, manageable dough, not a long fermentation or complicated resting process.
Rolling and Cutting the Biscuits
After chilling, turn the dough onto a lightly floured surface and gently bring it together. Roll it to an even thickness, then cut rounds with a biscuit cutter. Press the cutter straight down rather than twisting it. Twisting can compress the edges and may interfere with the biscuits rising evenly. Place each round on a parchment-lined baking sheet with enough room for the biscuits to expand. Work calmly and avoid repeatedly rerolling the dough, since extra handling can affect tenderness.
Preparing the Biscuits for Baking
Once the biscuits are cut, a brief return to the refrigerator can help keep the butter firm. While they chill, make sure the oven is fully preheated. A properly heated oven gives the leavening ingredients an immediate burst of heat, which supports a good rise. Starting with a cold or partially heated oven can change the baking time and may leave the biscuits flatter than expected. Keep the prepared baking sheet ready so the chilled biscuits can move directly from the refrigerator to the oven.
How to Know When They Are Done
Bake the biscuits until the tops are golden and the edges look set and lightly crisp. The exact baking time can vary with biscuit size, dough thickness, and individual ovens, so visual signs are helpful. A finished biscuit should feel light rather than heavy when lifted. Allow the biscuits to cool for a few minutes before serving. This short rest gives the center time to finish setting while the exterior stays pleasantly crisp. Serving them warm usually gives the best texture.
Serving Ideas for Breakfast
These gluten-free biscuits fit naturally into a breakfast spread. Serve them warm with butter, honey, or jam for a simple sweet option. For a savory meal, split the biscuits and pair them with scrambled eggs or another breakfast favorite. They can also be used as a base for sausage gravy, creating a filling Southern-style breakfast while keeping the biscuit itself gluten-free. Because the flavor is mild and buttery, the biscuits work with many toppings without overpowering the rest of the plate.
Using Them as a Dinner Side
Gluten-free biscuits are not limited to breakfast. Their tender texture makes them a useful side dish for dinner, especially with soups, stews, roasted vegetables, or other hearty meals. A warm biscuit can also help soak up a rich gravy or sauce. If you are serving guests who avoid gluten, make sure the flour blend and all other ingredients are appropriate for their dietary needs and prevent cross-contact in your kitchen. A separate clean work surface and utensils can be helpful when gluten exposure is a concern.
How to Store Leftover Biscuits
Store cooled biscuits in an airtight container at room temperature if you plan to eat them within about two days. For longer storage, refrigeration can extend their usable life, although chilled biscuits may lose some of their fresh texture. Reheating them in the oven can restore a warmer, slightly crisp exterior. Avoid leaving biscuits uncovered for long periods because gluten-free baked goods can dry out more quickly than you expect. Let them cool completely before sealing them so trapped steam does not soften the surface.
Freezing for Later
These biscuits are also suitable for freezing when you want to prepare food ahead of time. Place fully cooled biscuits in a freezer-safe container or bag, separating layers if needed to prevent sticking. They can be stored for up to two months. When you want to serve them, reheat them from frozen rather than leaving them to thaw for a long period. Warming them in the oven helps bring back some of the texture they had when freshly baked and makes them convenient for busy mornings.
Common Gluten-Free Biscuit Problems
Flat, crumbly, or dense biscuits usually come from a small number of issues. Butter that becomes too warm can reduce flakiness, while overmixing can make the dough heavy. A flour blend without xanthan gum may also produce a weaker structure. Another common problem is an oven that has not reached the correct temperature before baking. Measure carefully, keep the ingredients cold, handle the dough gently, and use a fully preheated oven. These habits address many of the texture problems associated with gluten-free baking.
Notes for Better Results
For the most consistent gluten-free biscuits, keep the butter, eggs, and buttermilk cold until you are ready to use them. Use a flour blend that already contains xanthan gum, and avoid adding extra unless the original recipe specifically calls for it. Do not twist the biscuit cutter, and do not spend too much time kneading or reshaping the dough. If the dough becomes warm while you work, chill it again before baking. These small adjustments can help produce biscuits that are taller, softer, and easier to handle.
What Makes This Recipe Reliable
The strength of this recipe comes from a straightforward combination of ingredients and careful technique. The gluten-free flour blend provides structure, xanthan gum helps hold the dough together, and the eggs and buttermilk add moisture and tenderness. Cold butter supports flaky layers, while baking powder and baking soda help the biscuits rise. Nothing needs to be complicated. By paying attention to temperature, mixing, shaping, and baking, you can make gluten-free biscuits that feel much closer to the classic homemade version.
Making the Recipe Fit Your Meal
A dependable biscuit recipe is useful because it can move easily between different meals. For breakfast, pair the biscuits with eggs, butter, jam, honey, or sausage gravy. At brunch, place them beside a larger spread as a warm bread option. At dinner, serve them with soup, stew, or gravy. Their mild flavor means you do not need to change the dough to make them work in different settings. Prepare them close to serving time when possible for the best texture.
Before Baking
Before you begin, gather the ingredients and make sure the butter, eggs, and buttermilk are cold. Check that your gluten-free flour blend contains xanthan gum, then preheat the oven fully before the shaped biscuits go inside. Mix the dough only until it comes together, chill it when needed, and cut the rounds with a straight downward motion. These steps are simple, but each one supports the final texture. With careful handling, the biscuits should bake into a golden, tender side that is easy to serve.
Understanding Biscuit Texture
The texture of a gluten-free biscuit depends on balance. Too much moisture can make the center gummy, while too little can leave the biscuit dry and fragile. The flour blend, eggs, buttermilk, and butter each contribute something different, so the dough should not be judged by the same standards as a wheat-based dough. A soft dough is acceptable as long as it can be gently shaped. Resist the temptation to add a large amount of extra flour during shaping, because that can make the finished biscuits firm and dry.
Keeping the Dough at the Right Temperature
Temperature affects every stage of this recipe. Butter should remain cold enough to form small pieces in the flour, and the wet ingredients should be chilled before they are added. If the dough becomes noticeably warm or sticky, place it back in the refrigerator for a short period before continuing. This is especially useful during warmer weather. Keeping the dough cool gives the butter a better chance of creating steam in the oven. It also makes the dough easier to cut cleanly and helps the biscuits hold their shape.
Choosing a Baking Surface
A parchment-lined baking sheet makes the biscuits easier to remove after baking and helps keep the preparation simple. Arrange the biscuits carefully so they have room to rise without being crowded. The baking sheet should be ready before the dough is cut because gluten-free biscuit dough is best handled efficiently once shaped. Make sure the oven rack is positioned appropriately for even heat. Since ovens can vary, watch the biscuits near the end of baking rather than relying only on the clock.
Simple Ways to Serve Warm Biscuits
Fresh biscuits are at their best when served warm, but they do not need elaborate toppings. A little butter is enough to highlight their flavor and soft center. Honey or jam adds sweetness, while sausage gravy turns them into a more filling meal. For a savory plate, serve them beside eggs or a hearty dinner. If you are preparing biscuits for several people, keep the serving ideas simple and offer toppings separately. This lets everyone choose a combination that suits the meal.
Gluten Free Buttermilk Biscuits
These gluten-free biscuits are soft, buttery, and flaky with crisp golden edges. Made with a gluten-free flour blend, cold butter, and buttermilk, they rise beautifully in the oven and work well for breakfast, brunch, or dinner.
12
biscuits20
minutes30
minutes45
minutes1
hour35
minutesIngredients
4 cups (560 g) gluten-free flour blend (preferably with xanthan gum)
¼ cup (45 g) baking powder
1 teaspoon salt
1 teaspoon baking soda
3 sticks (¾ lb or 339 g) cold butter, sliced into ¼-inch pieces
2 large eggs, cold
1¾ cups (420 ml) cold buttermilk (full fat for best results)
2 tablespoons melted butter
Instructions
- In a large bowl, whisk together the gluten-free flour blend, baking powder, salt, and baking soda.
- Add the cold butter slices to the dry ingredients. Using a pastry cutter or your hands, incorporate the butter until pea-sized pieces remain.
- In a separate bowl, mix together the cold buttermilk and eggs.
- Pour the buttermilk mixture into the flour mixture and stir with a wooden spoon until just combined. The dough should be slightly wet; if needed, add 1-2 teaspoons of buttermilk at a time until the dough comes together.
- Cover the bowl and refrigerate the dough for at least 30 minutes, or overnight for even better results.
- Preheat the oven to 400°F (200°C).
- Remove the chilled dough from the refrigerator. On a lightly floured surface, gently knead the dough and roll or pat it out to 1½-2 inches thickness.
- Using a biscuit cutter, cut out biscuits and place them side by side in a large round baking pan or any suitable bakeware.
- Chill the biscuits in the refrigerator for an additional 15-30 minutes while preheating the oven.
- Brush the tops of the biscuits with melted butter.
- Bake for 30-35 minutes, or until lightly browned and well risen.
- Allow the biscuits to cool for 5-10 minutes before serving.
Notes
- These gluten-free biscuits freeze beautifully. Simply wrap them individually or store them in a freezer bag, removing excess air before sealing. They can be stored in the freezer for up to 3 months, ready to be enjoyed whenever the craving strikes!