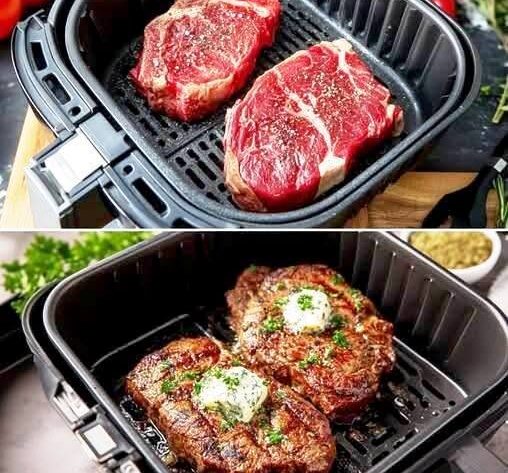
There’s a particular kind of dinner that feels like it should have taken a lot more effort than it actually did, and this air fryer steak is exactly that. It delivers a well-browned, flavorful crust on the outside while staying tender and juicy inside, and almost all of the work is handled by the air fryer itself. No standing over a hot skillet, no firing up an outdoor grill — just a preheated basket and a bit of patience.
The finishing touch is what elevates this from “good steak” to something that feels a little more special: a spoonful of homemade garlic herb butter, melted right on top of the hot steak. As it melts, it coats every slice in a rich, herby, garlicky layer that adds a lot of flavor for very little extra effort. It’s the kind of dish that works just as well for a regular weeknight as it does for a meal you’re making for guests.
Why the Air Fryer Works So Well for Steak
Cooking steak in an air fryer isn’t just a convenience shortcut — it genuinely produces a different (and in many ways better) result than other methods for home cooks. The circulating hot air cooks the steak evenly on all sides while helping build a good crust, and cleanup is minimal compared to pan-searing, since there’s no oil splatter or hot skillet to deal with afterward.
There’s also a consistency benefit. Once you know the thickness of your steak and your preferred level of doneness, you can expect very similar results each time you make it — which takes a lot of the guesswork out of getting a steak cooked exactly the way you like it. And because it’s a contained, closed-basket method, it keeps your kitchen noticeably cooler than using the oven or a grill, which makes it a practical option no matter the season.
Choosing the Right Steak
Not every cut is equally suited to this method. Rib eye is the recommended choice here because of its marbling — those thin streaks of fat running through the meat melt as it cooks, which is what keeps every bite moist and flavorful.
Between the two forms of rib eye, bone-in is the better option when available, since it tends to stay especially tender through cooking. Boneless rib eye is a perfectly good substitute if that’s what you have access to. New York strip is another solid alternative if you’d prefer a slightly leaner steak while still getting a rich, beefy flavor.
Regardless of which cut you choose, thickness matters more than most people realize. Steaks that are at least one inch thick give the outside enough time to properly brown before the inside has a chance to overcook — thinner cuts don’t have that same margin for error in an air fryer.
Mise en Place: Getting Ready Before You Cook
Before turning anything on, it helps to have everything portioned and ready to go:
For the steaks:
- 2 rib eye steaks (bone-in preferred), 12–16 ounces each
- Salt and pepper, to taste
- 2 teaspoons olive oil
For the garlic herb butter:
- 4 tablespoons softened butter
- 1/2 teaspoon minced garlic
- 1 tablespoon minced fresh herbs (thyme, parsley, or chives — or a mix of all three), plus extra for garnish if desired
Because this recipe has a resting period built into the prep (bringing the steaks to room temperature) and a cooking period that only takes about 12 minutes, having the butter mixture ready to go before you start air frying means the whole meal comes together with almost no downtime between steps.
Understanding the Key Steps and Why They Matter
Bringing the steak to room temperature isn’t just a nicety — cooking steak straight from the refrigerator means the center has a lot more distance to travel temperature-wise than the outside does, which makes even cooking harder to achieve. Letting the steaks sit out for about 20 minutes takes the chill off so they cook more evenly from edge to center.
Preheating the air fryer for at least 10 minutes is arguably the single most important step in this whole process. Adding steak to a basket that isn’t fully hot yet means the meat starts steaming instead of browning, and you lose the crust that makes this dish worth making in the first place. It costs a few extra minutes, but it’s not a step to skip.
Oiling and seasoning simply — a light brushing of olive oil helps the salt and pepper adhere and encourages even browning. A good steak doesn’t need a long ingredient list of seasonings; salt and pepper on both sides is enough to let the natural flavor of the meat come through.
Giving the steaks space in the basket is another easy step to get wrong. They need to sit in a single layer without touching or overlapping, because the hot air needs room to circulate around each piece. An overcrowded basket means uneven browning and a worse final texture. If you’re cooking more steaks than comfortably fit, cook them in separate batches rather than cramming them in together.
Flipping halfway through cooking ensures both sides get equal exposure to the hot air, which produces more even browning and a more consistent result from edge to edge.
Workflow: How It All Comes Together
- Temper the steaks. Take them out of the refrigerator and let them sit at room temperature for about 20 minutes.
- Preheat the air fryer to 400°F for at least 10 minutes while the steaks come to temperature.
- Oil and season both sides of each steak generously with salt and pepper.
- Arrange in a single layer in the basket, making sure the steaks aren’t touching.
- Cook for 6 minutes, flip, then cook for another 6 minutes for medium doneness (adjust timing based on the doneness guide below).
- Make the garlic herb butter while the steaks cook — combine softened butter, minced garlic, and fresh herbs, then season lightly with salt and pepper.
- Rest the steaks for 5 minutes once they come out of the air fryer.
- Top with the garlic herb butter and serve immediately, letting the residual heat melt the butter over the meat.
Steak Doneness Guide
Cooking time depends on the thickness of the steak and how well done you prefer it. For steaks around one inch thick, these times are a good starting point — though a meat thermometer will always give you a more reliable result than time alone:
- Rare: about 8 minutes, or an internal temperature of 130°F
- Medium Rare: about 9–10 minutes, or 135°F
- Medium: about 11–12 minutes, or 145°F
- Medium Well: about 12–14 minutes, or 150°F
- Well Done: about 15–17 minutes, or 160°F
Using an instant-read thermometer removes the guesswork entirely and is the most reliable way to hit your preferred doneness consistently.
Approved Variations and Swaps
Based strictly on what’s outlined in this recipe:
- Cut substitution: Boneless rib eye can be used in place of bone-in, and New York strip is a suitable leaner alternative.
- Herb choice: Thyme, parsley, or chives can be used individually or combined, depending on what’s on hand.
- Make-ahead butter: The garlic herb butter can be prepared in advance and stored in the refrigerator for up to 24 hours, which speeds up dinner on busier nights.
Resting: The Step That’s Easy to Skip
It’s tempting to cut into the steak the moment it comes out of the air fryer, but resting it for about five minutes first makes a real difference. Resting allows the juices, which get pushed toward the center of the meat during cooking, to redistribute throughout the steak instead of spilling out onto the cutting board the moment you slice into it. The result is a noticeably juicier steak with better texture in every slice.
Storing and Reheating Leftovers
If there’s steak left over, let it cool before transferring it to an airtight container. It will keep in the refrigerator for up to three days. When reheating, warm it gently rather than blasting it with high heat, since that helps avoid drying the meat out. Leftover slices also work well cold or reheated in sandwiches, wraps, salads, or grain bowls.
Serving Suggestions
This steak pairs well with a range of simple sides: roasted vegetables, mashed potatoes, baked potatoes, steamed green beans, grilled asparagus, or a crisp garden salad. The garlic herb butter is versatile too — it tastes just as good spooned over potatoes or vegetables as it does over the steak itself, so none of it needs to go to waste.
Air Fryer Steak with Garlic Herb Butter
Description: Well-seasoned rib eye steaks cooked in the air fryer until beautifully browned outside and tender and juicy inside, finished with a homemade garlic herb butter for a restaurant-style result with minimal effort.
Duration: Prep: 10 minutes | Cook: 12 minutes | Resting Time: 20 minutes | Total: 42 minutes | Servings: 4 | Course: Main Course | Cuisine: American
Ingredients:
- 2 rib eye steaks (bone-in preferred), 12–16 ounces each
- Salt and pepper, to taste
- 2 teaspoons olive oil
- 4 tablespoons softened butter
- 1/2 teaspoon minced garlic
- 1 tablespoon minced fresh herbs (thyme, parsley, or chives), plus extra for garnish if desired
Instructions:
- Remove the steaks from the refrigerator and let them sit at room temperature for about 20 minutes. Meanwhile, preheat the air fryer to 400°F for at least 10 minutes.
- Lightly brush both steaks with olive oil, then season both sides generously with salt and pepper.
- Arrange the steaks in a single layer in the air fryer basket, making sure they don’t overlap or touch. Cook for 6 minutes, flip, and cook for another 6 minutes for medium doneness.
- While the steaks cook, combine the softened butter, minced garlic, and fresh herbs in a small bowl. Mix well and season lightly with salt and pepper.
- Transfer the cooked steaks to a plate and let them rest for 5 minutes before slicing.
- Top each steak with a spoonful of the garlic herb butter, letting it melt over the warm meat. Garnish with additional fresh herbs if desired, and serve immediately.
Notes: Doneness guide (adjust cook time to preference): Rare, 8 min (130°F); Medium Rare, 9–10 min (135°F); Medium, 11–12 min (145°F); Medium Well, 12–14 min (150°F); Well Done, 15–17 min (160°F). Use an instant-read thermometer for the most accurate results. Garlic herb butter can be made up to 24 hours in advance and refrigerated. Leftover steak keeps up to 3 days refrigerated in an airtight container.
Disclaimer: This recipe and its accompanying information are provided for general informational and culinary purposes only and are not intended as medical, dietary, or nutritional advice. Cooking times and internal temperatures are provided as general guidance; always use a food thermometer to confirm that meat has reached a safe internal temperature before consumption. Please consult a physician, registered dietitian, or other qualified healthcare provider before making significant changes to your diet, particularly if you have existing medical conditions, food allergies, or specific nutritional requirements. The creator of this content assumes no liability for any adverse effects resulting from the preparation or consumption of this recipe.