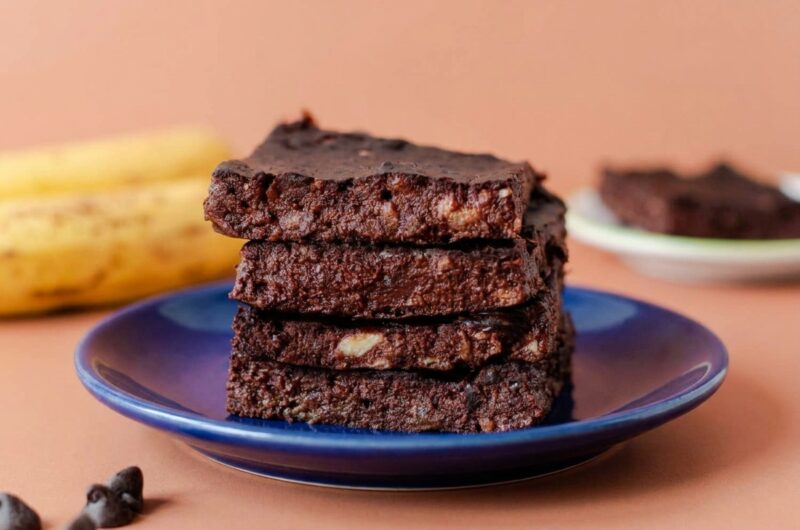
When you are craving a rich, deeply satisfying chocolate confection but want to maintain a clean, whole-food lifestyle free of processed white flour, heavy refined sugars, or animal products, these healthy three-ingredient banana brownies are the ultimate answer. This recipe entirely redefines the traditional baking landscape, transforming humble pantry staples into a dense, wonderfully fudgy chocolate treat without requiring separate wet-and-dry mixing steps or specialized baking binders. By leveraging the natural fruit sugars and fibrous structural matrix of heavily ripened fruit alongside creamy nut butter, this preparation method yields a spectacular, nutrient-dense dessert that satisfies your sweet tooth while genuinely nourishing your body.
The core structural, practical, and wellness advantages of incorporating this minimalist flourless method into your home baking routine include:
- Primal Ingredient Simplicity: Requiring absolutely zero refined cane sugars, industrial starches, or artificial sweetening drops, this formula relies on clean, raw agricultural staples that you likely already maintain on your kitchen counter.
- Flawless Egg-Free Binding: By utilizing the natural pectin and moisture profiles bound within mashed fruit purees, the batter holds together seamlessly during the bake cycle, remaining exceptionally fudgy in the center without modern chemical thickeners.
- Excellent Universal Dietary Alignment: This formula is naturally dairy-free, gluten-free, egg-free, and entirely vegan-friendly, making it an incredible sweet-treat asset for hosting diverse gatherings or packing allergen-safe school lunches.
- Minimalist Kitchen Logistics: The entire batter comes together effortlessly inside a single mixing bowl using basic hand tools, eliminating the need for high-speed food processors, blenders, or exhausting cleanup sessions.
When you prepare these brownies at home, you will discover that the interaction between the natural oils of the natural nut butter and the fine particles of unsweetened cocoa powder creates an incredibly rich, luxurious batter consistency. In traditional flourless recipes, alternative starches can occasionally turn dry or chalky in the oven, but a passive fruit-hydration method coaxes the cocoa solids to dissolve completely into the emulsion. Every bite delivers a beautiful balance between a delicate banana bread depth, a robustly nutty undertone, and an intense, dark chocolate profile that firms up into a sliceable, velvety dessert square upon cooling.
Section 1: The Ultimate Ingredients Blueprint
To consistently secure an impeccably set, fudgy center and a perfectly balanced chocolate flavor profile, you must assemble pristine components and recognize exactly how each element functions inside this flourless, egg-free matrix.
For the core three-ingredient artisan brownie batter, gather these exact quantities on your counter:
- 3 Large Ripe Bananas: The absolute primary structural engine and natural sweetening vehicle of your brownies. The fruit must be heavily overripe, displaying dense brown speckles or a completely darkened skin, which verifies that the internal starches have fully converted into rich, aromatic fruit fructose. Underripe or firm green-tipped fruits will lack the essential moisture and natural sugar content required, leaving your brownies tasting flat and chalky.
- 1/2 Cup Natural Peanut Butter: Use a creamy, drippy, well-stirred natural nut butter made exclusively from roasted peanuts (and a touch of sea salt if desired). This component introduces healthy, heart-stable monounsaturated fats and essential proteins, acting as the primary texturizing agent that provides structural stability and a rich, melt-in-your-mouth fudginess to the finished square.
- 1/4 Cup Unsweetened Cocoa Powder: This fine baking powder delivers a deep, authentic, and sophisticated chocolate experience. The cocoa solids absorb the moisture of the mashed fruit while structuring the thick batter without requiring any traditional white grain flours.
Section 2: Step-by-Step Master Home Cooking Instructions
The preparation process moves exceptionally fast, requiring a brief manual fruit-puree mashing session followed by a direct wet-and-dry hand incorporation, an even pan cast, and a brief, controlled oven bake.
Follow these direct, unhurried home kitchen instructions to bring your healthy banana brownies to life:
- The Oven and Pan Configuration: Begin by preheating your main kitchen oven to $350^\circ\text{F}$ ($177^\circ\text{C}$). Select a standard 8×8-inch square ceramic or glass baking dish. Line the interior base and sides thoroughly with a sheet of professional parchment paper, allowing a slight overhang on the edges to function as a convenient lifting sling later.
- Processing the Fruit Puree: Peel your 3 overripe speckled bananas and place them directly into the bottom of a large ceramic mixing bowl. Use a sturdy metal kitchen fork or a heavy potato masher to press the fruit down vigorously, crushing the fibers until they transform into a completely smooth, liquid puree. Take extra care during this step to ensure no solid fruit chunks or intact banana discs remain in the bowl.
- Emulsifying the Master Batter: Pour your 1/2 cup of creamy natural peanut butter and 1/4 cup of unsweetened cocoa powder directly into the bowl over the smooth banana base. Using a wide silicone spatula or a large wooden spoon, begin stirring from the center outward. Continue mixing firmly for roughly 60 seconds until the fine cocoa powder is fully incorporated and the mixture transforms into a very thick, glossy, and uniform dark chocolate batter.
- Casting into the Baking Dish: Scrape the thick chocolate batter out of your mixing bowl and into the center of the parchment-lined 8×8-inch pan. Use the flat back of your spatula to spread the heavy mixture evenly into the corners, smoothing the top surface into a flat, uniform layer across the entire pan.
- The Controlled Baking Window: Slide the filled baking dish carefully onto the center rack of your preheated $350^\circ\text{F}$ ($177^\circ\text{C}$) oven. Bake undisturbed for 17 to 20 minutes. Keep a close watch on the oven during the final minutes; your brownies are perfectly baked the exact moment the top surface transitions from a wet sheen to a matte, set appearance and the outer edges look firm.
- The Mandatory Structural Cooling Rest: Remove the hot dish from your oven using heavy oven mitts and place it down onto an elevated wire cooling rack. It is absolutely mandatory to let the brownies cool completely down to room temperature inside their pan before attempting to slice them. Because this formula contains zero eggs or gluten flours to lock the shape immediately, cutting into a hot brownie will cause the delicate center to stick to your knife; allowing it to cool completely allows the natural fruit pectins and nut oils to solidify cleanly into a perfect, uniform slice.
Section 3: Professional Kitchen Secrets for Brownie Success
Baking with high-moisture fruits and pure natural nut oils requires adhering to specific structural parameters to achieve an optimal artisan finish. Incorporate these expert insights into your routine:
- Thoroughly Stir Your Nut Butter Bases: Before measuring out your half-cup of natural peanut butter, ensure you stir the jar thoroughly from the bottom up to re-incorporate any separated surface oils. Utilizing the dry, chalky nut paste found at the very bottom of an un-stirred jar will disrupt the liquid balance, resulting in a crumbly, overly dry brownie rather than a rich, fudgy square.
- Leverage the Power of Cold Setting: Because these healthy brownies are naturally fudgy and soft due to their flourless architecture, their texture profile improves drastically when chilled. Once the pan hits room temperature on your cooling rack, slide the entire dish into your refrigerator for at least 1 hour before slicing. The cold temperature locks the healthy fats together, allowing you to slice clean, razor-sharp dessert squares effortlessly.
- Elevate with Textured Garnishments: Treat the basic three-ingredient batter as a pristine culinary canvas. If you want to enhance the texture and visual appeal for chocolate enthusiasts, scatter a handful of dark chocolate chips, raw cacao nibs, coarsely chopped walnuts, pecan pieces, or a light dusting of flaky sea salt completely across the top surface of the wet batter right before sliding the pan into the oven.
- Mechanical Puree Processing Shortcut: If you prefer an absolutely flawless, uniform crumb structure with zero manual effort, you can skip the fork-mashing step entirely. Drop your peeled overripe bananas, natural peanut butter, and cocoa powder directly into a small kitchen blender or food processor, running the machine on high speed for 20 seconds to achieve an ultra-velvety, perfectly smooth batter suspension.
Section 4: Strategic Ingredient Substitutions and Variations
This minimalist dessert formula features an incredibly adaptable base layout, making it remarkably simple to pivot individual components based on your current pantry inventory or specific household allergy parameters:
- The Anti-Allergy Nut-Free Exchanges: If your household manages a verified peanut allergy or needs to keep the dessert safe for school spaces, you can replace the peanut butter 1:1 with an equal measurement of well-stirred sunflower seed butter or rich sesame tahini. Both seed options preserve the essential fat balances required to solidify the center beautifully.
- Alternative Nut Butter Platforms: If peanuts are safe but you prefer a different flavor profile, you can swap the peanut butter seamlessly for creamy almond butter, rich cashew butter, organic walnut butter, or pecan butter to introduce unique, gourmet undertones to the chocolate base.
- The Botanical Sweet Potato Pivot: If you dislike the natural flavor of bananas but want to replicate the exact fudgy moisture of the original recipe, you can substitute the 3 mashed bananas with an equal volumetric measurement of fully cooked, mashed sweet potato or orange yams. If choosing this sweet potato variation, fold 2 to 3 tablespoons of pure maple syrup into the bowl to restore the missing sweetness.
- The Antioxidant Cacao Upgrade: Unsweetened baking cocoa powder delivers an exceptional baseline depth, but it can be replaced 1:1 with organic raw cacao powder if you prefer a less processed, antioxidant-dense option that delivers a bolder, slightly more intense dark chocolate experience.
Section 5: Long-Term Preservation, Storage, and Reheating
Because these scratch-made, vegan brownies contain zero artificial stabilizers, commercial emulsifiers, or chemical preservatives, executing these exact kitchen preservation rules will keep your treats tasting fresh:
- Optimal Refrigeration Boundaries: Once your brownies have completed their room-temperature rest and have been sliced into uniform squares, transfer them into an airtight glass storage container. Stored inside your refrigerator, the pieces will remain completely fresh, firm, and delicious for up to 5 full days, functioning as a wonderful meal prep grab-and-go snack.
- The Advanced Sub-Zero Freezer Blueprint: These flourless banana brownies handle freezing exceptionally well, making them fantastic candidates for long-term storage. Place your sliced squares in a single flat layer inside a heavy-duty freezer zipper bag, sliding small sheets of parchment paper between the pieces to prevent them from fusing together. Label the front with the current date and store frozen for up to 6 months.
- The Room-Temperature Thawing Sequence: To enjoy a frozen banana brownie square, simply retrieve a piece from your freezer bag and let it rest undisturbed on your kitchen counter for roughly 15 to 20 minutes. It will defrost rapidly into a perfectly tender, fudgy, and cool state that is immediately ready to consume.
- Warming Options for Melted Centers: While these brownies display their finest, sturdiest texture profile when enjoyed completely cold from the refrigerator, you can easily warm them if you prefer a molten, lava-cake-style dessert. Place a single square on a microwave-safe plate and heat on medium power for a brief 10 to 15 seconds, finishing the warm plate with a scoop of light whipped cream or a dollop of Greek yogurt.
Section 6: Frequently Asked Kitchen Questions
Home bakers often inquire whether these healthy brownies possess a strong, overwhelming banana flavor that completely masks the rich cocoa undertones. Because bananas are the primary moisture vehicle and volumizer of the recipe, a natural fruit profile will definitely carry through into the final baked crumb. However, the rich addition of a full quarter-cup of unsweetened cocoa powder and the deep savory oils of the peanut butter work together beautifully to balance the fruit notes, transforming the final square into a sophisticated flavor profile that feels much closer to a dense, chocolate-infused banana bread than a plain fruit bar.
Another very frequent question is why a test batch of these brownies might emerge from the oven looking beautifully set on top but remaining overly soft, fragile, or mushy right in the very center. In almost every single instance, this issue traces back to using an incorrect pan size or utilizing bananas that were not fully ripened. Baking this specific batter volume inside a narrow, deep loaf pan creates an overly thick layer that prevents the internal moisture from escaping properly within the 20-minute window. Sticking to a flat, shallow 8×8-inch square pan guarantees uniform heat distribution and a perfect set.
Section 7: Estimated Nutritional Profile
The following nutritional metrics are automatically calculated as a close approximation for a single complete serving square, based on a total batch yield of 9 equal portions from this specific artisan formula:
- Total Calories: 126 kcal
- Carbohydrates: 14g
- Protein: 4g
- Fat: 8g
- Saturated Fat: 2g
- Polyunsaturated Fat: 2g
- Monounsaturated Fat: 4g
- Sodium: 3mg
- Potassium: 257mg
- Fiber: 3g
- Sugar: 6g
- Vitamin A: 25 IU
- Vitamin C: 3mg
- Calcium: 122mg
- Iron: 1mg
Important Medical Disclaimer
Please Note: I am not a doctor, certified nutritionist, or medical professional. The nutritional information and dietary suggestions provided in this article are based purely on the historical recipe records and are intended for general educational and informational purposes only. Every individual’s body, health conditions, and dietary needs are completely different. Before making any significant changes to your diet, implementing new meal plans, or consuming specific ingredient adjustments, please consult with a qualified doctor or a registered healthcare professional to ensure it aligns safely with your personal health requirements.