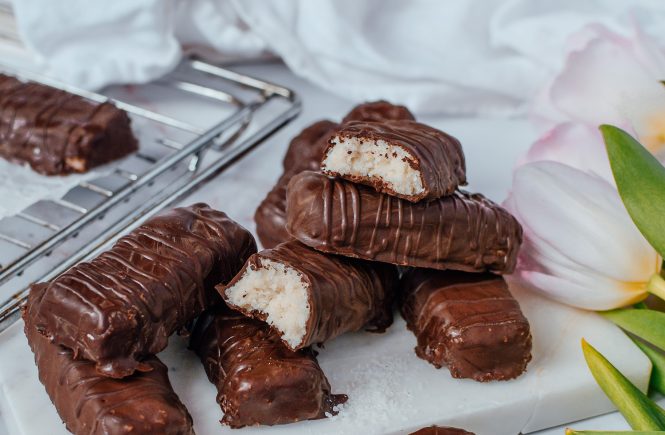
If you love coconut and chocolate, these Keto Bounty Bars deliver the classic combination without the sugar and carbs that come with the original candy bar. They’re built around a soft, creamy coconut filling wrapped in a rich chocolate coating — a low-carb, ketogenic, gluten-free treat that still tastes indulgent.
Traditional Bounty bars are delicious, but they’re loaded with sugar — a regular bar can carry 30 to 35 grams of carbohydrates, most of it from sugar alone. That’s far too high for anyone following a ketogenic or low-carb way of eating. This homemade version solves that by swapping sugar for monkfruit sweetener and using sugar-free chocolate, dramatically cutting the carb count while keeping the flavor intact.
What makes this recipe especially approachable is that there’s no baking involved at all. It’s a mix, shape, chill, dip, and set process — the freezer does most of the real work. That makes it a good option for beginners or for anyone who wants a homemade dessert without much hands-on effort.
A few reasons these bars are worth adding to your dessert rotation:
- No baking required. The whole process is mixing, shaping, chilling, and dipping.
- Dramatically lower in carbs than the original. Sugar is swapped for monkfruit sweetener, and the chocolate coating is sugar-free.
- Naturally gluten-free and egg-free, and can be made vegan with the right chocolate choice.
- Great for meal prep. They store beautifully in both the fridge and freezer.
- Fully customizable without changing the basic method — flavor extracts and an almond topping are both easy additions.
Mise en Place: Getting Your Components Organized
This recipe breaks down into two clear parts: the coconut filling and the chocolate coating. Having both ready before you start assembling keeps the process quick and mess-free.
Coconut filling:
- ½ can coconut cream
- ¼ cup coconut oil, melted
- 2 cups unsweetened desiccated coconut
- 2 tablespoons monkfruit sweetener
Chocolate coating:
- 7 ounces sugar-free or high cocoa dark chocolate chips
Equipment: An 8-inch square pan lined with parchment paper, or silicone molds or an ice cube tray as an alternative shaping method.
Understanding the Key Components
Coconut cream, coconut oil, desiccated coconut, and monkfruit sweetener together build the rich, moist filling that gives these bars their signature texture. The combination needs to be moist enough to shape by hand but firm enough to hold its form once chilled — that balance is really the whole trick to this recipe.
Coconut cream specifically can vary in consistency depending on the brand, which is why the texture of your filling might need a small adjustment. If it comes out too soft to shape, simply mix in a bit more desiccated coconut until it firms up enough to hold together through the dipping process.
The chocolate coating is what gives these bars their satisfying snap against the soft coconut center. Choosing a high-quality sugar-free dark chocolate, or one with a high cocoa percentage, keeps the whole bar low-carb without sacrificing that classic candy-bar bite. If the melted chocolate feels too thick to dip smoothly, stirring in a teaspoon of coconut oil thins it out and helps it coat each bar evenly.
Workflow: How These Bars Come Together
Step 1 — Prepare your pan or molds. Line an 8-inch square pan with parchment paper, or set up silicone molds or an ice cube tray if you’d rather shape the bars that way.
Step 2 — Mix the coconut filling. In a medium mixing bowl, combine the coconut cream, melted coconut oil, desiccated coconut, and monkfruit sweetener. Stir until a thick, sticky mixture forms.
Step 3 — Shape the bars. Form the mixture into small bars about 2 to 3 inches long, or press it firmly into your silicone molds if you’re using them instead.
Step 4 — First freeze. Arrange the shaped bars on a parchment-lined tray and freeze for 20 to 30 minutes, until firm. This step is what makes them sturdy enough to dip without falling apart.
Step 5 — Melt the chocolate. While the bars chill, melt the chocolate chips in the microwave in short intervals, or over a double boiler, stirring until smooth.
Step 6 — Dip the bars. Remove the chilled coconut bars from the freezer and dip each one completely into the melted chocolate, letting any excess drip off before setting it back down.
Step 7 — Return to the tray. Place the coated bars back on the lined tray as you go.
Step 8 — Final chill. Chill in the refrigerator or freezer for another 10 to 15 minutes, until the chocolate coating has fully hardened.
Step 9 — Serve or store. Enjoy immediately, or store for later.
Assembly Strategy and Technique Notes
- Watch the texture of the filling closely. If it feels too wet to hold its shape, gradually mix in more desiccated coconut rather than pushing forward with a mixture that won’t hold together during dipping.
- Don’t skip the first freeze. Dipping bars that haven’t firmed up in the freezer first is the most common way this recipe goes wrong — the filling can slump or break apart in the warm chocolate.
- Thin the chocolate if needed. A teaspoon of coconut oil stirred into overly thick melted chocolate makes for a smoother, more even coating.
- Customize before coating, not after. A drop of vanilla or almond extract mixed into the filling changes the flavor profile slightly while keeping the coconut base intact. For an Almond Joy-style variation, press a whole almond onto each bar before dipping it in chocolate.
- Serve from different temperatures for different textures. Straight from the fridge, the bars are soft and creamy. Straight from the freezer (after a minute or two resting), the texture firms up while the chocolate stays crisp.
Customization Options
These bars can be adjusted without changing the base recipe:
- Add a drop of vanilla extract or almond extract for a slightly different flavor
- Place a whole almond on top of each bar before coating for an Almond Joy-style variation
- Use dairy-free, sugar-free chocolate for a fully vegan version
Why Homemade Works Here
Making these yourself means knowing exactly what’s going into them — no unnecessary preservatives, artificial flavors, or hidden sugars. Every ingredient in this recipe serves a specific purpose in either the texture or the flavor, which is part of why the final result feels intentional rather than like a compromise version of the original candy bar.
Storage Guidance
- Refrigerator: Store in an airtight container for up to 1 week.
- Freezer: Store in a sealed freezer-safe container for up to 3 months. Let the bars sit at room temperature for a few minutes before serving, or enjoy them straight from the freezer for a firmer texture.
Carb Information
A traditional Bounty bar typically contains around 30 to 35 grams of carbohydrates, mainly from sugar. This homemade keto version replaces that sugar with unsweetened coconut, monkfruit sweetener, and sugar-free chocolate, keeping net carbs far lower and making it suitable for a ketogenic lifestyle.
Yield and Timing
- Prep Time: 15 minutes
- Chill Time: 40 minutes
- Total Time: 55 minutes
- Course: Dessert
- Cuisine: Keto, Low Carb
- Servings: 20 bars
- Calories: 126 kcal per bar
Keto Bounty Bars
Description: An easy, no-bake dessert made with a creamy coconut filling and coated in rich sugar-free chocolate. Low carb, keto-friendly, gluten-free, and built to satisfy sweet cravings without added sugar.
Prep Time: 15 minutes Chill Time: 40 minutes Total Time: 55 minutes Course: Dessert Cuisine: Keto, Low Carb Servings: 20 bars Calories: 126 kcal per bar
Ingredients
- ½ can coconut cream
- ¼ cup coconut oil, melted
- 2 cups unsweetened desiccated coconut
- 2 tablespoons monkfruit sweetener
- 7 ounces sugar-free or high cocoa dark chocolate chips
Instructions
- Line an 8-inch square pan with parchment paper, or prepare silicone molds or an ice cube tray.
- In a medium mixing bowl, combine the coconut cream, melted coconut oil, desiccated coconut, and monkfruit sweetener. Stir until a thick, sticky mixture forms.
- Shape the mixture into small bars about 2 to 3 inches long, or press firmly into silicone molds.
- Arrange the bars on a parchment-lined tray and freeze for 20 to 30 minutes until firm.
- Melt the chocolate chips in the microwave in short intervals, or over a double boiler, stirring until smooth.
- Remove the chilled coconut bars from the freezer.
- Dip each bar completely into the melted chocolate, allowing excess to drip off.
- Return the coated bars to the lined tray.
- Chill in the refrigerator or freezer for another 10 to 15 minutes until the chocolate coating has fully hardened.
- Serve immediately or store for later.
Notes
- Makes approximately 20 small bars.
- If the filling feels too soft, mix in a little more desiccated coconut to firm it up.
- Add vanilla or almond extract for extra flavor if desired.
- For an Almond Joy-inspired variation, place one whole almond on top of each bar before coating with chocolate.
- Store in an airtight container in the refrigerator, or freeze for longer storage.
- Nutrition per bar (approximate): 126 kcal, 7g carbohydrates, 5g fiber, 1g net carbs, 1g protein, 12g fat.
Medical Disclaimer: The information provided in this recipe, including all nutritional values, is for general informational purposes only and is not intended as medical, dietary, or professional nutritional advice. This recipe uses a sugar substitute (monkfruit sweetener) and sugar-free chocolate, which may affect individuals differently depending on personal tolerance or digestive sensitivity. This recipe is not intended to diagnose, treat, cure, or prevent any disease or health condition. Individuals with food allergies, dietary restrictions, or specific health concerns (including but not limited to sensitivities to sugar alcohols, coconut, or chocolate) should consult a physician, registered dietitian, or other qualified healthcare provider before preparing or consuming this dish. The creator of this content assumes no liability for any adverse effects resulting from the preparation or consumption of this recipe.