Discover the Magic of Homemade Artisan Sourdough Bread
If you’re looking to create fresh, bakery-style sourdough bread from scratch at home, you’re in the right place. This handcrafted sourdough bread recipe is beginner-friendly, using just five basic ingredients to produce an irresistibly soft interior and crusty golden crust. Whether you’re new to baking or already have experience, this easy artisan sourdough method brings consistent and delicious results. With a bubbly sourdough starter, high-quality bread flour, warm water, a hint of olive oil, and fine sea salt, this dough transforms into a loaf that could rival your favorite bakery. Not only will it fill your home with the inviting aroma of freshly baked bread, but you’ll also be amazed by how simple and therapeutic the process is.
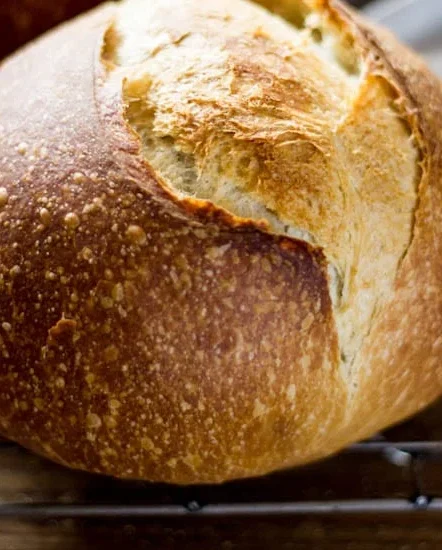
The Secret Behind a Perfect Sourdough Loaf
The combination of natural fermentation and a few helpful techniques, like autolysing, folding, and proper shaping, make all the difference when crafting a sourdough loaf with character. The use of olive oil in this recipe is a unique touch that makes the crumb incredibly light and tender while maintaining a robust crust. This recipe doesn’t require any commercial yeast – only the power of wild fermentation. If you’re aiming for that professional-looking sourdough bread with a plush, open crumb and deep flavor, keep reading – you’re about to become your own favorite baker.
Essential Ingredients You’ll Need
Let’s walk through the ingredients required to make this beautiful, crusty loaf:
-
150g active sourdough starter: Must be bubbly and recently fed for best leavening power.
-
250g warm water (filtered if possible): Helps create a more pliable dough and better gluten development.
-
25g olive oil: Adds softness, richness, and a moist crumb texture.
-
500g bread flour: Higher protein content is crucial for gluten strength and structure. Avoid all-purpose flour for this specific recipe.
-
10g fine sea salt: Enhances flavor and supports gluten development.
-
Cornmeal or parchment paper: Prevents sticking during baking and adds a rustic texture.
Pro Tip: Always use a digital kitchen scale for precision. Baking bread requires accurate measurements – measuring by cups can throw off the hydration ratio, which is critical in sourdough baking.
Optional Adjustments
Want a dough that’s even more flexible and soft? You can safely increase the water content to 300–325g for a wetter dough. This will yield a more open crumb but requires handling with care, especially during shaping and proofing.
Getting Started: Mixing the Dough
Begin by combining the sourdough starter, water, and olive oil in a large mixing bowl. Stir them together with a fork until mostly blended. Then add your bread flour and sea salt, mixing until a rough dough begins to form. Once it becomes too stiff to stir, switch to your hands. Gently knead the dough to fully incorporate the flour. The mixture will feel dry and slightly shaggy at this stage – that’s completely normal. Cover the bowl with a damp cloth or plastic wrap and let it rest for 30 minutes to one hour. This step is called autolysing, and it allows the flour to fully absorb the water, jumpstarting gluten development.
Shaping the Dough After Resting
After resting, lightly knead the dough into a rough ball using your hands. This activates the gluten further and helps prepare it for bulk fermentation. Depending on your hydration level, the dough might be stiff (250g water) or soft and elastic (300–325g water). Either way is acceptable, and both yield slightly different but delicious results.
Bulk Fermentation: Let the Dough Rise Naturally
Now it’s time to let the dough rise. Place it in a lightly oiled bowl or a dough container with a lid and measurement markings. Keep it somewhere warm – ideally between 70–75°F (21–24°C). You’re looking for the dough to roughly double in size and become lighter in texture. Bulk rise time varies depending on your room temperature and the strength of your starter. During summer, this could take 3–5 hours, while colder winter days might stretch the rise to 10–12 hours. Focus more on the dough’s appearance than the clock. A well-risen dough will look puffed up and feel soft to the touch.
Enhance Dough Strength with Stretch & Folds (Optional)
If you want to build more structure and height into your loaf, perform 1–2 rounds of stretch and fold during the bulk rise. To do this, gently grab a section of dough, stretch it upward, and fold it over itself. Turn the bowl and repeat until you’ve gone full circle. This strengthens the gluten and helps trap air inside. While optional, this step enhances oven spring and creates a more voluminous loaf.
Divide and Shape the Dough for Perfection
Flour one half of your work surface lightly and leave the other side clean. Turn the dough out onto the floured side. If making two loaves, use a bench scraper to divide the dough. Move one portion to the unfloured side and begin shaping by folding the edges over toward the center, turning the dough as you go. Flip the dough seam side down and use cupped hands to rotate and tighten the loaf into a smooth round shape. The idea here is to build surface tension without using excess flour, which prevents shaping.
Proof the Dough: Second Rise Before Baking
Choose your proofing vessel based on the dough’s hydration. For drier doughs (250g water), place the dough directly into a Dutch oven lined with parchment or sprinkled with cornmeal. Let it rest for 30–60 minutes until it looks slightly puffed. If your dough is wetter, use a cloth-lined bowl dusted with flour to hold the shape better. During this time, preheat your oven to 450°F (232°C).
Scoring the Dough for Artisan Finish
Just before baking, make a shallow cut in the top of the dough using a sharp blade or bread lame. This allows steam to escape and gives your loaf that signature sourdough split. One central slash about 2–3 inches long and ¼-inch deep is usually perfect.
Baking Instructions
Place the Dutch oven on the center rack and immediately reduce the temperature to 400°F (204°C). Bake the bread covered for 20 minutes. Then, remove the lid and continue baking for 40 more minutes or until the crust is deeply golden. If you prefer, you can check the internal temperature – it should register around 205–210°F (96–98°C) for a fully baked loaf. Once done, remove the bread from the oven and let it cool completely on a wire rack for at least an hour before slicing. Cutting too soon can result in a gummy interior.
Sourdough Bread FAQs
1. Can I use all-purpose flour instead of bread flour?
Bread flour is preferred for better gluten development, but if you only have all-purpose, try a sourdough recipe specifically tailored for it.
2. Is it okay to add whole wheat flour?
It’s possible but not recommended for this recipe unless you adjust water levels. Whole wheat flour absorbs more moisture and can make the dough denser.
3. Why use 150g starter instead of a smaller amount like 50g?
Using 150g speeds up fermentation and adds more tang, while smaller amounts make maintenance easier and produce milder loaves. It’s about preference.
4. What does olive oil do in sourdough?
Olive oil enhances the crumb’s texture, making it softer and richer while aiding moisture retention.
5. When should I use a proofing basket instead of a Dutch oven?
Use a basket for high-hydration doughs (above 250g water). A Dutch oven works well for lower hydration doughs that can hold shape on their own.
6. Why don’t you preheat the Dutch oven?
This method lets the dough rise directly in the Dutch oven, so preheating isn’t needed. Preheating is great when transferring dough from a proofing basket instead.
7. Can I bake half the dough now and the rest later?
Yes. Bake the first loaf, and refrigerate the second. Let it come to room temperature as the oven preheats.
8. How do I transfer dough from a cloth-lined bowl?
Place parchment over the bowl, flip it, and lift the bowl away. The dough will now be smooth-side up and ready to score.
9. Can I use measuring cups instead of a scale?
While volume is less accurate, here are approximate measurements:
-
¾ cup starter
-
1 cup + 1 tbsp water
-
2 tbsp olive oil
-
4 cups bread flour
-
1½ tsp salt
10. How do I store sourdough bread after baking?
Let it cool completely, then wrap in a clean kitchen towel or store in a paper bag. For long-term storage, freeze slices and toast as needed.
Source: Adapted and rewritten from healthofficialtips.com
Simple Sourdough Bread Recipe
Ingredients
150g/5.35 oz bubbly, active sourdough starter
250g/8.80 oz warm water, preferably filtered
25g/0.90 oz olive oil
500g/17.65 oz bread flour
10g/0.4 oz fine sea salt
Fine ground cornmeal or parchment paper
Instructions
In a large bowl, mix sourdough starter, water, and olive oil. Add flour and salt, mix until a stiff dough forms, then use hands to combine. Cover and rest 30 minutes to 1 hour. Shape into a rough ball. Cover and rise 3–12 hours until nearly doubled. Optionally, stretch and fold 1–2 times during the rise. Lightly flour surface, transfer dough, and shape. Place in Dutch oven lined with parchment or cornmeal. Let rise 30–60 minutes. Preheat oven to 450ºF. Score top of dough. Bake covered at 400ºF for 20 minutes, then uncovered for 40 more minutes. Cool at least 1 hour before slicing.
